YifanChen's Blog

一个专注技术的新手程序员

0%

Welcome to Hexo! This is your very first post. Check documentation for more info. If you get any problems when using Hexo, you can find the answer in troubleshooting or you can ask me on GitHub.

Quick Start

Create a new post

1
$ hexo new "My New Post"

More info: Writing

Run server

1
$ hexo server

More info: Server

Generate static files

1
$ hexo generate

More info: Generating

Deploy to remote sites

1
$ hexo deploy

More info: Deployment

Comprehensive Introduction to C

参考笔记:https://blog.csdn.net/weixin_52421373/article/details/127972228

vs 2013 ultimate的密钥:

VS_2013英文版下载:https://www.123pan.com/s/mWzgjv-es653.html

中文语言包下载:https://www.123pan.com/s/mWzgjv-ts653.html

KEY:BWG7X-J98B3-W34RT-33B3R-JVYW9

1. 课程简介,C#语言简介,开发环境准备

课程简介

C#面向对象

采用知识点和示例程序相结合的方式

认真做课后作业,独自写一遍视频中的程序

C#语言简介

  • 程序(Program),即软件。机器码(计算机指令)->汇编语言->高级语言。高级语言翻译为计算机指令的过程被称为编译,编译用编译器。

  • 为什么需要程序:随着硬件功能的增强,需要更强大的软件(程序)来统一管理硬件,让硬件之间能够协调和网络通信。这些软件组合在一起形成了操作系统。在操作系统上编写具备特定功能的程序。为什么需要程序可以总结为两点:

    • 管理硬件资源
    • 实现用户的特定需求
  • C#是一门通用的语言,可以编写多种类型的程序。不是特别追求性能时,可以用C#开发各种应用程序。

    • 纵向:语言->类库->框架(由浅入深)

      框架是有一定逻辑组织的类库。框架是类库的最佳组合(best practice),避免自行组合时出错。

    • 横向:命令行程序,桌面程序,设备(平板/手机)程序,Web(网站/服务)程序,游戏…

    C++偏底层,学习曲线陡峭。

    C语言不面向对象,主要目标是编写高性能的操作系统,不适合用来写应用程序。

    Java适合写设备程序和Web程序,但是不适合用来写桌面程序。

  • 怎样编写程序

    编辑->编译(高级语言经过编译变为机器语言)->调试(编译器看不出来的错误,通过调试被发现)->发布

开发环境和学习资料的准备

  • 集成开发环境:集成了编辑、编译、调试和发布四个步骤。

  • 下载Visual Studio:可视化工作室,应用了所见即所得的理念。

    有两种桌面程序,后者是新一代的桌面开发技术:

    • Windows Forms Application
    • WPF Application (windows presentation foundation)
  • 安装Visual Studio(2013),安装免费版即可

  • 打开Visual Studio,进入start page。选择tools-options-start up-show empty environment,点击OK。下次再打开visual studio,就会显示一个空的开发环境,让我们创建新项目。

  • 学习资料

    • 下载离线MSDN文档(特点:全面,文章数量多,在Visual Studio的help-add and remove help content-manage content中下载,点击update,文档很大,速度较慢)
    • C#语言定义文档(Language Specification)(特点:精确,难读懂,会出现很大的跳跃性,看不懂的去看MSDN文档,谷歌下载即可)
    • 推荐数据:C# 5.0 In A Nutshell(特点:读MSDN文档的指南针,其中列出了重点)
  • MSDN文档中最重要的部分:

    • Visual Basic and Visual C#-Visual C#-C# Programming Guide
    • Visual Basic and Visual C#-Visual C#-C# Reference:横向领略C#语言的特性
    • Visual Basic and Visual C#-Visual C#-C# Reference-C# Sample Application:源码
    • Visual Basic and Visual C#-Visual C#-C# Reference-C# Walkthroughs:功能浏览

本节课作业

  • 下载并安装Visual Studio Express 2013 for Windows Desktop(建议学生下载professional版本,其对学生免费)
  • 下载离线MSDN文档并尝试阅读
  • 编写视频中的小程序(所见即所得的wpf程序)

作业完成情况

  • HelloWorld项目的地址:D:\OneDrive - stu.xjtu.edu.cn\文档\Visual Studio 2013\Projects
  • MSDN文档成功下载了下面四个(最重要的文档已经下载下来了,其他文档要么是没有要么是下载失败):
    • .NET Framework 4
    • Get started with Blend for Visual Studio 2013
    • Welcome to Visual Studio 2013
    • Visual Basic and Visual C#

2. 初识各类应用程序

带领大家认识各种可以用C#编写的应用程序

编程学习的捷径

  • 编程不是“学”出来的,而是“练”出来的
  • 在反复应用中积累,忽然有一天就会“顿悟”。在实践中理解书本上知识的精髓。
  • 学习原则
    • 从感观到原理
    • 从使用别人的到创建自己的
    • 必须亲自动手
    • 必须学以致用、紧跟实际工作
    • 追求实用,不搞“学院派”

编写我们的第一个程序——Hello, World!

  • Solution与Project

    • Solution是针对客户需求的总的解决方案。举例:汽车经销商需要一套销售软件
    • Project利用具体的技术解决具体的某个问题
    • Visual Studio针对不同技术有不同的Project模板
    • Visual Studio在管理代码时,解决方案(Solution)在最高的级别。一个Solution中可以包含一到多个Project。

    如下图所示(各个组件是Project,所有Project在一起构成一个Solution):

    solution and project.png

  • Project模板(对比不同VS版本)

    VS有各种版本(express, professional, ultimate),版本越高级,其中包含的Project的模板越多,所支持的开发技术越多。一般来说,professional版本足够用了。

  • 分别编写Console, WPF, Windows Forms的Hello World程序

  • 初学编程时很重要的两点

    • 不要怕见到自己看不懂的东西
    • 要跟着操作,一遍一遍地练习,为的是熟悉手里的工具,培养感觉

见识C#编写的各类应用程序

  • 目的1:让大家拥有辨识各类程序的“火眼金睛”
  • 目的2:让大家了解一下完成C#语言学习后的职业发展方向(你最喜欢哪种?)

十种技术编写Hello World程序,打星号的是当下流行的技术。

Console(控制台)

  • File-New Project-Visual C#-Windows-Console Application,可以分别设置solution和project的name。

  • C#的源码文件用.cs作为扩展名

  • 写入以下的代码:

    1
    2
    3
    4
    5
    6
    7
    8
    9
    10
    11
    12
    13
    14
    15
    16
    using System;
    using System.Collections.Generic;
    using System.Linq;
    using System.Text;
    using System.Threading.Tasks;

    namespace ConsoleHelloWorld
    {
    class Program
    {
    static void Main(string[] args)
    {
    Console.WriteLine("Hello, World!");
    }
    }
    }
  • 运行时,直接点击Start会一闪而过,选择Debug-Start Without Debugging,就可以持续看到结果。

WPF(Windows Presentation Foundation)*

注意对比其与WPF。新建项目,选择WPF Application。现在页面下方出现了一些类似html的代码(xaml代码),设计师可以直接通过修改这些代码来设计界面。我理解类似前后端分离,同时前端不需要写代码,有可视化界面。后端的代码类似Windows Forms。

  • 点击Toolbox,搜索TextBox,将其拖入窗口中并调整大小。改Name,去掉其中的Text。

  • 再搜索Button,将其拖入窗口中并调整大小。改Name,改其中的Text。

  • 既可以改代码来改属性,也可以改可视化界面来改属性。

  • 选中Button,点击Events。目前Click的值为空,点击Button不会有响应。双击Button,同样生成代码模板,在其中写入以下的代码:

    1
    2
    3
    4
    5
    6
    7
    8
    9
    10
    11
    12
    13
    14
    15
    16
    17
    18
    19
    20
    21
    22
    23
    24
    25
    26
    27
    28
    29
    30
    31
    32
    33
    using System;
    using System.Collections.Generic;
    using System.Linq;
    using System.Text;
    using System.Threading.Tasks;
    using System.Windows;
    using System.Windows.Controls;
    using System.Windows.Data;
    using System.Windows.Documents;
    using System.Windows.Input;
    using System.Windows.Media;
    using System.Windows.Media.Imaging;
    using System.Windows.Navigation;
    using System.Windows.Shapes;

    namespace WpfHelloWorld
    {
    /// <summary>
    /// Interaction logic for MainWindow.xaml
    /// </summary>
    public partial class MainWindow : Window
    {
    public MainWindow()
    {
    InitializeComponent();
    }

    private void buttonSayHello_Click(object sender, RoutedEventArgs e)
    {
    textBoxShowHello.Text = "Hello, World!";
    }
    }
    }
  • 运行项目,点击Click Me按钮,TextBox中出现Hello, World!

Windows Forms(Old)

新建项目,选择windows forms application。

  • 点击Toolbox,搜索TextBox,将其拖入窗口中并调整大小。

  • 再搜索Button,将其拖入窗口中并调整大小。

  • 修改Button的属性:修改其上的文字,给其起一个带有独特含义的名字

  • 修改TextBox的属性:修改其名字为textBoxShowHello

  • 选中Button,在属性面板有闪电符号,就是Events(事件)。当前Click对应的值为空,表示点击Click没有任何的反应。双击事件中的Click,自动生成了代码模板。写入以下的代码:

    1
    2
    3
    4
    5
    6
    7
    8
    9
    10
    11
    12
    13
    14
    15
    16
    17
    18
    19
    20
    21
    22
    23
    24
    25
    using System;
    using System.Collections.Generic;
    using System.ComponentModel;
    using System.Data;
    using System.Drawing;
    using System.Linq;
    using System.Text;
    using System.Threading.Tasks;
    using System.Windows.Forms;

    namespace WinFormHelloWorld
    {
    public partial class Form1 : Form
    {
    public Form1()
    {
    InitializeComponent();
    }

    private void buttonSayHello_Click(object sender, EventArgs e)
    {
    textBoxShowHello.Text = "Hello, World!";
    }
    }
    }
  • 现在点击click me时,文本框就显示了Hello, World!现在让程序响应了button click事件,程序的相应为在TextBox中显示出Hello, World

ASP.NET Web Forms(Old)

选择visual c#-web-asp.net web application,再选择empty,勾选web forms。此时就获得了一个空的网站。右击右侧菜单的WebFormHelloWorld,选择add-web form,输入其名称为default,这样就生成了一个模板代码Default.aspx。在其中加入Hello, World:

1
2
3
4
5
6
7
8
9
10
11
12
<%@ Page Language="C#" AutoEventWireup="true" CodeBehind="Default.aspx.cs" Inherits="WebFormHelloWorld.Default" %>

<!DOCTYPE html>

<html xmlns="http://www.w3.org/1999/xhtml">
<head runat="server">
<title></title>
</head>
<body>
<h1>Hello, World!</h1>
</body>
</html>

点击运行(点击浏览器的名称即可),网页就显示出了Hello, World!。右键WebFormHelloWorld,点击publish,即可将其部署,供外人访问。

ASP.NET MVC(Model-View-Controller)*

是ASP.NET Web Forms技术的升级版。其特点是代码解耦合,易于维护。创建项目同ASP.NET Web Forms,但是要点击empty,勾选MVC。选择controllers-add-controller,选择MVC 5 Controller - Empty,点击add,然后输入其名称为HomeController,然后add。此时生成了HomeController.cs的样板代码:

1
2
3
4
5
6
7
8
9
10
11
12
13
14
15
16
17
18
using System;
using System.Collections.Generic;
using System.Linq;
using System.Web;
using System.Web.Mvc;

namespace MvcHelloWorld.Controllers
{
public class HomeController : Controller
{
//
// GET: /Home/
public ActionResult Index()
{
return View();
}
}
}

此时views文件夹中的home文件夹中还没有任何view。在函数:public ActionResult Index()中右击,选择add view,点击add,此时在home文件夹中生成了Index.cshtml。在其中写入代码:

1
2
3
4
5
@{
ViewBag.Title = "Index";
}

<h2>Hello, Wolld!</h2>

点击运行,网页上出现了Hello, World!同样也可以将这个项目publish到自己的网站上去。

WCF(Windows Communication Foundation)*

wcf是纯粹的网络服务。创建项目时选择visual c#-wcf-wcf service application,命名为WcfHello。

打开模板代码IService1.cs,在其中写入代码:

1
2
3
4
5
6
7
8
9
10
11
12
13
14
public interface IService1
{

[OperationContract]
string GetData(int value);

[OperationContract]
CompositeType GetDataUsingDataContract(CompositeType composite);

[OperationContract]
string SayHello();

// TODO: Add your service operations here
}

回到Service1.svc.cs中,点击IService1下面的蓝色小标记,选择Implement interface IService1。此时就会生成模板代码:

1
2
3
4
public string SayHello()
{
throw new NotImplementedException();
}

将其改为:

1
2
3
4
public string SayHello()
{
return "Hello, World!";
}

点击运行,会启动wcf test client的工具。wcf是最特殊的服务,只有纯粹的数据交互,没有前端,因此需要用到这个测试工具。双击其中的SayHello(),点击Invoke,就会调用SayHello函数,该函数会返回一个hello world给客户端。我尝试调用,果然在测试界面打印出了hello world。

现在尝试写一个加法器,在IService1.cs中写:

1
2
[OperationContract]
double Add(double a, double b);

Service1.svc.cs中写:

1
2
3
4
public double Add(double a, double b)
{
return a + b;
}

再次运行,双击Add方法,设置a和b的值为10和20,点击Invoke,计算结果为30。

Windows Store Application*

给平板电脑app写的程序。选择visual c#-windows store-blank app(xaml)。其和WPF很像。打开MainPage.xaml,将ToolBox中的TextBox拖进去,然后再拖入button。将TextBox重命名为textBoxShowHello,再将其中的Text清空。将buttom重命名为buttonSayHello,将其content改为Click Me。选择simulator,运行之,此时点击button没有任何反应。

选择button-click,然后双击,生成模板代码,在其中写入代码:

1
textBoxShowHello.Text = "Hello, World!";

再次在simulator中运行,此时点击click me,hello world就出现了。

Windows Phone Application*

创建项目,选择visual c#-windows phone-windows phone app,取名为PhoneHelloWorld。生成的代码同样和wpf非常类似。

同样的,在ToolBox中搜索TextBox,拖入界面中,取名为textBoxShowHello,清空text;再搜索Button,同样拖入界面中,取名为buttonSayHello,将content改为click me;再切换到Button的事件中去,双击click,生成模板代码,写入以下内容:

1
textBoxShowHello.Text = "Hello, World!";

选择一款较好的模拟器(内存和屏幕分辨率可选),然后执行。点击click me,hello world就出现了。

如何部署到手机上?
选择build-deploy solution,如果windows phone连接到了电脑上,就会直接找到该设备然后部署上去。

Cloud(Windows Azure)*

微软云计算平台上的hello world。创建项目,选择visual c#-cloud-windows azure cloud service,项目取名为CloudHelloWorld,要架网站,就选择asp.net web role,点击右箭头将其加到云平台上,改名为SayHello,点击OK。选择empty,勾选MVC。此时看上去和ASP.NET MVC完全相同。

右键controllers-add-controller,选择MVC 5 Controller - Empty,取名为HomeController。在生成的主函数中右键,add view,点击add。在index.cshtml中,写上hello world。点击运行即可,此时要启动云平台的模拟器才能运行程序。

查找最近的项目:file-recent projects and solutions

云平台模拟器会加载刚刚写的网站。

部署时,右键CloudHelloWorld,选择publish,选择云平台的订阅,就可以直接发布。发布网站需要买域名,买空间,但微软的云平台替你完成了这些步骤。

WF(Workflow Foundation)

workflow:工作流。选择visual c#-workflow-workflow console application,这个工作流执行起来是在console中执行,命名为WfHelloWorld。

在ToolBox中搜索WriteLine,拖入界面中,在其中写入"Hello, World!",点击debug-start with debugging。

3. 初识类与名称空间

剖析Hello, World程序

剖析的对象:最简单的console application。

  • 初识类(class)与名称空间(namespace)
    • 初学者:类(class)构成程序的主体。高级版本:类是最基础的C#类型。类是一个数据结构,将状态(字段)和操作(方法和其他函数成员)组合在一个单元中。类为动态创建的类实例(instance)提供了定义,实例也称为对象(object)。类支持继承和多态性,这是派生类可用来扩展和专用化基类的机制。
    • 名称空间(namespace)以树型结构组织类(和其他类型),也可以有效地避免同名类的冲突。
      • 例如Button和Path类
  • 下面以HelloWorld程序来展示类和名称空间。有以下代码:

    1
    2
    3
    4
    5
    6
    7
    8
    9
    10
    11
    12
    13
    14
    15
    16
    17
    18
    19
    20
    21
    22
    // using是将名称空间引用到程序中来
    // 名称空间的标记是{}
    using System;
    using System.Collections.Generic;
    using System.Linq;
    using System.Text;
    using System.Threading.Tasks;

    // 编写的Program类放在了ConsoleHelloWorld这个名称空间中,该名称空间的名字默认和project的名字一样
    namespace ConsoleHelloWorld
    {
    // 类在visual studio中高亮的颜色是水蓝色
    // c#是完全面向对象的
    class Program
    {
    static void Main(string[] args)
    {
    // Console类是内置的,我们利用其中的WriteLine方法
    Console.WriteLine("Hello, World!");
    }
    }
    }

    也可以简写为(权限命名写法):

    1
    2
    3
    4
    5
    6
    7
    8
    9
    10
    namespace ConsoleHelloWorld
    {
    class Program
    {
    static void Main(string[] args)
    {
    System.Console.WriteLine("Hello, World!"); // 权限命名写法
    }
    }
    }

    打印两行:

    1
    2
    3
    4
    5
    6
    7
    8
    9
    10
    11
    namespace ConsoleHelloWorld
    {
    class Program
    {
    static void Main(string[] args)
    {
    System.Console.WriteLine("Hello, World!");
    System.Console.WriteLine("Good morning!");
    }
    }
    }

    更方便的写法是引入名称空间:

    1
    2
    3
    4
    5
    6
    7
    8
    9
    10
    11
    12
    13
    14
    using System;

    namespace ConsoleHelloWorld
    {
    class Program
    {
    static void Main(string[] args)
    {
    Console.WriteLine("Hello, World!");
    Console.WriteLine("Good morning!");
    Console.WriteLine("Good evening!");
    }
    }
    }

    如何知道某个函数属于哪个名称空间?

    • 方法1:help-view help,在index中搜索console class,可以看到相应的文档。其中有信息:Assembly: mscorlib (in mscorlib.dll)mscorlib(microsoft core library)是类库。与操作系统有关的重要的类都在System这个名称空间中。
    • 点击报红的单词的任意位置,单词的首字母处会出现蓝色的小方块,为智能标记。点开智能标记,可选择Using System或者System.Console。弹出智能标记的快捷键:ctrl + .或者Shift+Alt+F10

    不同命名空间中相同的类名产生冲突的例子:

    新建一个wpf程序。在MainWindow.xaml.cs中,可以存在两个path类,分别是:

    1
    2
    System.Windows.Shapes.Path
    System.IO.Path

    前者是windows中用于画多边形的path,后者是文件路径的path。如果需要同时用到两者,就只能用权限命名。

    另一个例子:button class有更多种,用来写web/.NET/windows等等。使用名称空间就可以解决类名冲突的问题。

类库(assembly)的应用

dll: dynamic link library(动态链接库),以ddl结尾的文件是类库。

类和名称空间是放在类库中的。类库是类的仓库。

  • 类库引用是使用名称空间和类的物理基础

以一个wpf程序为例,其中的Button

  • 名称空间为System.Windows.Controls
  • 类库为 (in PresentationFramework.dll)
  • 如何查看类库引用在项目的哪里?在项目的References中就可以看到PresentationFramework。双击PresentationFramework,打开的窗口为对象浏览器(ObjectBrowser)。展开其中的PresentationFramework,即可看到有哪些名称空间,展开名称空间又可以看到其中有哪些类。

Console application由于不需要显示窗口,因此需要引用的类库要少于wpf application。

不同技术类型的项目会默认引用不同的类库。

如何为自己的项目添加对其他类库的引用?

  • DLL引用(黑盒引用,无ddl的源代码,直接用编译好的dll文件)

    • 以输出hello world的console application为例。如果有一个外部的dll,必须配有文档。例如一个文件夹中存放了MyLibrary.dllMyLibrary Document。右键项目的references-add reference-browse,即可把dll文件给加载进来,此时MyLibrary就会出现在References中。然后可以对照文档来使用类库中的名称空间、类和方法。也可以双击References中的MyLibrary,打开对象浏览器,来查看其中的名称空间、类和方法。

    • 黑盒引用的问题:类库一旦出错,本人无法修改,只能让类库的编写者去修改,然后编写者再次将类库编译为ddl并将该文件发送给本人,才能解决这个错误。此时我的项目会对类库产生依赖,我的Program类也会对类库中的类和方法产生依赖。这就是依赖关系。尽量使用弱的依赖关系,避免牵一发而动全身的问题。有一些办法可以减轻依赖关系。

    • 做实验:引用微软提供的类库,让console application显示窗口。在references中添加类库:System.Windows.Forms。help viewer中的msdn文档搜索功能非常难用,不如用微软提供的在线文档。让console application显示窗口的代码为:

      1
      2
      3
      4
      5
      6
      7
      8
      9
      10
      11
      12
      13
      14
      using System;
      using System.Windows.Forms;

      namespace ConsoleHelloWorld
      {
      class Program
      {
      static void Main(string[] args)
      {
      Form form = new Form();
      form.ShowDialog();
      }
      }
      }
    • NuGet简介

      使用NuGet添加对dll的引用。NuGet技术被用来解决比较复杂的依赖关系(复杂的依赖关系:底层的类库未被引用,则上层的类库也无法被引用)。

      • 做实验,在console application中引入一个wpf的窗口。在References中添加依赖:PresentationFramework。然后写入以下代码:

        1
        2
        3
        4
        5
        6
        7
        8
        9
        10
        11
        12
        13
        14
        using System;
        using System.Windows.Forms;

        namespace ConsoleHelloWorld
        {
        class Program
        {
        static void Main(string[] args)
        {
        System.Windows.Window window = new System.Windows.Window();
        window.ShowDialog();
        }
        }
        }

        运行时会产生报错:

        1
        2
        3
        Error	1	The type 'System.Windows.Markup.IAddChild' is defined in an assembly that is not referenced. You must add a reference to assembly 'PresentationCore, Version=4.0.0.0, Culture=neutral, PublicKeyToken=31bf3856ad364e35'.	d:\OneDrive - stu.xjtu.edu.cn\文档\Visual Studio 2013\Projects\ConsoleHelloWorld\ConsoleHelloWorld\Program.cs	10	13	ConsoleHelloWorld

        Error 2 The type 'System.Windows.Markup.IQueryAmbient' is defined in an assembly that is not referenced. You must add a reference to assembly 'System.Xaml, Version=4.0.0.0, Culture=neutral, PublicKeyToken=b77a5c561934e089'. d:\OneDrive - stu.xjtu.edu.cn\文档\Visual Studio 2013\Projects\ConsoleHelloWorld\ConsoleHelloWorld\Program.cs 10 13 ConsoleHelloWorld

        报错说明更底层的类库:PresentationCoreSystem.Xaml还没有被引用,需要将这两者加入到References中。再运行时,还会出现报错:

        1
        Error	2	The type 'System.Windows.DependencyObject' is defined in an assembly that is not referenced. You must add a reference to assembly 'WindowsBase, Version=4.0.0.0, Culture=neutral, PublicKeyToken=31bf3856ad364e35'.	d:\OneDrive - stu.xjtu.edu.cn\文档\Visual Studio 2013\Projects\ConsoleHelloWorld\ConsoleHelloWorld\Program.cs	10	13	ConsoleHelloWorld

        还需要添加更底层的WindowsBase,这很麻烦。因为这时候你只有DLL,没有源代码,几乎可以说是“蒙着眼睛引用类库”。这是很危险的!特别是对于大型的项目。

        后来有人用包的形式发布一组类库,用户输入命令,一组类库就都被引用了,不需要手动引用,这样很安全且高效,这就是NuGet技术。

        例如需要写一个用于连接数据库的程序,需要用到技术Entity Framework(实体框架),该类库可以将代码中的类和数据库中的表映射起来。可以采用NuGet技术来对上述类库进行引用。右击References-点击add nuget packages-选择online-输入Entity Framework,点击Install即可,此时就会看到两个自动安装的类库:EntityFrameworkEntityFramework.SqlServer,这两个类库由NuGet自动管理。但是我这样操作搜索不到结果,于是我采用了另一种方式。点击Tools-Library Package Manager-Package Manager Console,在其中输入命令:Install-Package EntityFramework,也可以起到相同的效果。

  • 项目引用(白盒引用,有源代码,源代码放在项目中,故称项目引用)

    直接获得类库项目的源代码,比如类库项目的名字是MyLibrary,其中的代码名为Calculator.cs,代码为:

    1
    2
    3
    4
    5
    6
    7
    8
    9
    10
    11
    12
    13
    14
    15
    16
    17
    18
    19
    20
    using System.Collections.Generic;
    using System.Linq;
    using System.Text;
    using System.Threading.Tasks;

    namespace Tools
    {
    public class Calculator
    {
    public static double Add(double a, double b)
    {
    return a + b;
    }

    public static double Sub(double a, double b)
    {
    return a - b;
    }
    }
    }

    如何引用MyLibrary这个类库,点击References-add references-solution-projects,当前的projects页面为空,因此需要将MyLibrary这个project添加到当前的solution中去。一个项目可以被多个solution包含(这被称为project的重用),因此将类库项目也包含到当前的solution中。将类库的project包含到当前solution中的操作:solution-add-existing project,选中MyLibrary-MyLibrary.csproj,将其添加进来。现在solution中有两个项目,一个是HelloWorld,一个是MyLibrary。再次右击References-add references-solution-projects,勾选MyLibrary,点击OK,此时MyLibrary就作为类库被成功引用了。此时就可以愉快地在console application中引用MyLibrary中的类和方法了:

    1
    2
    3
    4
    5
    6
    7
    8
    9
    10
    11
    12
    13
    using System;

    namespace ConsoleHelloWorld
    {
    class Program
    {
    static void Main(string[] args)
    {
    double result = Tools.Calculator.Sub(1, 1);
    Console.WriteLine(result);
    }
    }
    }

    此时由于已经有了类库的源代码,就可以对类库中的错误进行排除。接下来的内容跳转到排除错误部分。

依赖关系

类与类之间,类库与类库之间一旦互相引用,就产生了依赖关系。依赖关系在软件质量中起了关键作用。

质量好的软件,其依赖关系清晰且好维护;质量差的软件,依赖关系不清楚。

  • 依赖关系,就是类(或对象)之间的耦合关系

  • 优秀的程序追求“高内聚,低耦合”

    • 高内聚指的是一些数据和功能,该属于哪个类,就精确地放入哪个类。
    • 低耦合指的是类和类之间的依赖关系尽可能低
    • “高内聚,低耦合”对类和类库都是如此
    • 程序只有这样做才会结构清晰
    • 教学程序往往会违反这个原则
  • UML(通用建模语言)类图:以图的形式表达程序中的关系,UML除了可以画类图,还可以画流程图、序列图等。类图用来展现类和类之间的关系。以HelloWrold程序为例:

    uml.png

    这是一种非常紧密的耦合关系。

排除错误

如何排除程序中的错误?

在项目引用时,由于有类库的源代码,可以直接debug。点击出错的行(double result = Tools.Calculator.Sub(1, 1);),设置断点。然后debug-start debugging,此时程序会执行到断点前,result值为0.0(还未进行出错行的运算)。接下来点击step into(F11),此时执行指针就自动跳转到了类库的此处:

1
2
3
4
public static double Sub(double a, double b)
{
return a - b - 10;
}

就可以发现错误的出处。debug时需要找到root cause。

中文标点符号:全角
英文标点符号:半角

  • 仔细阅读编译器的报错
  • MSDN文档与搜索引擎结合

如何建立一个类库项目

solution-add-new project-class library(非可执行程序,编译出来的结果就是dll文件,即类库),项目起名为SuperCalculator,模板代码重命名为Calculator.cs,在其中写入代码:

1
2
3
4
5
6
7
8
9
10
11
12
13
14
15
16
17
18
19
20
21
22
23
24
25
26
27
28
29
30
31
32
33
34
35
36
37
38
using System;
using System.Collections.Generic;
using System.Linq;
using System.Text;
using System.Threading.Tasks;

namespace Tools
{
public class Calculator
{
public static double Add(double a, double b)
{
return a + b;
}

public static double Sub(double a, double b)
{
return a - b;
}

public static double Mul(double a, double b)
{
return a * b;
}

public static double Div(double a, double b)
{
if (b == 0)
{
return double.PositiveInfinity;
}
else
{
return a / b;
}
}
}
}

接着右击references-add reference-project-SuperCalculator,将这个自定义的类库引入主程序,就可以在主程序中使用它:

1
2
3
4
5
6
7
8
9
10
11
12
13
14
15
16
17
18
using System;
using Tools;

namespace ConsoleHelloWorld
{
class Program
{
static void Main(string[] args)
{
double result1 = Calculator.Mul(3, 4);
Console.WriteLine(result1);
double result2 = Calculator.Div(3, 4);
Console.WriteLine(result2);
double result3 = Calculator.Div(3, 0);
Console.WriteLine(result3);
}
}
}

本节作业

  • 练习创建类库项目进行项目引用
  • 练习DLL引用
  • 练习阅读编译器报错并排除错误

4. 类、对象、类成员简介

类(class)是显示世界事物的模型

  • 类是现实世界事物进行抽象所得到的结果
    • 事物包括“物质”(实体)与“运动”(逻辑)
    • 抽象也被称为建模。建模是一个去伪存真(留下需要的,去掉不要的)、由表及里(暴露的接口是表,封装的内容是里)的过程

类与对象的关系

  • 什么时候叫“对象”,什么时候叫“实例”

    • 对象也叫实例,是类经过“实例化”后得到的内存中的实体

      • Formally “instance” is synonymous with “object”——对象和实例是一回事
      • “飞机”与“一架飞机”有何区别?天上有(一架)飞机——必须是实例飞,概念是不能飞的
      • 有些类是不能实例化的,比如“数学”(Math class),我们不能说“一个数学”
    • 依照类,我们可以创建对象,这就是“实例化”

      • 现实世界中常称“对象”,程序世界中(特别是内存关系)常称“实例”
      • 二者并无太大区别,常常混用,初学者不必迷惑
    • 使用new操作符创建类的实例

      1
      2
      3
      4
      5
      6
      7
      8
      9
      10
      11
      12
      13
      14
      15
      16
      17
      18
      using System;
      using System.Collections.Generic;
      using System.Linq;
      using System.Text;
      using System.Threading.Tasks;
      using System.Windows.Forms;

      namespace ClassAndInstance
      {
      class Program
      {
      static void Main(string[] args)
      {
      // 实例化
      (new Form()).ShowDialog(); // ()表示实例在内存中诞生后的初始化方式,被称为构造器
      }
      }
      }

      上述程序运行的结果就是表单已窗口的形式呈现,即表单已被实例化。

  • 引用变量

    1
    2
    3
    4
    5
    6
    7
    8
    9
    10
    11
    12
    13
    14
    15
    16
    17
    18
    19
    20
    using System;
    using System.Collections.Generic;
    using System.Linq;
    using System.Text;
    using System.Threading.Tasks;
    using System.Windows.Forms;

    namespace ClassAndInstance
    {
    class Program
    {
    static void Main(string[] args)
    {
    Form myForm; // 声明引用变量
    myForm = new Form(); // 用引用变量引用一个实例
    myForm.Text = "My Form!"; // 设置标题的文字
    myForm.ShowDialog();
    }
    }
    }

    在使用引用变量引用了一个实例后,我们就可以多次访问这个实例。

  • 引用变量与实例的关系

    • 孩子与气球。孩子相当于引用变量,气球相当于实例。绳子相当于赋值符号

    • 气球不一定有孩子牵着。此时气球就飞掉了,内存垃圾收集器很快就回收了该变量,内存就被释放掉了

    • 多个孩子可以使用各自的绳子牵着同一个气球。如以下代码所示:

      1
      2
      3
      4
      Form myForm1;
      Form myForm2;
      myForm1 = new Form();
      myForm2 = myForm1;

      上面两个引用变量引用的是同一个实例/对象。

      1
      2
      3
      4
      5
      6
      7
      8
      9
      10
      11
      12
      13
      14
      15
      16
      17
      18
      19
      20
      21
      22
      23
      using System;
      using System.Collections.Generic;
      using System.Linq;
      using System.Text;
      using System.Threading.Tasks;
      using System.Windows.Forms;

      namespace ClassAndInstance
      {
      class Program
      {
      static void Main(string[] args)
      {
      Form myForm1;
      Form myForm2;
      myForm1 = new Form();
      myForm2 = myForm1;
      myForm1.Text = "My Form";
      myForm2.Text = "I changed it!";
      myForm1.ShowDialog();
      }
      }
      }

      此时显示的是I changed it!。用任何一个引用变量访问到的都是同一个实例。

      多个孩子也可以都通过同一根绳子牵着气球,目前暂且不讲。

类的三大成员

类的成员有十多种,但这三种非常重要,也是初学者最先接触到的。

  • 属性(Property)

    • 用于存储数据
    • 这些数据组合起来表示类或对象当前的状态
  • 方法(Method)

    • 由C语言中的函数(function)进化而来,表示类或对象“能做什么”
    • 工作中90%的时间是在与方法打交道,因为它是“真正做事”、“构成逻辑”的成员
  • 事件(Event)

    • 类或对象通知其他类或对象的机制,为C#所特有(Java通过其他方法实现这个机制)。例如当点击按钮时,发生click这个事件,响应该事件的方法中可以让界面上的文本框显示出Hello World的字符串。
    • 事件是非必须的,但有它在编程会变得方便且灵活,但这也意味着它可能会被滥用。因此,善用事件机制非常重要。
  • 使用MSDN文档。将鼠标移到一个类上,按下快捷键ctrl+shift+F1,就可以跳转到相应的MSDN文档。如果想看该类在哪个分支上,点击左上角的show topic in contents按钮。以Form class为例,其下面的第一句话:Represents a window or dialog box that makes up an application's user interface.,是以一句话概括本类的作用。接着是:

    • 继承关系列表:Inheritance Hierarchy
    • 名称空间:namespace
    • 类库: Assembly
    • 声明的格式:Syntax
    • 构造函数: Constructors
    • 属性:要么用来记忆值,要么表示Form的状态
    • 方法:Form这个类/对象可以做什么
    • 事件:表示Form能以怎样的形式在发生什么事情时通知别的类或对象
    • 类的详细解释,包含了类最常用的功能(即最常用的属性、方法和事件):Remarks
    • 例子:Examples。MSDN的例子质量良莠不齐
    • 版本信息
    • 平台
    • 多线程安全性:Thread Safety
  • 某些特殊类或对象在成员方面侧重点不同

    • 模型类或对象重在属性,如Entity Framework。模型类的功能主要是从数据库中读取数据,然后把数据写回数据库。其侧重于数据,因此属性特别发达。例子:用Entity Framework生成的作为数据模型的类。首先需要安装Entity Framework及其相关的包,可以使用Nuget/命令行,我的Nuget不管用,因此使用命令行。

      打开sql server 2012 developer version,创建一个样例数据库:AdventureWorksLT2012,打开Tables,再打开SalesLT.Product,打开其前1000行,主要包含ProductID, Name, ProductNumber, Color等数据。

      在项目中,右击solution-add-new item-data-ado.net entity data model,将其名字改为AdventureWorksModel.edmx。选择generate from database,然后新建一个和本地数据库AdventureWorksLT2012的连接。然后选择Product表和Address表。此时visual studio就和entity framework一起生成了一些专门用于数据传输的数据模型类。会显示两个数据模型类,分别是ProductAddress类。这两个类中,只有属性,没有方法和事件。使用这些类的代码:

      1
      2
      3
      4
      5
      6
      7
      8
      9
      10
      11
      12
      13
      // 打印产品的Name属性
      AdventureWorksLT2012Entities proxy = new AdventureWorksLT2012Entities();

      // 快速插入foreach代码的方法是:输入foreach时,当VS2013有所提示时,连续按两下Tab键
      foreach(Product p in proxy.Products)
      {
      // 输入cw,然后按两下tab键,就会补全为Console.WriteLine
      Console.WriteLine(p.Name);
      }

      // 打印产品的数目
      Console.WriteLine("==========================="); // 分割线
      Console.WriteLine(proxy.Products.Count());
    • 工具类或对象重在方法,如Math, Console。工具类主要用于计算和其他具体功能。以Math为示例:

      1
      2
      3
      4
      5
      6
      7
      8
      9
      10
      11
      12
      13
      14
      15
      16
      17
      18
      19
      20
      using System;
      using System.Collections.Generic;
      using System.Linq;
      using System.Text;
      using System.Threading.Tasks;

      namespace MethodSample
      {
      class Program
      {
      static void Main(string[] args)
      {
      double x = Math.Sqrt(4);
      Console.WriteLine(x);

      double y = Math.Pow(2, 3);
      Console.WriteLine(y);
      }
      }
      }
    • 通知类或对象重在事件,如各种Timer(时钟每隔一段时间触发某个事件,这个事件会执行某些功能)。

      新建WPF Application,先创建一个合适大小的textBox,然后去后台,写入以下代码,即可生成一个简易的时钟:

      1
      2
      3
      4
      5
      6
      7
      8
      9
      10
      11
      12
      13
      14
      15
      16
      17
      18
      19
      20
      21
      22
      23
      24
      25
      26
      27
      28
      29
      30
      31
      32
      33
      34
      35
      36
      37
      38
      39
      40
      41
      42
      43
      44
      45
      46
      using System;
      using System.Collections.Generic;
      using System.Linq;
      using System.Text;
      using System.Threading.Tasks;
      using System.Windows;
      using System.Windows.Controls;
      using System.Windows.Data;
      using System.Windows.Documents;
      using System.Windows.Input;
      using System.Windows.Media;
      using System.Windows.Media.Imaging;
      using System.Windows.Navigation;
      using System.Windows.Shapes;
      using System.Windows.Threading;

      namespace EventSample
      {
      /// <summary>
      /// Interaction logic for MainWindow.xaml
      /// </summary>
      public partial class MainWindow : Window
      {
      // Window的构造函数
      public MainWindow()
      {
      InitializeComponent();
      DispatcherTimer timer = new DispatcherTimer();
      timer.Interval = TimeSpan.FromSeconds(1); // 时间间隔1秒钟

      // 写完+=后,连续按两次tab键
      // 将timer_Tick函数挂接到事件上
      // 当事件Tick被触发时,timer_Tick函数就会被执行
      // timer_Tick方法用于响应事件,因此该方法也被称为事件处理器
      timer.Tick += timer_Tick;

      // 让时钟开始
      timer.Start();
      }

      void timer_Tick(object sender, EventArgs e)
      {
      this.timeTextBox.Text = DateTime.Now.ToString();
      }
      }
      }

类的静态成员与实例成员

  • 静态(Static)成员在语义上表示它是“类的成员”

  • 实例(非静态)成员在语义上表示它是“对象的成员”,而非“类的成员”

  • 例子:

    1
    2
    3
    4
    5
    6
    7
    8
    9
    10
    11
    12
    13
    14
    15
    16
    17
    18
    19
    20
    21
    22
    using System;
    using System.Collections.Generic;
    using System.Linq;
    using System.Text;
    using System.Threading.Tasks;
    using System.Windows.Forms;

    namespace StaticSample
    {
    class Program
    {
    static void Main(string[] args)
    {
    // WriteLine方法是隶属于Console类的,因此该方法是静态方法
    Console.WriteLine("Hello");

    Form form = new Form();
    form.Text = "Hello"; // Text是实例属性
    form.ShowDialog(); // ShowDialog是实例方法
    }
    }
    }
  • 在MSDN文档中,若某个属性上面加了红色的大写的S,那么其是静态属性。同理,同样的标记也被用于静态方法。静态事件非常少见。

  • “绑定”(Binding)指的是编译器如何把一个成员 与 类或对象关联起来

    • 早绑定。编译器就决定将成员与哪个类/对象关联。
    • 晚绑定。程序运行起来后,再决定将成员与哪个类/对象关联,编译器不知道此事。有晚绑定功能的语言是动态语言,比如javascript。

    • 不可小觑的“.”操作符——成员访问

本节作业

  • 跟着视频进行操作,直到能够自己动手编写这些程序

5. 语言基本元素概览、初始类型、变量与方法,算法简介

构成C#语言的基本元素

前五种被统称为标记(Token)。标记是对编译器有意义的记号。

  • 关键字(Keyword):构成一门编程语言的基本词汇。

    具体参照这个文档:https://learn.microsoft.com/en-us/previous-versions/visualstudio/visual-studio-2013/x53a06bb(v=vs.120)?redirectedfrom=MSDN

    其中包含两个表格,第一个表格中的关键字一直都是关键字(70多个),第二个表格中的关键字是上下文关键字(20多个)。一共100多个关键字。

    注意:

    • 某些关键字有多个用途
    • 关键字按照逻辑分组,可以分为Types, Modifiers, Statement, Namespace, Operator等
  • 操作符(Operator)

    查看文档:https://learn.microsoft.com/en-us/previous-versions/visualstudio/visual-studio-2013/6a71f45d(v=vs.120)?redirectedfrom=MSDN

    操作符大概30-40个。有些操作符是关键字,因此这类关键字被称为操作符关键字。

  • 标识符(Identifier),即名字

    • 什么是合法的标识符

      • 首先不能与关键字冲突。关键字又名保留字,不能被用来作为标识符。
      • 可以用字母、数字和下划线来组成标识符,但是不能拿数字开头,可以拿字母和下划线开头。

      • 怎样阅读语言定义文档

        以Identifier为例:

        identifier1.png

        identifier2.png

        • 斜体字意味着还未完全解释清楚,后面还有它的解释
        • 标识符=非关键字的标识符&关键字+@ 标识符&关键字
        • 下标opt表示可选的
        • 汉语也可以用作标识符
    • 大小写规范:驼峰命名法(myVariable),pascal命名法(MyVariable)

      C#中,变量名都用驼峰法,方法名、类名、名称空间等用pascal法

    • 命名规范:要求变量名、类名、类的成员都有意义

      • 类名是一个名词
      • 类的成员名的属性是名字,方法是动词/动词短语
  • 标点符号:比如{}, ;。是符号,但是不参与运算。

  • 文本(字面值)

    • 整数

      • 多种后缀

      • 例子:

        1
        2
        int x = 2; // 32 bit表示一个数字
        long y = 3L; // 大小写L均可,64 bit表示一个数字,long能表示的数字范围广于int
    • 实数

      • 多种后缀

      • 例子:

        1
        2
        3
        float x = 3.0F; // 32 bit表示一个浮点数,F是必须的后缀,否则3.0默认为双精度浮点数
        double y = 4.0D; // D表示双精度浮点数, 64 bit表示一个浮点数
        double z = 4.0;
    • 字符

    • 字符串

      • 例子:
        1
        2
        3
        4
        char c = 'a'; // 单引号中只能有一个字符,字符类型的变量必须用单引号
        string str1 = "ABCDE";
        string str2 = "a";
        string str3 = "";
    • 布尔

    • 空(null)

      • 例子:
        1
        2
        3
        bool b = true;
        bool b2 = false;
        string str = null;
  • 注释与空白

    • 单行://
    • 多行(块注释):/* */。块注释不能嵌套
    • 空白:一个空白和多个空白/tab键生成的空白没有区别
    • 格式化代码:edit-advanced-format document,快捷键为ctrl + k, ctrl + d

简要介绍类型、变量与方法

  • 初识类型(Type)

    • 亦称数据类型(Data Type):明确的数据类型/推断的数据类型(var

    • 例子:

      1
      2
      3
      4
      5
      6
      7
      8
      9
      10
      11
      var x = 3; // 编译器会根据赋的值自动推断var变量的类型
      Console.WriteLine(x.GetType().Name); // 输出为Int32

      var y = 3L;
      Console.WriteLine(y.GetType().Name); // 输出为Int64

      var z = 3.0;
      Console.WriteLine(z.GetType().Name); // 输出为Double

      var w = 3.0F;
      Console.WriteLine(w.GetType().Name); // 输出为Single
  • 变量是存放数据的地方,简称“数据”

    • 变量的声明
    • 变量的使用
  • 方法(旧称函数)是处理数据的逻辑,又称“算法”

    • 方法即成员函数

    • 方法的声明

    • 方法的调用

    • 例子:

      1
      2
      3
      4
      5
      6
      7
      8
      9
      10
      11
      12
      13
      14
      15
      16
      17
      18
      19
      20
      21
      22
      23
      24
      25
      26
      27
      28
      29
      30
      31
      32
      33
      34
      35
      36
      37
      38
      39
      40
      41
      42
      43
      44
      45
      46
      using System;
      using System.Collections.Generic;
      using System.Linq;
      using System.Text;
      using System.Threading.Tasks;

      namespace Identifier
      {
      class Program
      {
      static void Main(string[] args)
      {
      Calculator c = new Calculator();
      int x = c.Add(3, 4);
      Console.WriteLine(x);

      string str = c.GetToday();
      Console.WriteLine(str);

      c.PrintSum(2, 3);
      }

      }

      class Calculator
      {
      // 方法
      public int Add(int a, int b)
      {
      int result = a + b;
      return result;
      }

      public string GetToday()
      {
      int day = DateTime.Now.Day;
      return day.ToString();
      }

      public void PrintSum(int a, int b)
      {
      int result = a + b;
      Console.WriteLine(result);
      }
      }
      }
  • 程序=数据+算法

    • 有了变量和方法就可以写有意义的程序了

算法简介

  • 循环初体验

    循环又称迭代。例子:打印x到1

    1
    2
    3
    4
    5
    6
    7
    8
    9
    10
    11
    12
    13
    14
    15
    16
    17
    18
    19
    20
    21
    22
    23
    24
    25
    26
    27
    28
    29
    using System;
    using System.Collections.Generic;
    using System.Linq;
    using System.Text;
    using System.Threading.Tasks;

    namespace Identifier
    {
    class Program
    {
    static void Main(string[] args)
    {
    Calculator c = new Calculator();
    c.PrintXTo1(10);
    }

    }

    class Calculator
    {
    public void PrintXTo1(int x)
    {
    for (int i = x; i > 0; i--)
    {
    Console.WriteLine(i);
    }
    }
    }
    }
  • 递归初体验

    例子:打印x到1

    1
    2
    3
    4
    5
    6
    7
    8
    9
    10
    11
    12
    13
    14
    15
    16
    17
    18
    19
    20
    21
    22
    23
    24
    25
    26
    27
    28
    29
    30
    31
    32
    33
    34
    35
    using System;
    using System.Collections.Generic;
    using System.Linq;
    using System.Text;
    using System.Threading.Tasks;

    namespace Identifier
    {
    class Program
    {
    static void Main(string[] args)
    {
    Calculator c = new Calculator();
    c.PrintXTo1(10);
    }

    }

    class Calculator
    {
    // 递归写法
    public void PrintXTo1(int x)
    {
    if (x == 1)
    {
    Console.WriteLine(x);
    }
    else
    {
    Console.WriteLine(x);
    PrintXTo1(x - 1);
    }
    }
    }
    }
  • 计算1到100的和

    循环写法:

    1
    2
    3
    4
    5
    6
    7
    8
    9
    10
    11
    12
    13
    14
    15
    16
    17
    18
    19
    20
    21
    22
    23
    24
    25
    26
    27
    28
    29
    30
    31
    32
    33
    using System;
    using System.Collections.Generic;
    using System.Linq;
    using System.Text;
    using System.Threading.Tasks;

    namespace Identifier
    {
    class Program
    {
    static void Main(string[] args)
    {
    Calculator c = new Calculator();
    int result = c.SumFrom1ToX(100);
    Console.WriteLine(result);
    }

    }

    class Calculator
    {
    // 循环写法
    public int SumFrom1ToX(int x)
    {
    int result = 0;
    for (int i = 1; i < x + 1; i++)
    {
    result += i;
    }
    return result;
    }
    }
    }

    递归写法:

    1
    2
    3
    4
    5
    6
    7
    8
    9
    10
    11
    12
    13
    14
    15
    16
    17
    18
    19
    20
    21
    22
    23
    24
    25
    26
    27
    28
    29
    30
    31
    32
    33
    34
    35
    36
    using System;
    using System.Collections.Generic;
    using System.Linq;
    using System.Text;
    using System.Threading.Tasks;

    namespace Identifier
    {
    class Program
    {
    static void Main(string[] args)
    {
    Calculator c = new Calculator();
    int result = c.SumFrom1ToX(100);
    Console.WriteLine(result);
    }

    }

    class Calculator
    {
    // 递归写法
    public int SumFrom1ToX(int x)
    {
    if (x == 1)
    {
    return 1;
    }
    else
    {
    int result = x + SumFrom1ToX(x - 1);
    return result;
    }
    }
    }
    }

本节作业

独立完成“汉诺塔问题”

汉诺塔的问题:n个盘子,由A柱子,经过B柱子,最终放到C柱子上。

以递归角度进行分析为:

  • 把n-1个盘子由A移动到B;(借助辅助塔C)
  • 把第n个盘子,由A移动到C;
  • 把n-1个盘子由B移动到C; (借助辅助塔A)

汉诺塔的代码:

1
2
3
4
5
6
7
8
9
10
11
12
13
14
15
16
17
18
19
20
21
22
23
24
25
26
27
28
29
30
31
32
33
34
35
36
37
38
39
using System;

namespace Identifier
{
class Program
{
static int m = 0;

public static void move(int disks, char from, char to)
{
Console.WriteLine("移动次数: {0} 把块: {1} 按照如下移动: {2} --> {3}", ++m, disks, from, to);
}

public static void hanoi(int disks, char from, char to, char assist)
{
if (disks == 1)
{
move(1, from, to);
return;
}
else
{
hanoi(disks - 1, from, assist, to);
move(disks, from, to);
hanoi(disks - 1, assist, to, from);
}

}

static void Main(string[] args)
{
char A = 'A';
char B = 'B';
char C = 'C';
hanoi(4, A, C, B);
Console.WriteLine(m);
}
}
}

简化后的程序:

1
2
3
4
5
6
7
8
9
10
11
12
13
14
15
16
17
18
19
20
21
22
23
24
25
26
27
28
29
30
31
32
33
34
35
36
37
38
using System;

namespace Identifier
{
class Program
{
static int m = 0;

public static void move(char from, char to)
{
m++;
}

public static void hanoi(int disks, char from, char to, char assist)
{
if (disks == 1)
{
move(from, to);
return;
}
else
{
hanoi(disks - 1, from, assist, to);
move(from, to);
hanoi(disks - 1, assist, to, from);
}
}

static void Main(string[] args)
{
char from = 'A';
char to = 'C';
char assist = 'B';
hanoi(4, from, to, assist);
Console.WriteLine(m);
}
}
}

6. 详解类型、变量与对象(上)

分析编程语言在内存中是如何运作的。

什么是类型(Type)

  • 数据结构是类型的延申。

  • 又名数据类型(Data Type)

    • A data type is a homogeneous collection of values, effectively presented, equipped with a set of operations which manipulate these values.
    • 是数据在内存中存储时的“型号”。内存全称是内部存储单元。当今的计算机架构是冯诺依曼系统,其有几大组成部分:运算器和控制器(CPU),存储器(内存),输入输出系统。程序运行时必须从硬盘加载到内存中,内存越大的计算机,内存中可以同时运行的程序越多。总之,内存是计算机程序运行的空间。外存是扩展存储器,是对内存的扩展,如计算机中的硬盘,硬盘是电磁存储,因此关机后数据也不会丢失。
    • 小内存容纳大尺寸数据会轻则丢失精确度,重则发生错误。
    • 大内存容纳小尺寸数据会导致内存的浪费。
    • 编程语言的数据类型与数学中的数据类型不完全相同。例如数学中3/4=0.75,编程中3/4=0。
  • 强类型语言与弱类型语言的比较

    • 编程时,数据受到数据类型的约束,就是强类型编程语言。数据不严格受数据类型的约束,就是弱类型编程语言。强弱类型语言各有优缺点。C#语言是强类型语言。例子:

      1
      2
      3
      4
      5
      6
      7
      8
      9
      10
      11
      12
      13
      14
      15
      int x;
      x = 100; // 内存中用32 bit/4 Byte来存储100这个整数值
      long y;
      y = 100L; // L代表长整型整数,在内存中用64 bit/8 Byte
      // x = 100L; 这样写会报错,且会build失败

      bool b;
      b = true;
      // b = 100; 报错,因为整数100无法转化为bool类型的值

      int x = 100;
      if (x = 200) // if的括号中明确要求一个bool类型的值。赋值后得到的不是bool值,因此会报错
      {
      Console.WriteLine("It's OK!");
      }
    • C语言实例:if条件

      例子:新建一个c++项目,new project-visual c++-win32-Win32 Console Application

      1
      2
      3
      4
      5
      6
      7
      8
      9
      10
      11
      12
      13
      14
      15
      16
      17
      // Console.cpp : Defines the entry point for the console application.
      //

      #include "stdafx.h"


      int _tmain(int argc, _TCHAR* argv[])
      {
      int x = 100;
      // c中没有专门的布尔类型,只要表达式的值不为0,就算作真,此处赋值后,得到的值为200,算作真
      if (x = 200)
      {
      printf("It's OK!\n");
      }

      return 0;
      }

      C中常见的避免错误的写法,将字面值写到前面去,即200 = x,编译器报错后,就立即改为200 == x

    • JavaScript示例:动态类型。js中的变量基本不受数据类型的约束。

      例子:新建项目,选择visual c#-web-asp.net web application,选择empty,web forms。右击项目-add-html page,命名为index.html,这样其执行后就是首页。

      1
      2
      3
      4
      5
      6
      7
      8
      9
      10
      11
      12
      13
      14
      15
      16
      17
      <!DOCTYPE html>
      <html xmlns="http://www.w3.org/1999/xhtml">
      <head>
      <title></title>
      <script>
      function ButtonClicked() {
      var myVar = 100;
      myVar = "Chen Yifan"; // 强类型中不允许,但js中可以
      alert(myVar); // 弹出小的警告框,显示100,这里js并没有管100的类型
      }
      </script>
      </head>
      <body>
      <h1>Hello, JavaScript!</h1>
      <input type="button" value="Click Me"onclick="ButtonClicked()"/>
      </body>
      </html>

      弱类型,灵活性与危险并存。

    • C#语言(4.0版本后)对弱类型/动态类型的模仿,例子:

      1
      2
      3
      4
      5
      // c#中的dynamic关键字类似于js中的var关键字
      dynamic myVar = 100;
      Console.WriteLine(myVar);
      myVar = "Chen Yifan";
      Console.WriteLine(myVar);

类型在C#语言中的作用

  • 一个C#类型中所包含的信息有:

    • 存储此类型变量所需的内存空间大小,例如int类型占有4 Byte/32 bit,long类型占有8 Byte/64 bit。

    • 此类型的值可表示的最大、最小值范围(与第一条推算)。可以查看以下的文档?redirectedfrom=MSDN),再分为三个文档:Integral Types Table?redirectedfrom=MSDN), Floating-Point Types Table?redirectedfrom=MSDN), decimal?redirectedfrom=MSDN)。一般用ulong来表示对象的身份id(类似uuid)。

    • 此类型所包含的成员(如方法、属性、事件等)

    • 此类型由何基类(父类)派生而来。程序未执行时,处于静态时期,即编辑期和编译期;程序执行起来后,处于动态/运行时期,即运行期。C#的机制:反射,即程序运行时,拿到对象/类型,可以立即知道其中的成员,然后根据需求来操作这些成员。例子参见TypeSample,代码如下所示:

      1
      2
      3
      4
      5
      6
      7
      8
      9
      10
      11
      12
      13
      14
      15
      16
      17
      18
      19
      20
      21
      22
      23
      24
      25
      26
      27
      28
      29
      30
      31
      32
      33
      34
      using System;
      using System.Collections.Generic;
      using System.Linq;
      using System.Reflection;
      using System.Text;
      using System.Threading.Tasks;
      using System.Windows.Forms;

      namespace TypeSample
      {
      class Program
      {
      static void Main(string[] args)
      {
      Type myType = typeof(Form); // 查看Form类的类型

      PropertyInfo[] pInfos = myType.GetProperties(); // 一个类型知道其成员, GetProperties能够在程序运行的过程中动态地探知类型的所有属性
      MethodInfo[] mInfos = myType.GetMethods(); // GetMethods是得到该类型方法的函数
      foreach (var m in mInfos)
      {
      Console.WriteLine(m.Name);
      }
      Console.WriteLine("----------------");
      foreach (var p in pInfos)
      {
      Console.WriteLine(p.Name);
      }
      Console.WriteLine("----------------");
      Console.WriteLine(myType.Name); // Form类的类型的名字就是Form
      Console.WriteLine(myType.FullName); // Form类的类型的全名是System.Windows.Forms.Form
      Console.WriteLine(myType.BaseType.FullName); // 一个类型知道其基类/父类
      }
      }
      }

      反射的用途:能够拿到某个属性,就能动态地访问到该属性的值;能够拿到某个方法,就能够动态地调用该方法。

    • 程序运行的时候,此类型的变量在分配在内存的什么位置(即变量应该被分配到栈中还是堆中)。静态的程序在硬盘中,动态的程序在内存中。运行程序就是静态到动态的切换,就是从硬盘中装载到内存中。内存中有两个区域,分别是stack栈和heap堆。

      • Stack简介:函数调用用到的是栈。栈较小,只有1-2M。

      • Stack overflow:栈较小且快。栈爆的两种情况:

        • 算法没写好,函数调用过多
        • 往栈上分配了太多的内存
      • stack overflow的例子1,对应stack overflow的第一种情况:

        1
        2
        3
        4
        5
        6
        7
        8
        9
        10
        11
        12
        13
        14
        15
        16
        17
        18
        19
        20
        21
        22
        23
        24
        25
        26
        27
        28
        29
        using System;
        using System.Collections.Generic;
        using System.Linq;
        using System.Text;
        using System.Threading.Tasks;

        namespace StackOverflow
        {
        class Program
        {
        static void Main(string[] args)
        {
        BadGuy bg = new BadGuy();
        bg.BadMethod();
        }
        }

        class BadGuy
        {
        public void BadMethod()
        {
        int x = 100;

        // 递归调用BadMethod
        // 很快就会stack overflow,因为每次调用都需要在栈上切出一块内存存储变量x
        this.BadMethod();
        }
        }
        }

        stack overflow的例子2,对应stack overflow的第二种情况:

        1
        2
        3
        4
        5
        6
        7
        8
        9
        10
        11
        12
        13
        14
        15
        16
        17
        18
        19
        20
        21
        22
        using System;
        using System.Collections.Generic;
        using System.Linq;
        using System.Text;
        using System.Threading.Tasks;

        namespace StackOverflow
        {
        class Program
        {
        static void Main(string[] args)
        {
        // stackalloc是往栈上切内存,切的过多就会stack overflow
        // c#中不推荐使用指针,一定要用需要在函数前加unsafe
        // 记得去project-StackOverflow properties-build中勾选allow unsafe code,并保存
        unsafe
        {
        int* p = stackalloc int[9999999];
        }
        }
        }
        }
      • Heap简介:堆用来存储对象/实例。堆较大,有几个G。

      • 使用Performance Monitor查看进程的堆内存使用量

      • 使用wpf application介绍堆。compile是编译,build是组装。一个程序从硬盘加载到内存中,开始执行后,就形成了一个进程(process)。在wpf application中,创建一个界面,上面有两个button,一个用于consume heap memory,一个用于release heap memory,对应的点击两个按钮后执行的逻辑为:

        1
        2
        3
        4
        5
        6
        7
        8
        9
        10
        11
        12
        13
        14
        15
        16
        17
        18
        19
        20
        21
        22
        23
        24
        25
        26
        27
        28
        29
        30
        31
        32
        33
        34
        35
        36
        37
        38
        39
        40
        41
        42
        43
        44
        45
        46
        using System;
        using System.Collections.Generic;
        using System.Linq;
        using System.Text;
        using System.Threading.Tasks;
        using System.Windows;
        using System.Windows.Controls;
        using System.Windows.Data;
        using System.Windows.Documents;
        using System.Windows.Input;
        using System.Windows.Media;
        using System.Windows.Media.Imaging;
        using System.Windows.Navigation;
        using System.Windows.Shapes;

        namespace HeapSample
        {
        /// <summary>
        /// Interaction logic for MainWindow.xaml
        /// </summary>
        public partial class MainWindow : Window
        {
        public MainWindow()
        {
        InitializeComponent();
        }

        List<Window> winList; // 本变量需要被两个函数使用,因此被声明在函数之外

        private void Button1_Click(object sender, RoutedEventArgs e)
        {
        winList = new List<Window>();
        // 往list中加入15000个Window,Window的实例占用的内存较多
        for (int i = 0; i < 15000; i++)
        {
        Window w = new Window();
        winList.Add(w);
        }
        }

        private void Botton2_Click(object sender, RoutedEventArgs e)
        {
        winList.Clear(); // 找合适的时机回收垃圾内存
        }
        }
        }

        build-build solution后,右击项目,选择open folder in file explorer,进入bin-debug,双击运行HeapSample.exe。win+r,键入perfmon,即performance monitor,打开了性能监视器,可用其监视系统和某个程序的性能。点击添加-process-private bytes,选择实例为HeapSample,即可开始监视HeapSample这个程序使用的堆内存。双击图例,选择图表,最大值从100改为1024,然后的点击两个按钮,即可开始实验。观察到,点击consume heap memory按钮,堆内存的占用拉高;点击release heap memory按钮,堆内存的占用先不变,后拉低(因为不是立即释放内存,而是在合适的时机释放内存,当内存占用不多时,先不会释放内存)。

        未来写程序时,观察程序是否占用过多内存,或者某个操作是否占用过多的内存,就可以用performance monitor。

      • 关于内存泄漏:对象被分配,但没有被回收,导致内存被浪费掉了。比较C++和C#

        • C++中,对象被分配但没被回收,会导致内存泄漏
        • C#中,有垃圾收集器的机制,不需要手动释放内存,会自动回收内存。C#中也不需要手动释放内存,相对安全,不易出现内存泄漏。
    • 此类型所允许的操作(运算),例子:

      1
      2
      3
      4
      5
      6
      7
      8
      9
      10
      11
      12
      13
      14
      15
      16
      17
      18
      19
      20
      21
      22
      using System;
      using System.Collections.Generic;
      using System.Linq;
      using System.Reflection;
      using System.Text;
      using System.Threading.Tasks;
      using System.Windows.Forms;

      namespace TypeSample
      {
      class Program
      {
      static void Main(string[] args)
      {
      double result1 = 3.0 / 4.0; // 浮点除法
      Console.WriteLine(result1);

      double result2 = 3 / 4; // 整数除法
      Console.WriteLine(result2);
      }
      }
      }

7. 详解类型、变量与对象(下)

C#语言的类型系统

  • C#的五大数据类型

    • 类(Classes):如Windows, Form, Console, String
    • 结构体(Structures):如Int32, Int64, Single, Double
    • 枚举(Enumerations):如HorizontalAlignment, Visibility
    • 接口(Interfaces)
    • 委托(Delegates)
  • C#类型的派生谱系

    树状的,带有层级结构的类型系统。根部是Object数据类型。C#的类型系统包括引用类型和值类型,引用类型包括类、接口和委托,值类型包括结构体和枚举,所有类型都以Object类型为基类型。三组关键字。第一组对应的是引用类型,蓝色的是数据类型的关键字,黑色的是用于定义引用类型的关键字,class用于定义类,interface用于定义接口,delegate用于定义委托。第二组对应的是值类型,蓝色的是数据类型,黑色的是用于定义值类型的关键字,struct用于定义结构体,enum用于定义枚举。第三组,最上面是bool类型的取值,中间的:void表示函数无返回值,null表示引用变量为空,最下面是用于声明变量的。

    蓝色的字表明:

    • 是现成的数据类型,非常常用,c#已经将其作为关键字
    • 是基本数据类型(又称内建数据类型),别的类型都是基于这些类型构成的,没有更基本的类型来构成它们

    csharpType.png

  • 实验

    • 实验1:证明Form是一个类

      1
      2
      3
      Type myType = typeof(Form); // 获取Form的类型
      Console.WriteLine(myType.FullName);
      Console.WriteLine(myType.IsClass);

      或者在Form上右击,选择go to definition,或者按下快捷键F12,就来到了微软定义Form的地方,可以看到定义Form时,有以下代码:

      1
      public class Form : ContainerControl

      因此Form的类型是class,其基类是ContainerControl

    • 实验2:结构体类型:int, long等,都是结构体类型。在上面右击,选择go to definition,即可验证。

      1
      2
      public struct Int32 : IComparable, IFormattable, IConvertible, IComparable<int>, IEquatable<int>
      public struct Int64 : IComparable, IFormattable, IConvertible, IComparable<long>, IEquatable<long>

      int即相当于Int32long即相当于Int64

    • 实验3:枚举类型,用于限定用户从一个集合中选取有效值。显示窗口时,有三种状态:最大化、标准模式(可调整窗口大小)和最小化。现在来设置窗口的状态,有效值就三个,因此需要枚举类型。

      1
      2
      3
      Form f = new Form();
      f.WindowState = FormWindowState.Maximized;
      f.ShowDialog(); // 此时显示最大化的窗口

      查看FormWindowState的源代码,用enum关键字声明的类型就是枚举类型:

      1
      2
      3
      4
      5
      6
      7
      8
      9
      10
      11
      12
      13
      14
      15
      16
      17
      18
      19
      20
      21
      22
      23
      24
      25
      26
      27
      #region Assembly System.Windows.Forms.dll, v4.0.0.0
      // C:\Program Files (x86)\Reference Assemblies\Microsoft\Framework\.NETFramework\v4.5\System.Windows.Forms.dll
      #endregion

      using System;
      using System.Runtime.InteropServices;

      namespace System.Windows.Forms
      {
      // Summary:
      // Specifies how a form window is displayed.
      [ComVisible(true)]
      public enum FormWindowState
      {
      // Summary:
      // A default sized window.
      Normal = 0,
      //
      // Summary:
      // A minimized window.
      Minimized = 1,
      //
      // Summary:
      // A maximized window.
      Maximized = 2,
      }
      }
    • 三个关键字:

      • class:用来声明类 类型
      • struct:用来声明结构体类型
      • enum:用来声明枚举类型
    • 接口和委托类型暂且不讲。

变量、对象与内存(核心内容)

  • 什么是变量

    变量 = 以变量名所对应的内存地址为起点、以其数据类型所要求的存储空间为长度的一块内存区域

    • 表面上来看(C#代码的上下文行文上来看),变量的用途是存储数据

    • 实际上,变量表示了存储位置,并且每个变量都有一个类型,以决定什么样的值能够存入变量

      • 变量表示了存储位置:变量名表示(对应着)变量的值在内存中的存储位置。例子:

        1
        2
        int x; // x是一个标签,其对应着内存中的地址,100就存在这个地址
        x = 100;
      • 每个变量都有一个类型,以决定什么样的值能够存入变量。同样用上面的例子解释:只有int类型的值可以保存到x指示的地址上去。

    • 变量一共有7种

      • 静态变量,实例变量(成员变量,字段),数组元素,值参数,引用参数,输出形参,局部变量
    • 狭义的变量指局部变量,因为其它种类的变量都有自己的约定名称

      • 简单地讲,局部变量就是方法体(函数体)里声明的变量
    • 7种变量的例子:

      1
      2
      3
      4
      5
      6
      7
      8
      9
      10
      11
      12
      13
      14
      15
      16
      17
      18
      19
      20
      21
      22
      23
      24
      25
      26
      27
      28
      29
      30
      31
      32
      33
      34
      35
      36
      37
      38
      39
      using System;
      using System.Collections.Generic;
      using System.Linq;
      using System.Text;
      using System.Threading.Tasks;
      using System.Windows.Forms;

      namespace TypeInCSharp
      {
      class Program
      {
      static void Main(string[] args)
      {
      int[] array = new int[100]; // 声明了长度为100的整型数组
      // 取出数组中的元素: array[0], array[99]
      // 这100个数组中的元素都是变量

      int x; // 局部变量
      }
      }

      class Student
      {
      public static int Amount; // 静态成员变量

      // 实例变量/字段
      // 字段容易被赋为不合法的值,属性自带逻辑,可以保护字段不被赋不合法的值
      public int Age;
      public string Name;

      // 参数
      // double b是值参数变量, ref double a是引用参数变量, out double a是输出参数变量
      public double Add(ref double a, double b)
      {
      double result = a + b; // result是Add方法的局部变量
      return result;
      }
      }
      }
    • 变量的声明

      • 有效的修饰符组合opt+类型+变量名+初始化器opt

      • opt表示可选的,没有opt下角标则是必需的

      • 例子:

        1
        2
        3
        4
        5
        6
        7
        8
        9
        10
        11
        12
        13
        14
        15
        16
        17
        18
        19
        20
        21
        22
        23
        24
        25
        26
        27
        28
        29
        30
        31
        using System;
        using System.Collections.Generic;
        using System.Linq;
        using System.Text;
        using System.Threading.Tasks;
        using System.Windows.Forms;

        namespace TypeInCSharp
        {
        class Program
        {
        static void Main(string[] args)
        {
        int a; // 声明变量
        a = 100;
        int b; // 声明变量
        b = 200;
        int c = a + b; // 声明变量
        Console.WriteLine(c);
        }
        }

        class Student
        {
        // 有效的修饰符组合: public static
        // 类型: int
        // 变量名: Amount
        // 初始化器: = 0
        public static int Amount = 0;
        }
        }
  • 值类型的变量

    • 值类型没有实例,所谓的“实例”与变量合二为一。比如int a = 100a既是变量,也是int类型的实例。

    • 基本知识:计算机内存的最小单位是bit,1个bit存储1个二进制数。8个bit组成一个字节(Byte),计算机内存中以字节为单元进行存取数据和读取数据,计算机为每个字节准备了一个唯一的编号,内存地址就是某个字节在计算机中的编号。寻找某个特定字节的过程:寻址。

      操作系统如何使用内存:

      • 部分内存保留给计算机操作系统,别的应用程序不能用
      • 其他内存为自由内存
    • 以byte/sbyte/short/ushort这四种结构体为例,演示值类型的变量在内存中如何存储。

      • byte: vs中输入byte,然后快捷键ctrl+shift+F1查看其文档,获取基本信息

      • 例子:

        1
        2
        3
        4
        5
        6
        7
        8
        9
        10
        11
        12
        13
        14
        15
        16
        17
        18
        19
        20
        21
        22
        23
        24
        25
        26
        27
        28
        29
        30
        31
        using System;
        using System.Collections.Generic;
        using System.Linq;
        using System.Text;
        using System.Threading.Tasks;
        using System.Windows.Forms;

        namespace TypeInCSharp
        {
        class Program
        {
        static void Main(string[] args)
        {
        byte b;
        b = 100; // 内存中存储为二进制,值为01100100

        sbyte sb; // Signed 8-bit integer, range -128 to 127
        sb = 100; // 内存中存储为二进制,值为01100100,最高位为符号位
        // 负数 = 正数按位取反加1,故-100 = 10011100(注意进位)

        ushort us; // Unsigned 16-bit integer, range 0 to 65,535
        us = 1000; // 内存中存储为二进制,值为000000 + 1111101000, 注意高位存储在内存地址(字节编号)较大处

        short s; // Signed 16-bit integer, range -32,768 to 32,767
        s = 1000; // 值为000000 + 1111101000
        s = -1000; // 按位取反加1, -1000存储为1111110000011000
        string str = Convert.ToString(s, 2); // s转为二进制,然后打印为字符串
        Console.WriteLine(str); // 验证-1000存储为1111110000011000
        }
        }
        }
  • 引用类型的变量与实例

    • 引用类型变量与实例的关系:引用类型变量里存储的数据是对象/实例的内存地址

    • 以类为例:

      1
      2
      3
      4
      5
      6
      7
      8
      9
      10
      11
      12
      13
      14
      15
      16
      17
      18
      19
      20
      21
      22
      23
      24
      25
      26
      27
      28
      29
      using System;
      using System.Collections.Generic;
      using System.Linq;
      using System.Text;
      using System.Threading.Tasks;
      using System.Windows.Forms;

      namespace TypeInCSharp
      {
      class Program
      {
      static void Main(string[] args)
      {
      Student stu; // 计算机看到引用类型,就分配4 Byte,将其中的所有bit都置为0,说明此时变量stu没有引用任何实例
      stu = new Student(); // 在堆内存中创建一个Student实例,实例才是真正包含ID和Score这两个字段的实体
      // 将实例在堆内存中的地址保存到stu变量中,即将内存编号以二进制的形式写入上面的4 Byte中

      // 也可解释为什么可以用两个不同的引用变量来引用同一个实例
      Student stu2;
      stu2 = stu;
      }
      }

      class Student
      {
      uint ID; // 32 bit
      ushort Score; // 16 bit
      }
      }
  • 局部变量是在stack上分配内存

  • 变量的默认值。例子:

    1
    2
    3
    4
    5
    6
    7
    8
    9
    10
    11
    12
    13
    14
    15
    16
    17
    18
    19
    20
    21
    22
    23
    24
    25
    26
    27
    28
    29
    using System;
    using System.Collections.Generic;
    using System.Linq;
    using System.Text;
    using System.Threading.Tasks;
    using System.Windows.Forms;

    namespace TypeInCSharp
    {
    class Program
    {
    static void Main(string[] args)
    {
    Student stu = new Student();

    // ID和Score的默认值为0
    // 所有类型的变量,其默认值都是分配好的Byte的各个bit全部置为0
    // 但所有本地变量都需要有显示地赋初值
    Console.WriteLine(stu.ID);
    Console.WriteLine(stu.Score);
    }
    }

    class Student
    {
    public uint ID;
    public ushort Score;
    }
    }
  • 常量(值不可改变的变量),例子:

    1
    2
    3
    4
    5
    6
    7
    8
    9
    10
    11
    12
    13
    14
    15
    16
    17
    18
    using System;
    using System.Collections.Generic;
    using System.Linq;
    using System.Text;
    using System.Threading.Tasks;
    using System.Windows.Forms;

    namespace TypeInCSharp
    {
    class Program
    {
    static void Main(string[] args)
    {
    const int x = 100; // 常量const,常量不可被二次赋值,常量的初始化器不可省略或者换行
    Console.WriteLine(x);
    }
    }
    }
  • 装箱与拆箱(Boxing & Unboxing)

    在实际编程中少用,因为会导致性能的损失。有以下的例子和笔记:

    1
    2
    3
    4
    5
    6
    7
    8
    9
    10
    11
    12
    13
    14
    15
    16
    17
    18
    19
    20
    21
    22
    23
    24
    25
    26
    27
    28
    29
    30
    31
    32
    33
    34
    using System;
    using System.Collections.Generic;
    using System.Linq;
    using System.Text;
    using System.Threading.Tasks;
    using System.Windows.Forms;

    namespace TypeInCSharp
    {
    class Program
    {
    static void Main(string[] args)
    {
    int x = 100;
    object obj = x; // 装箱
    // obj是引用类型,在内存中分配4 Byte的存储单元
    // 分开来写: object obj; // 4 Byte全部置零
    // obj = x;
    // 装箱:当obj要引用的值不是堆上的实例,而是栈上的值类型变量
    // 操作就是在堆上找一片空余的区域,将栈上的值拷贝过去
    // 再将堆上的地址存储到obj对应的内存空间中
    // 总之,obj变量对堆上的实例进行引用,实例中封装着x这个整数,这就是装箱

    // 拆箱: 拿到obj在堆上存储的整数值x
    int y = (int)obj;
    // 看到obj在堆上存储的值,将其转换为整数类型,然后存储在y对应的内存空间中
    Console.WriteLine(y);

    // 装箱和拆箱会损失性能,因为在栈和堆之间搬运了东西
    // 装箱:将栈上的值类型变量封装为object类型的实例,存储在堆上
    // 拆箱:将堆上object类型的实例里面的值,按照要求拆为目标数据类型,存储在栈上
    }
    }
    }

本节作业

  • 理解并熟记所有概念和知识
  • 对照视频编写示例程序,直至能够默写

8. 方法的定义、调用与调试(上)

方法的由来

方法的定义与调用(重要)

构造器(一种特殊的方法)

方法的重载(Overload)

如何对方法进行debug

方法的调用与栈*

9. 方法的定义、调用与调试(下)

Details Explanation of Java Stream

注意

wsl和本地上用IDEA运行java代码,最新修改的结果往往都无法被正常运行出来,我推测是缓存没有及时刷新之类的。有两个解决办法:

  • 每次运行前按下快捷键:ctrl + shift + f9,达到rebuild project的目的
  • 手动点击上边栏,选择build-rebuild project,选择build project没有作用

根据这个帖子,要彻底解决这个问题,恐怕要更新到2024.1以后的版本,我暂时不要更新自己的IDEA,因为当前的IDEA还能够正常使用,而我使用的是破解版的密钥,贸然更新可能会导致反而无法正常使用的情况出现。

不可变集合详解

创建不可变集合

不可变集合:不可以被修改的集合。其长度和内容都不可以被修改。

创建不可变集合的应用场景:

  • 如果某个数据不能被修改,把它防御性地拷贝到不可变集合中是个很好的实践。
  • 当集合对象被不可信的库调用时,不可变形式是安全的。
  • 某些确定的规则。
  • 电脑中的硬件信息。

简单理解:不想让别人修改集合中的内容,就可以给他提供一个不可变的集合。拿到不可变集合的人只能做查询操作,不能删除、修改、添加。

创建不可变集合的书写格式:
在List, Set, Map接口中,都存在静态的of方法,可以获取一个不可变的集合。
| 方法名称 | 说明 |
| :————————————————————: | :————————————————: |
| static <E> List<E> of(E...elements) | 创建一个具有指定元素的List集合对象 |
| static <E> Set<E> of(E...elements) | 创建一个具有指定元素的Set集合对象 |
| static <K, V> Map<K, V> of(E...elements) | 创建一个具有指定元素的Map集合对象 |

List of:

1
2
3
4
5
6
7
8
9
10
11
12
13
14
15
16
17
18
19
20
21
22
23
24
25
26
27
28
29
30
31
32
33
34
35
36
37
38
39
40
41
42
43
44
45
46
47
48
49
50
51
52
53
package com.cyf.a01immutable;

import java.util.Iterator;
import java.util.List;

public class ImmutableDemo1 {
public static void main(String[] args) {
/*
创建不可变的List集合
"张三", "李四", "王五", "赵六"
*/

// ctrl + alt + v可以自动生成List<String> list,只需要自己写List.of即可
// 一旦创建完毕之后,是无法进行修改的,在下面的代码中,只能进行查询操作
List<String> list = List.of("张三", "李四", "王五", "赵六");

// 查询
System.out.println(list.get(0));
System.out.println(list.get(1));
System.out.println(list.get(2));
System.out.println(list.get(3));

System.out.println("-----------------------------");

// 遍历
for (String s : list) {
System.out.println(s);
}

System.out.println("-----------------------------");

// 迭代器遍历
Iterator<String> it = list.iterator();
while (it.hasNext()) {
String s = it.next();
System.out.println(s);
}

System.out.println("-----------------------------");

// 普通for循环
for (int i = 0; i < list.size(); i++) {
String s = list.get(i);
System.out.println(s);
}

System.out.println("-----------------------------");

// list.remove("李四");
// list.add("aaa");
// list.set(0, "aaa");
}
}

Set of:

1
2
3
4
5
6
7
8
9
10
11
12
13
14
15
16
17
18
19
20
21
22
23
24
25
26
27
28
29
30
31
32
33
34
35
36
package com.cyf.a01immutable;

import java.util.Iterator;
import java.util.Set;

public class ImmutableDemo2 {
public static void main(String[] args) {
/*
创建不可变的Set集合
"张三", "李四", "王五", "赵六"
*/

// ctrl + alt + v可以自动生成List<String> list,只需要自己写List.of即可
// 一旦创建完毕之后,是无法进行修改的,在下面的代码中,只能进行查询操作
// 细节:当我们要获取一个不可变的Set集合时,里面的参数一定要保证唯一性
Set<String> set = Set.of("张三", "李四", "王五", "赵六");

// set中没有索引,因此查询只能遍历
for (String s : set) {
System.out.println(s);
}

System.out.println("-----------------------------");

Iterator<String> it = set.iterator();
while(it.hasNext()) {
String s = it.next();
System.out.println(s);
}

System.out.println("-----------------------------");

// 不能删除、添加、修改
// set.remove("王五");
}
}

Map.of:

1
2
3
4
5
6
7
8
9
10
11
12
13
14
15
16
17
18
19
20
21
22
23
24
25
26
27
28
29
30
31
32
33
34
35
36
37
38
39
40
41
42
43
44
45
46
47
48
49
50
51
52
53
package com.cyf.a01immutable;

import java.util.Map;
import java.util.Set;

public class ImmutableDemo3 {
public static void main(String[] args) {
/*
创建Map的不可变集合
细节1:键是不能重复的
细节2:Map里面的of方法,参数是有上限的,最多只能传递20个参数,即10个键值对
细节3:如果我们要传递多个键值对对象,数量大于10个,在Map接口中还有一个方法:Map.ofEntries()
其将键和值看作一个整体,由于形参中可以有一个可变参数,因此可以实现传递多个键值对对象的功能
*/

// 一旦创建完毕之后,是无法进行修改的,在下面的代码中,只能进行查询操作
Map<String, String> map =
Map.of(
"张三", "南京", "李四", "北京", "王五", "上海", "赵六", "广州", "孙七", "深圳", "周八", "杭州", "吴九", "宁波",
"郑十", "苏州", "刘一", "无锡", "陈二", "嘉兴");

// map.keySet获取所有的键
Set<String> keys = map.keySet();
for (String key : keys) {
String value = map.get(key);
System.out.println(key + "=" + value);
}

System.out.println("-----------------------------");

// map的第二种遍历方式
// map.entrySet()获取所有键值对
Set<Map.Entry<String, String>> entries = map.entrySet();
for (Map.Entry<String, String> entry : entries) {
String key = entry.getKey();
String value = entry.getValue();
System.out.println(key + "=" + value);
}

System.out.println("-----------------------------");
}

// 如果我想让这个方法能够接收多个键和值
// 解决方案:
// 键 可变参数
// 值 可变参数
// 键和值的类型不确定:泛型方法<>
// 由于两个可变参数无法在形参中共存,因此无法设计这个方法
// public static<K, V> void of(K...keys, V...values) {
//
// }

}

Map.ofEntries:

1
2
3
4
5
6
7
8
9
10
11
12
13
14
15
16
17
18
19
20
21
22
23
24
25
26
27
28
29
30
31
32
33
34
35
36
37
38
39
40
41
42
43
44
45
46
47
package com.cyf.a01immutable;

import java.util.HashMap;
import java.util.Map;
import java.util.Set;

public class ImmutableDemo4 {
public static void main(String[] args) {
/*
创建Map的不可变集合,键值对的数量超过10个
细节3:如果我们要传递多个键值对对象,数量大于10个,在Map接口中还有一个方法:Map.ofEntries()
其将键和值看作一个整体,由于形参中可以有一个可变参数,因此可以实现传递多个键值对对象的功能
*/

// 1. 创建一个普通的Map集合
HashMap<String, String> hm = new HashMap<>();
hm.put("张三", "南京");
hm.put("李四", "北京");
hm.put("王五", "上海");
hm.put("赵六", "广州");
hm.put("孙七", "深圳");
hm.put("周八", "杭州");
hm.put("吴九", "宁波");
hm.put("郑十", "苏州");
hm.put("刘一", "无锡");
hm.put("陈二", "嘉兴");
hm.put("aaa", "111");

// 2. 利用上面的数据来获取一个不可变的集合
// 获取所有的键值对对象(Entry对象)
Set<Map.Entry<String, String>> entries = hm.entrySet();
// 由于可变参数在底层就是一个数组,因此需要将上面的entries变成数组
// 需要调用指定类型的toArray函数,类型是Map.Entry
Map.Entry[] arr1 = new Map.Entry[0]; // 将map中的所有数据放到arr中
// toArray方法在底层会比较集合的长度跟数组的长度两者的大小
// 如果集合的长度11 > 数组的长度0:数据在数组中放不下,此时会根据实际数据的个数11,重新创建数组
// 如果集合的长度<=数组的长度:数据在数组中放得下,此时不会创建新的数组,而是直接用
// 因此数组的长度直接写成0就可以,不用想数组的长度是否和集合的长度匹配
Map.Entry[] arr2 = entries.toArray(arr1);

// 不可变的map集合
Map map = Map.ofEntries(arr2);

// 不可增删改,只可查
// map.put("bbb", "222");
}
}

上面的代码非常麻烦,可以简化。

Stream流

方法引用

初爽Stream流

Stream流的思想和获取Stream流

链接

理论基础

455.分发饼干

376. 摆动序列

53. 最大子序和

知识

理论基础

什么是贪心

贪心算法的本质是找到每个阶段的局部最优,从而去推导全局最优

例如:

  • 10张面值不同的钞票,如何取能取到总数最多的钱?每次取面额最大的钞票即可,这就是局部最优。取10次后拿到最多的钱,就是全局最优。这是贪心的思路。
  • 背包最大承重是n。有一系列物品,其重量和价值各不相同,问这个背包能装的最大价值是多少?这需要用动态规划的思路来解决。

贪心的两个极端

贪心的题目要么太简短,要么太难。

贪心的套路

不像二叉树或者回溯算法的套路,贪心是没有套路的。部分较难的贪心题目,做过了才知道怎么做,否则完全想不到。非要说有套路,就是要想清楚每个阶段的局部最优,能否由局部最优推出全局最优。怎么由局部最优推出全局最优,也没有固定的思考方式。不需要做数学证明(数学证明的常用方法是数学归纳法和反证法),浪费时间。面试时,只要想到局部最优,可以推出全局最优,没有明显的反例,就已经可以试试,面试官不会要求严谨的数学证明。文字版讲解中有解决贪心算法的四个步骤,但实际做题时无法严格遵循四个步骤,实操性不强。

455.分发饼干

376.摆动序列

53.最大子序和

初次尝试

455.分发饼干

本题我的思路是,找出s数组的最大值,然后看g数组中有几个数小于等于s数组中的最大值,即为结果。我写了如下的代码,但只通过了23/25个测试样例:

1
2
3
4
5
6
7
8
9
10
11
12
13
14
15
16
17
class Solution {
public:
int findContentChildren(vector<int>& g, vector<int>& s) {
if (s.size() == 0) return 0;

sort(s.begin(), s.end());
int max = s[s.size() - 1];

int res = 0;
for (int i = 0; i < g.size(); i ++ )
if (g[i] <= max)
res ++ ;

if (s.size() <= res) return s.size();
return res;
}
};

直接看代码随想录的讲解吧。

376.摆动序列

53.最大子序和

实现

455.分发饼干

例子:
胃g: 1, 2, 7, 10
饼s: 1, 3, 5, 9
输出:3

策略:尽量用大饼干去喂胃口大的孩子,这样就可以充分利用饼干

代码实现:

1
2
3
4
5
6
7
8
9
10
11
12
13
14
15
16
17
// 对两个数组进行排序
sort(g.begin(), g.end());
sort(s.begin(), s.end());

int res = 0;
int index = s.size() - 1; // 饼干的index

// 优先用大饼干喂胃口大的小孩,因此倒序遍历
for (int i = g.size() - 1; i >= 0; i -- ) {
// 饼干成功投喂后,再向前遍历小孩数组,否则不能向前
if (index >= 0 && s[index] >= g[i]) {
res ++ ;
index -- ;
}
}
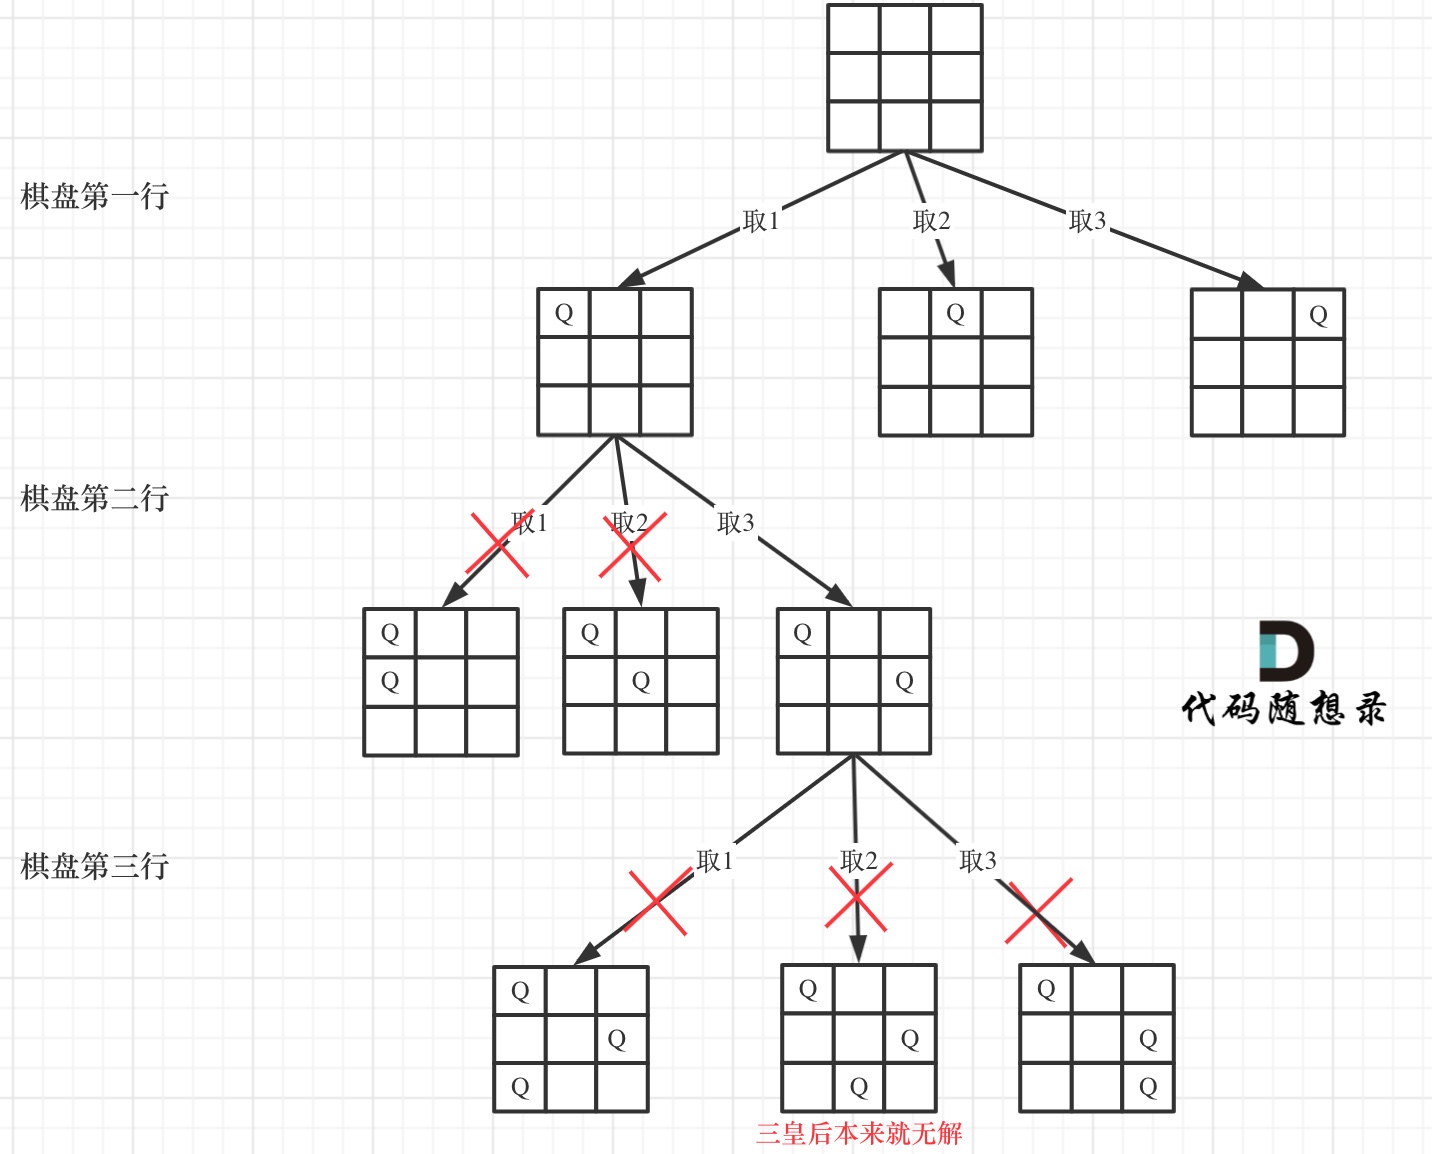
return res;

一定要外层循环遍历胃口,内层循环遍历饼干。如果外层循环遍历饼干,内层循环遍历胃口,拿上面的例子模拟就知道不可行。拿外层循环遍历饼干,内层循环遍历胃口,代码为:

1
2
3
4
5
6
7
8
9
10
11
12
13
14
15
// 对两个数组进行排序
sort(g.begin(), g.end());
sort(s.begin(), s.end());

int res = 0;
int index = g.size() - 1;

for (int i = s.size() - 1; i >= 0; i -- ) {
if (index >= 0 && s[i] >= g[index]) {
res ++ ;
index -- ;
}
}

return res;

对于上面的例子,上述写法返回值为0。核心在于,要尝试去喂饱胃口大的孩子,而我们无法确保最大的饼干一定能喂饱胃口最大的孩子,如果最大的饼干无法喂饱胃口最大的孩子,那么上述写法的返回值恒为0。

另一种思路:尽量用小饼干去满足胃口小的孩子,这样可以充分利用小饼干

376.摆动序列

53.最大子序和

心得与备忘录

455.分发饼干

  1. 一定要外层循环遍历胃口,内层循环遍历饼干。
  2. 内存循环用if判断而不用while循环,因为要一个小孩一个小孩地喂过去。
  3. 两种思路:先去满足大胃口的孩子,先去使用小饼干。两种思路遍历的顺序不同。

376.摆动序列

53.最大子序和

简介

都柏林,素有美食荒漠、欧洲宁古塔之称。然而,经过本人和好友长期约饭探店的实地考察之后,发现都柏林的中餐馆门类齐全、品种多样,除去价格稍贵外相比于国内并无显著的短板和缺憾。因此,本人维护本帖用于记录都柏林吃喝之旅,并为读者提供一份尽可能详细的都柏林美食推荐清单。

本人向来赞同孔夫子“食不厌精,脍不厌细”的名言,因此,性价比是这份排行榜中相对次要的因素,食物的调味、口感、精细和新颖程度是更重要的。本帖中的五星代表着这个饭店的食物有独道之处,甚至超过了国内同种食物之最。四星代表着这个饭店的食物在味道或性价比方面至少有一个非常出众,而另一个也至少在平均水平之上。三星代表着值得一试,但并不惊艳。果腹则代表着仅供日常果腹之用,胜在量大管饱。心愿清单则是我早有耳闻,但还未成行的餐馆。本帖中推荐的餐馆会附带有谷歌地图的位置信息和一句简短的点评。本帖中也会提到一些国内的餐馆,主要分布在南昌、西安和合肥,都是本人曾经久居过的城市。本帖中评分点评随性,主观色彩浓重,愿博看官一笑。

五星

  1. 四川
  2. 川九香

四星

三星

果腹

国内

心愿清单

  1. 日料Omakase
  2. 西餐Shanahan’s on the Green

菜谱

下面是我目前已经掌握的菜肴做法。

青椒炒牛肉

https://www.xiaohongshu.com/explore/64084cf10000000014024bf6?xsec_token=ABjk8kDPjbnjQBy5ninATf_t4OFqDsNTj2tvDoDR8YAew=&xsec_source=pc_user

素炒小青菜

https://www.xiaohongshu.com/explore/649eb823000000001203d1d0?xsec_token=ABhF-yZeYWU_KFyde9iuIRaP4osN7hN84uBTDHM4muOJY=&xsec_source=pc_user

酸汤水饺

https://www.xiaohongshu.com/explore/640626770000000013030f32?xsec_token=ABKMjy9V_2e41wBdiSonEoj8xIax3g9thkyzM_zYygvEo=&xsec_source=pc_user

烤鸡腿

https://www.xiaohongshu.com/explore/61d80f75000000000102f662?xsec_token=ABFeZ243mB41AtUkgopJjbtnfNUjXvXk5X0vREX-Cr9-o=&xsec_source=pc_user

清汤面

https://www.xiaohongshu.com/explore/64ef0d47000000001e031fc3?xsec_token=ABhdjuqwDUBOmK31gzU44aiEzUHgQx9krLx1OMg7WbYlQ=&xsec_source=pc_user

辣椒炒鸡丁

https://www.xiaohongshu.com/explore/642ef0440000000013003052?xsec_token=ABP-oNHr9xdj_dfJ3PFdEz90JgCfpOKhxwZCwXod7BaKM=&xsec_source=pc_user

耗油生菜

https://www.xiaohongshu.com/explore/6331a4890000000017019ee3?xsec_token=ABvHsXQ8990EWiCV0UivQ0VJJbi921rouqm8fD0HcXocg=&xsec_source=pc_user

蛋炒饭

https://www.xiaohongshu.com/explore/6539c724000000001f036536?xsec_token=AByuVdQE_Yu5WBwBdOxBbp1JqGxwtjXagF-Ct3aIRyTB4=&xsec_source=pc_user

炒米粉

https://www.xiaohongshu.com/explore/63d11d5e000000002203b147?xsec_token=AB6hQFjxlcFe1hFOtuDSpjFvIpDPYH0fIElCl-xqe0uk8=&xsec_source=pc_search

排骨汤

https://www.xiaohongshu.com/explore/63b295f3000000001c0349e2?xsec_token=ABx6mW_uBfj9nVHk20uySHX_8uZaNhS6D0mnuGF2iL0IY=&xsec_source=pc_search

https://www.xiaohongshu.com/explore/654d46ab000000003103d1b1?xsec_token=ABC1d6ftIfXeIjYWoQ6zTAFYDNRBJPT1MTjZYuH7pO92o=&xsec_source=pc_search

链接

332.重新安排行程
51. N皇后
37. 解数独
总结

知识

51. N皇后

初始化一个vector<string>,其中的元素全是字符.(共有n行,每行是一个字符串,每个字符串由n个.构成):

1
vector<string> chessboard(n, string(n, '.'));

实现

今天这三道题都非常难,那么这么难的题,为啥一天做三道?

因为一刷也不求能把这么难的问题解决,所以一刷的时候,就了解一下题目的要求,了解一下解题思路,不求能直接写出代码,先大概熟悉一下这些题,二刷的时候,随着对回溯算法的深入理解,再去解决如下三题。

332.重新安排行程

本题的思路不难,但选择的数据结构和初始化、遍历等操作非常复杂,是一道难题。

本题需要一个特殊的数据结构来存储一个机场映射多个机场,机场之间要靠字母序排列的这种复杂关系,选择的数据结构是unordered_map<string, map<string, int>> targets。其具体的含义为unordered_map<出发机场, map<到达机场, 航班次数>> targets。在遍历 unordered_map<出发机场, map<到达机场, 航班次数>> targets的过程中,可以使用”航班次数”这个字段的数字做相应的增减,来标记到达机场是否使用过了。如果“航班次数”大于零,说明目的地还可以飞,如果“航班次数”等于零说明目的地不能飞了,而不用对集合做删除元素或者增加元素的操作。有如下代码:

1
2
3
4
// unordered_map<出发机场, map<到达机场, 航班次数>> targets
// 使用map的原因是为了让其key有序(字典序)
// 第一个unordered_map是为了存储出发机场和到达机场间的映射关系,第二个map是为了对到达机场按照字典序排序,且记录到达机场在输入数据中出现的次数
unordered_map<string, map<string, int>> targets;

本题的树形结构如下所示,以输入:[["JFK", "KUL"], ["JFK", "NRT"], ["NRT", "JFK"]为例:
332.重新安排行程1

对上述树形结构的解释:始终从JFK出发,输入中JFK可以到KUL或者NRT,因此可以有这两个选择。输入中没有以KUL作为出发点的航班,因此飞向KUL的那一枝结束。飞向NRT的一枝,输入中以NRT为出发点的航班的终点是JFK,因此有行程:JFK->NRT->JFK。输入中以JFK为出发点的航班的终点可以是KUL或者NRT,因此分为两枝。JKF已经飞过NRT,因此剪枝;JKFKUL构成了行程:JFK->NRT->JFK->KUL,三趟航班,形成中有四个机场,说明找到了结果。

通过上述分析,我们可以得出代码的终止条件:n张机票,即有n个航班,则行程中有n + 1个机场(机场可重复)时,收集结果。原因是行程是由若干个向量组成的,每个向量都是一个航班,行程是单向的,不会形成环。因此,若有n个向量(即n个航班),那么就会有n + 1个节点(即单个向量的首尾),即n + 1个机场。有如下代码:

1
2
3
4
5
6
vector<string> res; // 存放结果,即由n个航班拼接成的行程,其中有n + 1个机场

// ticketNum为票数,即航班数
if (result.size() == ticketNum + 1) {
return true;
}

在写单层递归逻辑前,需要先对res数组和targets数组进行初始化,代码如下所示:

1
2
3
4
for (const vector<string>& vec : tickets) {
targets[vec[0]][vec[1]]++; // 记录映射关系
}
result.push_back("JFK"); // 起始机场

tickets数组是输入,其类型是vector<vector<string>>。由于输入不可更改,且其中的每个元素的类型都是vector<string>,因此用类型为const vector<string>的变量对其进行遍历,这里的引用就不加都可以,不会影响运行结果。vec[0]为出发机场,vec[1]为到达机场。targets中存储的是出发机场与到达机场的映射关系。对一个出发机场,若输入中存在其的到达机场,则在targets中记录这个映射关系,且map<string, int>中的string存储到达机场(vec[1]),int存储次数(有出发机场和其对应的到达机场,则该int存1)。这实现了对每一个航线(从某个出发机场到某个目的地机场)的航班次数进行计数。

根据树形结构,可以写出单层递归的逻辑:

1
2
3
4
5
6
7
8
9
for (pair<const string, int>& target : targets[result[result.size() - 1]]) {
if (target.second > 0 ) { // 记录到达机场是否飞过了
result.push_back(target.first);
target.second--;
if (backtracking(ticketNum, result)) return true;
result.pop_back();
target.second++;
}
}

这里特别需要注意的是:

1
for (pair<const string, int>& target : targets[result[result.size() - 1]])

其含义为:result[result.size() - 1] 获取 result 向量的最后一个元素,即当前路径中最新的机场。然后,使用这个机场名称作为键,从 targets 映射中检索对应的内层 map,这个内层 map 包含所有从该机场出发的航班及其次数。for 循环遍历这个内层 map,即遍历从当前结果集中的最新机场可以直接到达的所有机场及对应的航班次数。一定要加上引用即 & target,因为后面有对 target.second 做减减操作,如果没有引用,单纯复制,这个结果就没记录下来,那最后的结果就不对了。加上引用之后,就必须在string前面加上const,因为map中的key是不可修改了,这就是语法规定了。

还需要注意本题的递归函数的返回值和参数:

1
bool backtracking(int ticketNum, vector<string>& result)

注意函数返回值用的是bool!因为我们只需要找到一个行程,就是在树形结构中唯一的一条通向叶子节点的路线。所以找到了这个叶子节点了直接返回。

拆分地写好了各部分的代码之后,整合起来就是本题的完整代码:

1
2
3
4
5
6
7
8
9
10
11
12
13
14
15
16
17
18
19
20
21
22
23
24
25
26
27
28
29
30
31
32
33
34
35
36
37
38
39
40
41
42
43
class Solution {
public:
unordered_map<string, map<string, int>> targets;

bool backtracking(int ticketSum, vector<string>& res)
{
// 终止条件
if (ticketSum + 1 == res.size()) return true;

// 单层递归逻辑
// 以res中最新机场为出发点,遍历targets寻找可能的目的地
for (pair<const string, int>& target: targets[res[res.size() - 1]])
{
// target.second > 0说明目的地可用
if (target.second > 0)
{
// 处理节点
res.push_back(target.first);
target.second -- ;
// 递归
if (backtracking(ticketSum, res)) return true;
// 回溯
res.pop_back();
target.second ++ ;
}
}
return false;
}

vector<string> findItinerary(vector<vector<string>>& tickets) {
// 初始化res
vector<string> res;
res.push_back("JFK");

// 初始化targets
for (auto vec: tickets)
targets[vec[0]][vec[1]] ++ ;

// 调用递归函数并返回结果
backtracking(tickets.size(), res);
return res;
}
};

使用auto来简化上述代码,避免需要手写复杂的变量类型:

1
2
3
4
5
6
7
8
9
10
11
12
13
14
15
16
17
18
19
20
21
22
23
24
25
26
27
28
29
30
31
32
33
34
35
class Solution {
public:
// 提取输入数据中的信息:构造出发机场和到达机场间的映射,到达机场按照字典序排序并记录到达机场出现的次数
unordered_map<string, map<string, int>> targets;

bool backtracking(int ticketSum, vector<string>& res)
{
// 终止条件
if (ticketSum + 1 == res.size()) return true;

// 单层递归逻辑
for (auto& target: targets[res[res.size() - 1]])
{
if (target.second > 0)
{
target.second -- ;
res.push_back(target.first);
if (backtracking(ticketSum, res)) return true;
target.second ++ ;
res.pop_back();
}
}
return false;
}

vector<string> findItinerary(vector<vector<string>>& tickets) {
// 初始化res
vector<string> res;
res.push_back("JFK");
// 初始化targets
for (auto ticket: tickets) targets[ticket[0]][ticket[1]] ++ ;
backtracking(tickets.size(), res);
return res;
}
};

51. N皇后

本题是回溯中较难的题目。题意:给一个n*n的棋盘,在其中放n个皇后,要求同一行、同一列、同意斜线上不能有两个皇后,将放置皇后的结果返回。难点:之前讲的组合问题、分割问题、子集问题和排列问题,都是一个一维的集合按照条件输出若个子集,本题则是一个二维的集合(数组)。

首先想如何暴力枚举,以4*4的棋盘为例,需要4个for循环,每一行每个位置尝试放皇后,根据规则判断能否放皇后。回溯算法的本质和暴力枚举没有区别,但回溯算法用递归的方式控制嵌套for循环的层数。

本题的树形结构如下所示,以3*3的棋盘为例:
51.N皇后

第n层递归对应着尝试在第n行中放置皇后。3*3的N皇后问题是无解的,画其只是为了展现其树形结构。树的深度为棋盘的行数,树的宽度为棋盘的列数。接下来写本题的代码:

1
2
3
4
5
6
7
8
9
10
11
12
13
14
15
16
17
18
19
20
21
22
23
24
25
26
27
28
29
// 每个棋盘是一个二维数组,放置若干棋盘,因此需要三维数组
vector<vector<vector<int>>> res; // 三维数组收集所有可能的摆放结果

// chessboard为棋盘,n为棋盘的大小, row为行,第n层递归负责处理第n行,用row来记录当前处理到了第几行
void backtracking(vector<vector<int>> chessboard, int n, int row)
{
// 终止条件: 叶子节点收获结果
if (row == n)
{
res.push_back(chessboard); // 单层递归逻辑中会对合法性进行判断,保证放入res中的chessboard都是合法的
return;
}

// 单层递归逻辑
for (int i = 0; i < n; i ++ )
{
// 合法性判断
// 判断在第row行,第i个位置放皇后是否合法
if (isValid(row, i, chessboard, n))
{
// 放皇后
chessboard[row][i] = 'Q';
// 递归
backtracking(chessboard, n, row + 1); // 下一层递归, row->row + 1
// 回溯
chessboard[row][i] = '.';
}
}
}

总结:回溯法解决二维数组问题,第n层递归处理第n行,每层递归中遍历每一行中的每个元素。

在理解了本题的主题思路后,独立写出代码依然有难度,因为本题返回的变量类型是vector<vector<string>,chessboard的变量类型应该为vector<string>,对其进行初始化有一定难度。另外,isValid函数的实现我第一次写也有一定的困难,直接看文字版讲解。

我独立写出的本题的代码如下:

1
2
3
4
5
6
7
8
9
10
11
12
13
14
15
16
17
18
19
20
21
22
23
24
25
26
27
28
29
30
31
32
33
34
35
36
37
38
39
40
41
42
43
44
45
46
47
48
49
50
51
52
53
54
class Solution {
public:
// 结果集
vector<vector<string>> res;

bool isValid(vector<string>& chessboard, int n, int row, int col)
{
// 同一列中不能有两个皇后
for (int i = 0; i < row; i ++ )
if (chessboard[i][col] == 'Q') return false;

// 主对角线不能有两个皇后
for (int i = row - 1, j = col - 1; i >= 0 && j >= 0; i -- , j -- )
if (chessboard[i][j] == 'Q') return false;

// 副对角线不能有两个皇后
for (int i = row - 1, j = col + 1; i >= 0 && j < n; i -- , j ++ )
if (chessboard[i][j] == 'Q') return false;

return true;
}

// 传入棋盘,棋盘大小,行数(即递归层数)
void backtracking(vector<string>& chessboard, int n, int row)
{
// 终止条件
if (row == n)
{
res.push_back(chessboard);
return;
}

// 单层递归逻辑
for (int i = 0; i < n; i ++ )
{
// 合法性判断
if (isValid(chessboard, n, row, i))
{
// 放皇后
chessboard[row][i] = 'Q';
// 递归
backtracking(chessboard, n, row + 1);
// 回溯
chessboard[row][i] = '.';
}
}
}
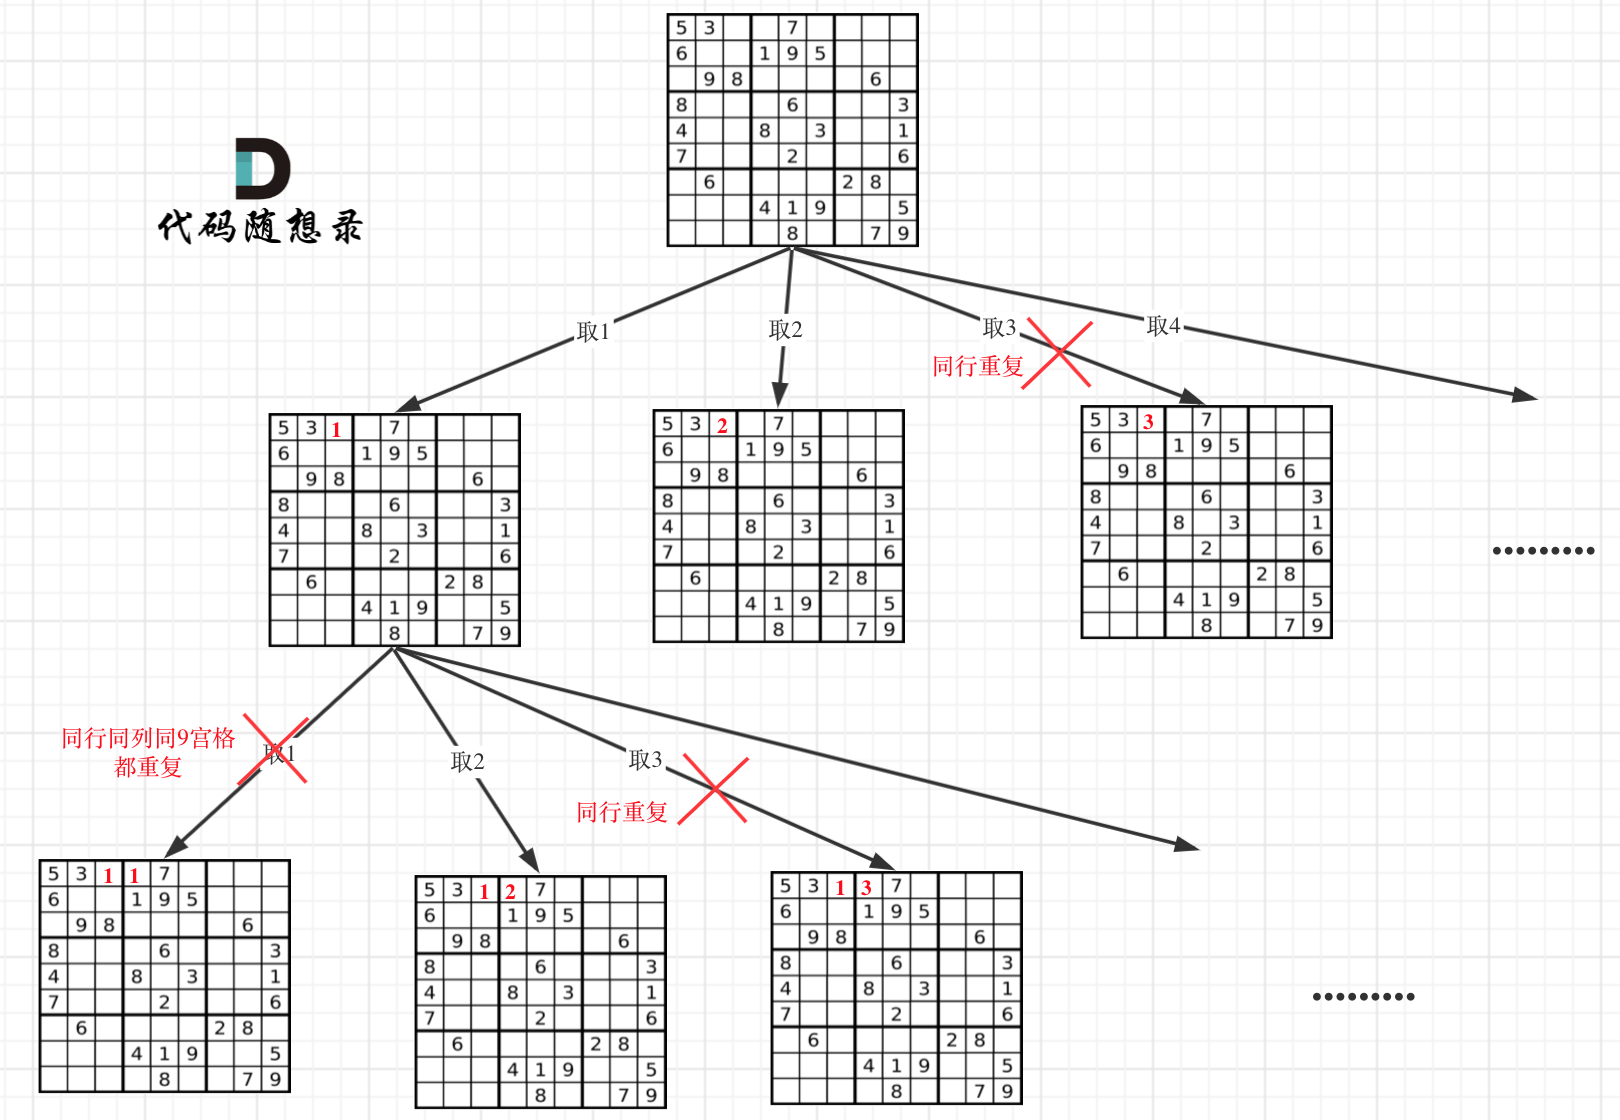
vector<vector<string>> solveNQueens(int n) {
vector<string> chessboard(n, string(n, '.'));
backtracking(chessboard, n, 0);
return res;
}
};

需要特别注意的是,在放皇后时,每次只在一行中的某个位置放一个皇后,且放完后会回溯,因此同一行中不会出现两个皇后,因此不需要在isValid函数中对同一行中出现两个皇后的情况进行判断。另外,放皇后的顺序是从行数小放到行数大,从列数小放到列数大。在不同行中,行数小的位置会被优先尝试放置皇后。在同一行的不同列中,列数小的位置会被优先尝试放置皇后。因此,isValid函数中对同一列判断,只需要判断从0-row列;对主对角线判断,只需要判断i从row-1到0,j从col-1到0;对副对角线判断,只需要判断i从row - 1到0,j从col + 1到n(由于优先放小的行,所以i < row, j > col的位置可能已经放置了皇后)。

37. 解数独

给一个99的棋盘,用1-9填满这个棋盘,规则为:同一行中不能有重复的数字,同一列中不能有重复的数字,九宫格中不能有重复的数字。本题求出一个填满的方案即可。本题是回溯章节的难题,和上一题N皇后类似。但用N皇后的思路做本题做不出来。*本题比N皇后多一个维度。N皇后用for循环遍历行,递归遍历列。本题不仅行要放满数字,列也要放满数字,整个棋盘都要放满数字。

本题解法被称为二维递归,即两个for循环,下面是一个递归函数。一个for循环来遍历行,一个for循环来遍历列,这样才能确定一个空格。递归用来确定空格中应该放的数字。本题的树形结构如下所示:
37.解数独

现在开始写本题的代码,本题的代码其实并不复杂。

1
2
3
4
5
6
7
8
9
10
11
12
13
14
15
16
17
18
19
20
21
22
23
24
25
26
27
28
29
30
31
32
33
34
// 确定递归函数的返回值和参数
// 返回值为bool类型,原因是本题求数独的一个解即可,一旦棋盘被填满,立即返回
// 若一题有多个结果,多个结果散落在树形结构里,需要将树形结构全都搜索一遍,然后将结果放入结果集中,因此返回值为void类型
bool backtracking(vector<vector<char>>& board) // board要引用,这样才会修改board
{
// 本题不需要写终止条件,棋盘被填满后会直接return true,若无法满足填充规则,则会return false
// 两个for循环,一个遍历行,另一个遍历列
for (int i = 0; i < board.size(); i ++ )
for (int j = 0; j < board[0].size(); j ++ )
{
// 处理节点
// 棋盘中的点表示空格
if (board[i][j] == '.')
{
for (char k = '1'; k <= '9'; k ++ )
{
// 检查在board的(i, j)处放置数字k是否合法
if (isValid(i, j, k, board))
{
board[i][j] = k;
// 进入下一层递归
bool res = backtracking(board);
// 找到一个结果就立即停止搜索,返回
if (res == true) return true;
// 回溯
board[i][j] = '.';
}
}
return false; // 在空格处将9个数字都尝试了,无法填入,则说明该棋盘没有结果,返回false
}
}
// 若没有走到return false,则return true(若棋盘一直被填充直到被填满,则不会走if (board[i][j] == '.'))
return true;
}

根据上面的核心代码,我自己实现了isValid函数,写出了本题的完整代码:

1
2
3
4
5
6
7
8
9
10
11
12
13
14
15
16
17
18
19
20
21
22
23
24
25
26
27
28
29
30
31
32
33
34
35
36
37
38
39
40
41
42
43
44
45
46
47
48
49
50
51
52
53
54
55
56
57
class Solution {
public:
bool isValid(int i, int j, char k, vector<vector<char>>& board)
{
// 检查第i行能否放入k
for (int j = 0; j < board[0].size(); j ++ )
if (board[i][j] == k)
return false;

// 检查第j列能否放入k
for (int i = 0; i < board.size(); i ++ )
if (board[i][j] == k)
return false;

// 检查九宫格能否放入k
int starti = i / 3 * 3;
int startj = j / 3 * 3;
int endi = starti + 2;
int endj = startj + 2;
for (int i = starti; i <= endi; i ++ )
for (int j = startj; j <= endj; j ++ )
if (board[i][j] == k)
return false;

return true;
}

bool backtracking(vector<vector<char>>& board)
{
for (int i = 0; i < board.size(); i ++ )
for (int j = 0; j < board[0].size(); j ++ )
{
if (board[i][j] == '.')
{
// 处理节点
for (char k = '1'; k <= '9'; k ++ )
{
if (isValid(i, j, k, board))
{
board[i][j] = k;
// 递归
bool res = backtracking(board);
if (res == true) return true;
// 回溯
board[i][j] = '.';
}
}
return false;
}
}
return true;
}

void solveSudoku(vector<vector<char>>& board) {
backtracking(board);
}
};

心得与备忘录

332.重新安排行程

  1. 本题的解题思路其实不难,画出树形结构后,是一道经典的回溯问题。本题的难点在于选用怎样的数据结构来有效地存放和处理输入的数据。
  2. 因为本题是hard题,且由于使用了较为复杂的数据结构,因此我觉得在hard中都算是难题,显著比N皇后困难。因此,第一遍学习本题,了解本题的思路和核心代码即可,不要求能够将本题完整地写出来。
  3. 本题的实现部分对代码进行了细致的拆分讲解,大致可以分为以下几个要点:

    • 用怎样的数据结构存储输入数据中出发机场和到达机场间的映射关系,且要求同一个出发机场的到达机场按照字典序排列,同时记录到达机场的使用次数
    • 如何对结果集和上面的数据结构进行初始化
    • 根据树形结构写出终止条件和单层搜索逻辑,并确定递归函数的返回值和传入的参数。本题递归函数的返回值是罕见的bool类型,而非void类型

    明确上述三个问题,即可理解本题的思路和实现细节,进而顺畅地写出本题的代码。

  4. 在初始化targets时,范围遍历可以直接采用auto类型的变量,避免需要手写复杂的变量类型。但在单层递归逻辑中遍历targets时,不能直接采用auto,因为for循环中涉及到了对遍历的值的修改操作,因此一定要使用引用,可以使用auto&

51. N皇后

  1. 本题的新奇之处在于:之前用回溯法解决过组合、切割、子集、排列问题,处理的对象都是一维数组,N皇后问题处理的对象却是二维数组

  2. 本题的原理实际上非常简单,理解本题的树形结构即可:

    51.N皇后

  3. 由上述树形结构可知,树的宽度是棋盘的列数,树的深度是棋盘的行数。据此,可以轻松地写出backtracking函数的终止条件和单层递归逻辑。

  4. 对棋盘合法性的判断其实是比较容易写错的。按照以下标准验证棋盘是否合法,两皇后:

    • 不能同行

    • 不能同列

    • 不能同斜线 (主对角线和副对角线)

    isValid函数中,不能同行的判断不需要写。因为在单层搜索的过程中,每一层递归,只会选for循环(也就是同一行)里的一个元素,且后序还会回溯释放掉这个元素。因此只需要写不能同列、不能同主对角线、不能同副对角线的判断。这三个判断的书写依据如下图所示。

    n_queen_revised_2.png

    当我们尝试在(row, col)处放置皇后时,只有绿色部分可能在之前被放置过皇后。原因是:递归到当前层,只有行数<row的格点上可能被放置过皇后。根据三条黄线,可以方便地写出三个判断。

  5. 本题的时间复杂度O(n!),空间复杂度O(n)。

    • 时间复杂度:由于回溯法的本质依然是暴搜,因此,在棋盘的第一行,有n种放置皇后的方式;第二行最多有n - 1种,依次类推,得到时间复杂度为O(n!)。
    • 空间复杂度即为树的深度,即为棋盘的行数,故空间复杂度为O(n)。

37. 解数独

  1. 和之前的递归题目不同,本题的递归是二维递归。一个for循环遍历棋盘的行,一个for循环遍历棋盘的列,一行一列确定下来之后,递归遍历这个位置放9个数字的可能性。
  2. 本题递归函数的函数返回值类型为bool类型。原因是本题只需要找到一个解,就立即返回。如果需要搜索整棵二叉树,找到所有的解,然后将结果记录在结果集中,那么递归函数的返回值类型为void
  3. 本题不需要写终止条件。因为在递归逻辑中,如果找到了满足条件的解,就会直接return true。如果某个空格中无论填入哪个数字都无法满足条件,就会直接return false
  4. 注意return truereturn false的位置。前者放在递归函数末尾,意思是若棋盘一直被填充直到被填满,则不会走if (board[i][j] == '.'),就return true。后者放在for (char k = '1'; k <= '9'; k ++ )的结束之处,意思是在空格处将9个数字都尝试了,无法填入,则说明该棋盘没有结果,return false
  5. 时间复杂度:O(9^m) , m是’.’的数目。空间复杂度:$O(n^2)$,原因是递归的深度是n^2(原因是第一层for循环代表树的宽度,后面两层for循环代表了树的深度。由于本题中数独的长宽固定为9,因此本题中的n = 9)。
  6. 回溯的题目到此结束,总体来说比较简单,有统一的模板,但每个题目又有一些需要注意的小细节。

链接

491.递增子序列
46.全排列
47.全排列 II

知识

491.递增子序列

46.全排列

47.全排列 II

初次尝试

491.递增子序列

本题的关键:递增、至少两个元素、去重。但本题存在一个很大的问题,就是去重的时候不能对原数组进行排序,否则会打乱原数组的顺序,以以下测试样例为例:

1
2
Input: nums = [4,4,3,2,1]
Output: [[4,4]]

一旦顺序被打乱,实际输出和理论输出就会不同,会多出很多递增的子序列。

本题和90.子集II非常像,但又很不一样,很容易掉坑里。直接看卡尔的讲解吧。

46.全排列

本题是排列问题,不需要startIndex,但我写不出代码,直接看卡尔的讲解。经过卡尔的提示用used数组避免重复取元素后,我独立写出了以下的代码:

1
2
3
4
5
6
7
8
9
10
11
12
13
14
15
16
17
18
19
20
21
22
23
24
25
26
27
28
29
30
31
32
33
34
class Solution {
public:
vector<int> path;
vector<vector<int>> res;

void backtracking(vector<int>& nums, vector<int>& used)
{
// 终止条件
if (path.size() == nums.size())
{
res.push_back(path);
return;
}

// 单层递归逻辑
for (int i = 0; i < nums.size(); i ++ )
{
if (used[i] == 1) continue;
// 处理节点
path.push_back(nums[i]);
used[i] = 1;
// 递归
backtracking(nums, used);
// 回溯
path.pop_back();
used[i] = 0;
}
}
vector<vector<int>> permute(vector<int>& nums) {
vector<int> used(nums.size(), 0);
backtracking(nums, used);
return res;
}
};

47.全排列 II

本题中的数组中会有重复元素,因此本题需要去重逻辑。本题相当于40.组合总和II去重逻辑和46.全排列的结合。我先尝试用set去重。我独立写出了以下的代码:

1
2
3
4
5
6
7
8
9
10
11
12
13
14
15
16
17
18
19
20
21
22
23
24
25
26
27
28
29
30
31
32
33
34
35
36
class Solution {
public:
vector<int> path;
vector<vector<int>> res;

void backtracking(vector<int>& nums, vector<int>& used)
{
// 终止条件
if (path.size() == nums.size())
{
res.push_back(path);
return;
}

unordered_set<int> uset;
for (int i = 0; i < nums.size(); i ++ )
{
if (uset.find(nums[i]) != uset.end() || used[i] == 1) continue;
// 处理节点
uset.insert(nums[i]);
used[i] = 1;
path.push_back(nums[i]);
// 递归
backtracking(nums, used);
// 回溯
used[i] = 0;
path.pop_back();
}
}

vector<vector<int>> permuteUnique(vector<int>& nums) {
vector<int> used(nums.size(), 0);
backtracking(nums, used);
return res;
}
};

再接着尝试写出used数组去重的代码。我独立写出了如下的代码:

1
2
3
4
5
6
7
8
9
10
11
12
13
14
15
16
17
18
19
20
21
22
23
24
25
26
27
28
29
30
31
32
33
34
35
class Solution {
public:
vector<int> path;
vector<vector<int>> res;

void backtracking(vector<int>& nums, vector<int>& used)
{
// 终止条件
if (path.size() == nums.size())
{
res.push_back(path);
return;
}

for (int i = 0; i < nums.size(); i ++ )
{
if (used[i] == 1 || i > 0 && nums[i] == nums[i - 1] && used[i - 1] == 0) continue;
// 处理节点
used[i] = 1;
path.push_back(nums[i]);
// 递归
backtracking(nums, used);
// 回溯
used[i] = 0;
path.pop_back();
}
}

vector<vector<int>> permuteUnique(vector<int>& nums) {
vector<int> used(nums.size(), 0);
sort(nums.begin(), nums.end());
backtracking(nums, used);
return res;
}
};

由于本题中nums[i]的数据范围在-10-10之间,所以可以不用set去重,而是用数组去重(将数据范围-10-10映射到数组下标范围0-20),这样效率更高,代码如下所示:

1
2
3
4
5
6
7
8
9
10
11
12
13
14
15
16
17
18
19
20
21
22
23
24
25
26
27
28
29
30
31
32
33
34
35
36
37
38
class Solution {
public:
vector<int> path;
vector<vector<int>> res;

void backtracking(vector<int>& nums, vector<int>& used)
{
// 终止条件
if (path.size() == nums.size())
{
res.push_back(path);
return;
}

// 数组去重
int hash[21] = {0};

for (int i = 0; i < nums.size(); i ++ )
{
if (used[i] == 1 || hash[nums[i] + 10]) continue;
// 处理节点
hash[nums[i] + 10] = 1;
used[i] = 1;
path.push_back(nums[i]);
// 递归
backtracking(nums, used);
// 回溯
used[i] = 0;
path.pop_back();
}
}

vector<vector<int>> permuteUnique(vector<int>& nums) {
vector<int> used(nums.size(), 0);
backtracking(nums, used);
return res;
}
};

实现

491.递增子序列

列出递增子序列,子序列元素数量大于等于2。有以下测试样例:

1
2
Input: [4, 7, 6, 7]
Output: [4, 7, 7], [4, 7], [4, 6], [4, 6, 7], [6, 7], [7, 7]

要求不能有重复的子序列,因此需要去重。本题和90.子集II,只不过要求元素有顺序,且元素个数大于等于2。实际上,本题的细节和90有很大区别本题的去重思路不可以沿用先排序再去重的做法,因为会改变原数组中元素的顺序,导致递增子序列的改变。例如对上述测试样例排序后,递增子序列会包括[4, 6, 7, 7],实际上原本的输出不包含[4, 6, 7, 7]

所有的回溯算法都是深搜,所有的深搜都可以说是递归。画本题的树形结构:
491. 递增子序列1

去重为树层去重。现在开始写代码:

1
2
3
4
5
6
7
8
9
10
11
12
13
14
15
16
17
18
19
20
21
22
23
24
25
26
27
vector<int> path; // 单个结果
vector<vector<int>> res; // 结果集

void backtracking(vector<int>& nums, int startIndex)
{
// 子集类问题可以不写终止条件,具体原因参见78/90
if (path.size() >= 2) res.push_back(path); // 子集中元素数量大于等于2

unordered_set<int> uset; // set去重

// 单层递归逻辑
for (int i = startIndex; i < nums.size(); i ++ )
{
// 剪枝条件1:所取元素小于子序列最后一个元素,此时要求子序列非空,否则path.back()会报错
// 剪枝条件2:用set做树层去重
if (!path.empty() && nums[i] < path.back() || uset.find(nums[i]) != uset.end()) continue;

// 处理节点
// 记录每一层取的数(for循环中除去递归部分外都是横向遍历的),每一层不能重复取相同的数
uset.insert(nums[i]);
path.push_back(nums[i]);
// 递归
backtracking(nums, i + 1);
// 回溯
path.pop_back();
}
}

为什么没有对uset做回溯操作?
原因:上述代码中,每进入一层递归,都会重新定义一个uset。因此uset就是确保同一层中没有取到相同的元素,在进入下一层递归时,uset会被刷新。因此uset并不会对树枝去重,只会对树层去重。而used数组需要做回溯,因为used数组记录的是元素是否在path中被使用过,因此path中加减元素都需要对used数组进行修改。

本题的去重方式也可以应用于40.组合总和II和90.子集II。本题也可以用数组取代set进行去重,用数组的效率会更高些。

本题的完整代码如下所示:

1
2
3
4
5
6
7
8
9
10
11
12
13
14
15
16
17
18
19
20
21
22
23
24
25
26
27
28
29
30
31
32
class Solution {
public:
vector<int> path;
vector<vector<int>> res;

void backtracking(vector<int>& nums, int startIndex)
{
// 收集结果
if (path.size() >= 2) res.push_back(path);
unordered_set<int> uset;

// 单层递归逻辑
for (int i = startIndex; i < nums.size(); i ++ )
{
// 剪枝条件1:所取元素小于子序列最后一个元素,此时要求子序列非空,否则path.back()会报错
// 剪枝条件2:用set做树层去重
// cpp中&&的优先级高于||,因此是先与后或,不需要给剪枝条件1加括号
if (!path.empty() && nums[i] < path.back() || uset.find(nums[i]) != uset.end()) continue;
// 处理节点
uset.insert(nums[i]);
path.push_back(nums[i]);
// 递归
backtracking(nums, i + 1);
// 回溯
path.pop_back();
}
}
vector<vector<int>> findSubsequences(vector<int>& nums) {
backtracking(nums, 0);
return res;
}
};

由于本题nums[i]的数据范围很小,因此可以用数组做去重,运行效率也更高。只需要将set替换为普通数组,然后做一个偏移(数值-100-100映射到数组下标0-200上)即可。代码如下所示:

1
2
3
4
5
6
7
8
9
10
11
12
13
14
15
16
17
18
19
20
21
22
23
24
25
class Solution {
public:
vector<int> path;
vector<vector<int>> res;

void backtracking(vector<int>& nums, int startIndex)
{
if (path.size() > 1) res.push_back(path);
int cnt[201] = {0};

for (int i = startIndex; i < nums.size(); i ++ )
{
if (!path.empty() && nums[i] < path.back() || cnt[nums[i] + 100] == 1) continue;
cnt[nums[i] + 100] = 1;
path.push_back(nums[i]);
backtracking(nums, i + 1);
path.pop_back();
}
}

vector<vector<int>> findSubsequences(vector<int>& nums) {
backtracking(nums, 0);
return res;
}
};

46.全排列

题目中明确说了给定的集合中没有重复元素,因此不用去重。

排列相对于组合的区别:[2, 1], [1, 2]是同一个组合,但是两个排列。排列是强调元素顺序的,组合不强调元素顺序。接下来画本题的树形结构。

46.全排列

排列问题中也需要用到used数组,用于标记哪些元素被使用过,因为在排列问题中同一个元素不能重复使用。组合问题中是用startIndex来避免取同一个元素和避免产生相同组合的情况。树的深度由nums的长度来控制。

used数组用来标记哪些元素被取过,取过的元素不能重复取,但所有没取过的元素都可以重复取,而不需要像组合问题那样用startIndex来控制只能取当前元素的下一个元素。具体的代码如下所示:

1
2
3
4
5
6
7
8
9
10
11
12
13
14
15
16
17
18
19
20
21
22
23
24
25
26
27
vector<int> path; // 放单个结果
vector<vector<int>> res; // 结果集

void backtracking(vector<int>& nums, vector<int>& used)
{
// 终止条件
if (path.size() == nums.size())
{
res.push_back(path); // 收获结果
return;
}

// 单层递归逻辑
// 排列问题不需要startIndex,只要不重复取同一个元素即可
for (int i = 0; i < nums.size(); i ++ )
{
if (used[i] == 1) continue; // 不重复取同一个元素
// 处理节点
used[i] = 1;
path.push_back(nums[i]);
// 递归
backtracking(nums, used);
// 回溯
used[i] = 0;
path.pop_back();
}
}

47.全排列 II

上一题给定的集合中没有重复元素,本题给定的集合中有重复元素。以[1, 1, 2]为例,如果依然用上一题的办法求解本题,结果集中会出现两个[1, 1, 2],因此本题需要做去重。如果对去重的思路不够了解,可以看40.组合总和II。回溯的所有题目中,去重的逻辑都是相同的。本题等于排列+去重。但排列问题中的去重会有些与之前不同的地方

画出本题的树形结构:
47.全排列II1

used数组做树层去重前,记得对nums数组进行排序。本题中的used数组有两个作用:

  • 避免同一个元素被重复使用
  • 做树层去重

接下来写具体的代码:

1
2
3
4
5
6
7
8
9
10
11
12
13
14
15
16
17
18
19
20
21
22
23
24
25
26
27
28
29
30
vector<int> path;
vector<vector<int>> res;

void backtracking(vector<int>& nums, vector<int>& used)
{
// 终止条件
if (path.size() == nums.size())
{
res.push_back(path);
return;
}

// 单层递归逻辑
for (int i = 0; i < nums.size(); i ++ )
{
// 树层去重
if (i > 0 && nums[i] == nums[i - 1] && used[i - 1] == 0) continue;
// 同一个元素不能被重复取,因此取过的数直接跳过
if (used[i] == 1) continue;

// 处理节点
used[i] = 1;
path.push_back(nums[i]);
// 递归
backtracking(nums, used);
// 回溯
used[i] = 0;
path.pop_back();
}
}

细节:

1
2
// 树层去重
if (i > 0 && nums[i] == nums[i - 1] && used[i - 1] == 0) continue;

可以通过

1
2
// 树枝去重
if (i > 0 && nums[i] == nums[i - 1] && used[i - 1] == 1) continue;

也可以通过。这意味着树层去重和树枝去重都可以解决本题。但树层去重的效率更高,树层去重会剪掉更多分支,而树枝去重要一直到最后一个树枝才会列出所有的结果。因此还是推荐树层去重的写法。以[1, 1, 1]为例,画出树层去重和树枝去重的树形结构:
47.全排列II2

47.全排列II3

很清晰的看到,树层上对前一位去重非常彻底,效率很高,树枝上对前一位去重虽然最后可以得到答案,但是做了很多无用搜索。

时间复杂度和空间复杂度分析:

  • 时间复杂度: 最差情况所有元素都是唯一的,时间复杂度为$O(n!\times n)$。 对于n个元素一共有n!中排列方案。而对于每一个答案,我们需要$O(n)$去复制最终放到res数组。
  • 空间复杂度: $O(n)$。空间复杂度即为回溯树的深度,其取决于nums数组中有多少个元素。

心得与备忘录

491.递增子序列

关键点:set去重->剪枝->数组去重取代set去重

  1. 本题和90.子集II乍一看非常相似,但细节上有很大不同,解决本题时不能有惯性思维。

  2. 之前去重的方法都是利用used数组,这意味着需要对nums数组进行排序。在本题中,如果对nums数组进行排序,就会打乱原数组中元素的顺序,导致递增子序列发生改变。因此,本题不能用used数组去重,而需要用set去重。因为用set去重不需要对原数组排序。

  3. 本题有两个剪枝条件:

    • 剪枝条件1:若所取元素小于子序列最后一个元素,则需要剪枝。此时要求子序列非空,否则path.back()会报错。剪枝条件1的原因是本题要求子序列是递增的。

    • 剪枝条件2:用set做树层去重

    两个剪枝条件用||相连。

  4. 为什么不需要对set进行回溯?

    每进入一层递归,都会重新定义一个set。因此set就是确保同一层中没有取到相同的元素。在进入下一层递归时,set会被刷新(重新定义)。因此set并不会对树枝去重,只会对树层去重。而used数组需要做回溯,因为used数组记录的是元素是否在path中被使用过,因此path中加减元素都需要对used数组进行相应的修改。

  5. 本题的去重方法也可以应用于40.组合总和II和90.子集II。

  6. 由于本题nums[i]的数据范围很小,因此可以用数组做去重,运行效率也更高。只需要将set替换为普通数组,然后做一个偏移(数值-100-100映射到数组下标0-200上)即可。

  7. 本题的时间和空间复杂度分别为$O(n\times2^n)$和$O(n)$。同90和78。

46.全排列

  1. 排列问题和组合问题的两大区别:
    • 每层都是从0开始搜索而不是startIndex
    • 需要used数组记录path里都放了哪些元素了
  2. 不需要startIndex的原因:[1, 2][2, 1]是同一个组合,但却是不同的排列,因此排列问题不能像组合问题那样从当前元素的下一个元素开始取,而是要取nums数组中所有当前没有取过的元素。
  3. 需要used数组的原因:used数组记录了此时path里都有哪些元素使用了,一个排列里一个元素只能使用一次。
  4. 终止条件为path.size() == nums.size()nums数组的大小限制了树的深度。
  5. 本题的时间复杂度为$O(n!)$,空间复杂度为$O(n)$。时间复杂度的原因是有$n$个元素的nums数组共有$n!$种排列。空间复杂度的原因是递归的深度(即树的深度)为$n$。

47.全排列 II

  1. 本题相当于40.组合总和II(树层去重)和46.全排列的结合。
  2. 本题的去重有三种写法:set去重、数组去重、used数组去重。三种写法我都在初次尝试中给出了。
  3. used数组去重前,一定要记得对nums数组进行排序。另外两种去重写法则不需要对nums数组进行排序。
  4. 由于本题是在叶子节点处收集结果,因此需要终止条件。
  5. 本题的时间复杂度为$O(n!\times n)$,空间复杂度为$O(n)$。具体原因参见实现部分。
  6. 本题用树层去重和树枝去重都可以,具体原因参见实现部分。但树层去重的效率远高于树枝去重,因此采用一贯以来的used数组树层去重写法即可,不要纠结树枝去重的原理和合理性。

34. 在排序数组中查找元素的第一个和最后一个位置

本题是整数二分的加强版。本题的要点为:

  1. 写两个函数,分别寻找target的左边界和右边界。本题的区间定义为左闭右闭。

  2. 寻找左边界,说明target在[left, mid]之间,因此在[left, mid]中更新左边界。寻找右边界,说明target在[mid, right]之间,因此在[mid, right]中更新右边界。

  3. 寻找左边界,就要在nums[mid] == target的时候更新right,然后将right赋给左边界。寻找右边界,就要在nums[mid] == target的时候更新left,然后将left赋给右边界。

  4. 实际上的左右边界是mid,而非rightleft,因此在主函数中需要将左边界+1,恢复为mid;将右边界-1,也恢复为mid。也可以直接让左右边界是mid,这样就不需要加1减1,参见我的第二种写法。

  5. target的三种情况:

    • target在数组范围的右边或者左边
    • target 在数组范围中,且数组中存在target
    • target 在数组范围中,且数组中不存在target
      1
      2
      3
      4
      5
      6
      7
      8
      9
      10
      11
      12
      13
      14
      15
      16
      17
      18
      19
      20
      21
      22
      23
      24
      25
      26
      27
      28
      29
      30
      31
      32
      33
      34
      35
      36
      37
      38
      39
      40
      41
      42
      43
      44
      45
      46
      47
      48
      49
      50
      51
      52
      53
      54
      55
      56
      57
      // 左闭右闭写法
      class Solution {
      public:
      // 寻找左边界
      // 说明target在[left, mid]之间
      int findLeftBorder(vector<int>& nums, int target)
      {
      int leftBorder = -2;
      int left = 0, right = nums.size() - 1;

      while (left <= right)
      {
      int mid = left + (right - left) / 2;
      // 在[left, mid]中更新左边界
      if (nums[mid] >= target)
      {
      right = mid - 1;
      leftBorder = right;
      }
      else left = mid + 1;
      }
      return leftBorder;
      }

      // 寻找右边界
      // 说明target在[mid, right]之间
      int findRightBorder(vector<int>& nums, int target)
      {
      int rightBorder = -2;
      int left = 0, right = nums.size() - 1;

      while (left <= right)
      {
      int mid = left + (right - left) / 2;
      if (nums[mid] > target) right = mid - 1;
      // 在[mid, right]中更新右边界
      else
      {
      left = mid + 1;
      rightBorder = left;
      }
      }
      return rightBorder;
      }

      vector<int> searchRange(vector<int>& nums, int target) {
      int leftBorder = findLeftBorder(nums, target);
      int rightBorder = findRightBorder(nums, target);

      // target在数组范围的右边或者左边
      if (leftBorder == -2 || rightBorder == -2) return {-1, -1};
      // target 在数组范围中,且数组中存在target
      if (rightBorder - leftBorder > 1) return {leftBorder + 1, rightBorder - 1};
      // target 在数组范围中,且数组中不存在target
      return {-1, -1};
      }
      };

我写出了以下的变式代码。在这个代码里,通过mid来更新左右边界。这样若找到了左右边界,则直接返回左右边界即可,不需要做加1减1的操作。

1
2
3
4
5
6
7
8
9
10
11
12
13
14
15
16
17
18
19
20
21
22
23
24
25
26
27
28
29
30
31
32
33
34
35
36
37
38
39
40
41
42
43
44
45
46
47
48
49
50
51
52
53
54
55
56
57
// 左闭右闭写法
class Solution {
public:
// 寻找左边界
// 说明target在[left, mid]之间
int findLeftBorder(vector<int>& nums, int target)
{
int leftBorder = -2;
int left = 0, right = nums.size() - 1;

while (left <= right)
{
int mid = left + (right - left) / 2;
// 在[left, mid]中更新左边界
if (nums[mid] >= target)
{
right = mid - 1;
leftBorder = mid;
}
else left = mid + 1;
}
return leftBorder;
}

// 寻找右边界
// 说明target在[mid, right]之间
int findRightBorder(vector<int>& nums, int target)
{
int rightBorder = -2;
int left = 0, right = nums.size() - 1;

while (left <= right)
{
int mid = left + (right - left) / 2;
if (nums[mid] > target) right = mid - 1;
// 在[mid, right]中更新右边界
else
{
left = mid + 1;
rightBorder = mid;
}
}
return rightBorder;
}

vector<int> searchRange(vector<int>& nums, int target) {
int leftBorder = findLeftBorder(nums, target);
int rightBorder = findRightBorder(nums, target);

// target在数组范围的右边或者左边
if (leftBorder == -2 || rightBorder == -2) return {-1, -1};
// target 在数组范围中,且数组中存在target
if (rightBorder - leftBorder >= 0) return {leftBorder, rightBorder};
// target 在数组范围中,且数组中不存在target
return {-1, -1};
}
};

278.第一个坏版本

我独立写出了以下代码:

1
2
3
4
5
6
7
8
9
10
11
12
13
14
15
16
17
// The API isBadVersion is defined for you.
// bool isBadVersion(int version);

class Solution {
public:
int firstBadVersion(int n) {
int left = 1, right = n;

while (left < right)
{
int mid = left + (right - left) / 2;
if (isBadVersion(mid) == 0) left = mid + 1;
else right = mid;
}
return left;
}
};

在本题中,尽管是左闭右闭的写法,但循环的条件应该为left < right,因为当left = right时,实际上就锁定了第一个坏版本,循环就应当结束。这种题目当出现超时,要着重检查是不是循环的条件不对。

和本题同样的题目:输入一个数组,比如[0, 0, 0, 1, 1, 1, 1],找到第一个为1的数的下标,代码如下所示:

1
2
3
4
5
6
7
8
9
10
11
12
13
14
15
16
17
18
19
20
21
22
23
#include <iostream>
#include <vector>
using namespace std;

int firstBadVersion(vector<int> arr)
{
int left = 0, right = arr.size() - 1;

while (left < right)
{
int mid = left + (right - left) / 2;
if (arr[mid] == 1) right = mid;
else left = mid + 1;
}
return left;
}

int main()
{
vector<int> arr = {0, 0, 0, 1, 1, 1, 1, 1};
cout << firstBadVersion(arr) << endl;
return 0;
}

27. 移除元素

本题直接采用(快慢)双指针解法即可。一遍过,但需要注意不要在for循环中重复定义指针j。本题的暴力做法甚至比双指针做法更复杂,也更容易写错。相向双指针做法暂时不用管。

977.有序数组的平方

暴力解法非常简单,也能通过测试。我先在纸上模拟了双指针的过程,然后独立写出了如下的双指针代码,时间和空间复杂度都是$O(n)$。

1
2
3
4
5
6
7
8
9
10
11
12
13
14
15
16
17
18
19
20
21
22
23
24
25
26
// 双指针经典题
class Solution {
public:
vector<int> sortedSquares(vector<int>& nums) {
int size = nums.size() - 1;
vector<int> res(nums.size(), 0);

for (int i = 0, j = size; i <= j; )
{
if (nums[i] * nums[i] <= nums[j] * nums[j])
{
res[size] = nums[j] * nums[j];
j -- ;
size -- ;
}
else
{
res[size] = nums[i] * nums[i];
i ++ ;
size -- ;
}
}

return res;
}
};

不要追求把代码写得过度简洁,而导致可能的问题,宁可把代码写长一些,也要让代码清楚地表达算法思想。

209.长度最小的子数组

一时想不起来具体怎么写了,只记得遍历整个数组的同时,有数划入窗口,该数被累加到和中,有数划出窗口,则该数被从和中减去。看了我自己的笔记后,我独立写出了以下的代码:

1
2
3
4
5
6
7
8
9
10
11
12
13
14
15
16
17
18
19
20
21
22
23
24
class Solution {
public:
int minSubArrayLen(int target, vector<int>& nums) {
int len = INT_MAX;
int s = 0; // 滑动窗口的和
int i = 0; // 起始位置

// j为终止位置
for (int j = 0; j < nums.size(); j ++ )
{
s += nums[j]; // 终止位置划入

while (s >= target)
{
int sub = j - i + 1;
if (sub < len) len = sub;
s -= nums[i]; // 起始位置从和中滑出
i ++ ; // 起始位置从滑动窗口中滑出
}
}
if (len == INT_MAX) return 0;
else return len;
}
};

需要注意:

  • i为起始位置,j为终止位置

  • 循环中,终止位置先划入。若和大于等于目标值,则先更新最小长度,再将起始位置划出。

  • 起始位置的值需要先从和中滑出,起始位置再从滑动窗口中滑出。顺序不可颠倒。

  • for循环中是while循环,而非if判断

  • 数组中的每个元素至多被滑入一次再滑出一次,因此时间复杂度是$O(2n)$,即$O(n)$。

59.螺旋矩阵II

我记得本题是个模拟题。但实在记不得怎么做了,看以前的笔记。复习完后,我写出了本题的代码:

1
2
3
4
5
6
7
8
9
10
11
12
13
14
15
16
17
18
19
20
21
22
23
24
25
26
27
28
class Solution {
public:
vector<vector<int>> generateMatrix(int n) {
vector<vector<int>> res(n, vector<int>(n, 0));

int i, j;
int startx = 0, starty = 0;
int offset = 1, cnt = 1;
int loop = n / 2;

while (loop -- )
{
for (j = starty; j < n - offset; j ++ )
res[startx][j] = cnt ++ ;
for (i = startx; i < n - offset; i ++ )
res[i][j] = cnt ++ ;
for (j = n - offset; j > starty; j -- )
res[i][j] = cnt ++ ;
for (i = n - offset; i > startx; i -- )
res[i][j] = cnt ++ ;
offset ++ ;
startx ++ ;
starty ++ ;
}
if (n % 2) res[n / 2][n / 2] = cnt;
return res;
}
};

需要注意:

  1. 画图理解(记住本图,就可以写出这道题的代码)

    Snipaste_2024-01-26_06-26-17.png

  2. 顺时针转圈,转多少圈可以填满整个二维数组?从(0, 0)的位置开始转圈,终止的位置为中心(n/2, n/2)。每转一圈横纵坐标均加1,因此一共转了n/2圈。

  3. 切记遵守循环不变量原则,所有边都是左闭右开的。所以是j < n - offset,且offset的初始值为1,因为右边界是开的。

  4. startx, starty, offset每转一圈都要加1。

  5. 定义二维数组的方式是将一位数组复制行数遍。

  6. 若n为奇数,则最后记得向二维数组的中心填入最后一个数。

189.旋转数组

首先我写出了可以正常运行但会超时的代码:

1
2
3
4
5
6
7
8
9
10
class Solution {
public:
void rotate(vector<int>& nums, int k) {
while (k -- )
{
reverse(nums.begin(), nums.end());
reverse(nums.begin() + 1, nums.end());
}
}
};

不超时的代码我写不出来,看卡尔的讲解。

本题的代码如下所示:

1
2
3
4
5
6
7
8
9
class Solution {
public:
void rotate(vector<int>& nums, int k) {
k = k % nums.size();
reverse(nums.begin(), nums.end());
reverse(nums.begin(), nums.begin() + k);
reverse(nums.begin() + k, nums.end());
}
};

本题其实原理不难,类似于旋转字符串的题目,总结如下:

  1. 首先反转整个数组,这样在不考虑顺序的情况下,就将两段数字放在了正确的位置上。
  2. 然后反转前k个数,将前k个数的顺序调整正确。
  3. 最后反转剩下的数,将剩下的数的顺序调整正确。
  4. 需要注意的是,若k > nums.size(),则右移k % nums.size()即可,因为右移nums.size()次相当于没有改变原数组。
  5. 不要对nums.end()进行加减操作,nums.end()不指向一个特定的元素(不要下意识地以为其指向最后一个元素后面的紧邻的位置),对其进行加减操作会导致未定义的随机行为。对nums.begin()进行操作就没有这个问题。因此反转的第三步不要写成reverse(nums.end() - k - 1, nums.end())

153.寻找旋转数组中的最小值

应该是先要将其恢复为有序的数组,然后返回有序数组的第一个元素即可。本题应该结合了二分法和旋转数组。我直接看题解吧。

虽然但是,本题用暴力做法也可以通过:

1
2
3
4
5
6
7
class Solution {
public:
int findMin(vector<int>& nums) {
sort(nums.begin(), nums.end());
return nums[0];
}
};

上述算法的时间复杂度是O(nlogn)。用二分法应该可以将时间复杂度优化为O(logn)。

本题的二分做法如下所示:

1
2
3
4
5
6
7
8
9
10
11
12
13
14
15
16
17
18
19
20
21
22
// 左闭右闭写法
class Solution {
public:
int findMin(vector<int>& nums) {
int left = 0, right = nums.size() - 1;

// 循环的终止条件:left = right。此时必然已经找到了数组中的最小值
while (left < right)
{
int mid = left + (right - left) / 2;
// 中间数字大于右边数字,比如[3,4,5,1,2],则左侧是有序上升的,最小值在右侧
if (nums[mid] > nums[right]) left = mid + 1;
// 中间数字小于右边数字,比如[6,7,1,2,3,4,5],则右侧是有序上升的,最小值在左侧
// 以[6, 7, 1, 2, 3, 4]为例,mid = 2, right = 2,即恰好在[left, mid]中取到最小值1
// 若right = mid - 1,则[left, right]会错过最小值
else if (nums[mid] < nums[right]) right = mid;
// 中间数字等于右边数字,则说明数组中只有一个元素,返回该元素即可
// 也可以直接写作else right = mid;
}
return nums[left];
}
};

本题延续了二分法的思路和代码形式,但细节和二分法略有不同,需要注意复习。

本题的思路:

  • 本题是左闭右闭写法,区间为[left, right]

  • 数组中的最小值要么在数组的右侧,要么在数组的左侧

  • 数组的最小值在数组右侧的情况:[3, 4, 5, 1, 2]。数组的最小值在数组左侧的情况:[6, 7, 1, 2, 3, 4, 5]
  • 若数组的最小值在数组的右侧,由于nums[mid] > nums[right],因此nums[mid]必然不可能是数组的最小值,因此left = mid + 1
  • 对于剩下的情况,即nums[mid] <= nums[right],数组的最小值在数组的左侧。由于可能存在nums[mid] = nums[right]的情况,因此nums[mid]可能是最小值,因此有right = mid
  • 记住始终是nums[mid]nums[right]比较。始终是中间和右边比!

本题的另一种思路(更推荐这种,因为这种思路可以推广到33)

  • nums[mid]nums[right]的关系可以分为大于,等于,小于三种情况
  • nums[mid] == nums[right]时,中间的数字等于最右边的数字,说明数组中只有一个元素,此时返回nums[left]即可,这种情况不需要考虑
  • nums[mid] > nums[right]时,例如[3, 4, 5, 1, 2]。数组的最小值在数组的右侧,nums[mid]必定不为最小值,因此有left = mid + 1
  • nums[mid] < nums[right]时,数组的最小值在数组的左侧。例如[6, 7, 1, 2, 3, 4, 5],也有可能是[6, 7, 1, 2, 3, 4],此时mid = 2, right = 2,即恰好在[left, mid]中取到最小值1。若right = mid - 1,则[left, right]会错过最小值,因此right = mid

154.寻找旋转数组中的最小值II

本题的思路:

  • 延续上题的思路,nums[mid]nums[right]的关系可以分为大于,等于,小于三种情况
  • nums[mid] > nums[right]nums[mid] < nums[right]的情况同上
  • 由于数组中可以有重复的元素,因此需要考虑nums[mid] == mums[right]的情况,例如[2,3,1,1,1]或者[4,1,2,3,3,3,3]。此时,重复值nums[right]可能是最小值,也可能最小值在重复值的左侧,因此right左移一位:right -= 1

本题的代码如下所示:

1
2
3
4
5
6
7
8
9
10
11
12
13
14
15
16
17
class Solution {
public:
int findMin(vector<int>& nums) {
int left = 0, right = nums.size() - 1;

while (left < right)
{
int mid = left + (right - left) / 2;
// [5, 6, 7, 1, 2]
if (nums[mid] > nums[right]) left = mid + 1;
// [7, 1, 2, 3, 4]
else if (nums[mid] < nums[right]) right = mid;
else right -= 1;
}
return nums[left];
}
};

33.搜索旋转排序数组

我对本题的初步思路:先找到最小的那个点,然后分别对两段单调递增的区间用二分法进行搜索。根据这个原理,我独立写出了以下的代码:

1
2
3
4
5
6
7
8
9
10
11
12
13
14
15
16
17
18
19
20
21
22
23
24
25
26
27
28
29
30
31
32
33
34
35
36
37
class Solution {
public:
// 二分查找有序数组中的数
// 左闭右闭写法
int searchTarget(vector<int>& nums, int left, int right, int target)
{
while (left <= right)
{
int mid = left + (right - left) / 2;
if (nums[mid] > target) right = mid - 1;
else if (nums[mid] < target) left = mid + 1;
else return mid;
}
return -1;
}

int search(vector<int>& nums, int target) {
// 先找到最小的数字, 下标为left
int left = 0, right = nums.size() - 1;

while (left < right)
{
int mid = left + (right - left) / 2;
// nums[mid] nums[right], [4, 5, 6, 7, 0, 1, 2]
if (nums[mid] > nums[right]) left = mid + 1;
else right = mid;
}

int leftIndex = searchTarget(nums, 0, left - 1, target);
int rightIndex = searchTarget(nums, left, nums.size() - 1, target);

if (leftIndex == -1 && rightIndex == -1) return -1;
else if (leftIndex == -1) return rightIndex;
else if (rightIndex == -1) return leftIndex;
return -1;
}
};

时间复杂度也是$O(logn)$。

更简单的写法如下:

1
2
3
4
5
6
7
8
9
10
11
12
13
14
15
16
17
18
19
20
21
22
23
24
25
26
27
28
29
30
31
32
33
34
35
36
// 左闭右闭写法
class Solution {
public:
int search(vector<int>& nums, int target) {
int left = 0, right = nums.size() - 1;

// 本质是查找target,因此是小于等于。若是查找最小值,则是小于
while (left <= right)
{
int mid = left + (right - left) / 2;

// 第一种情况,直接找到
if (nums[mid] == target) return mid;

// 由于第一种情况已经讨论过nums[mid] == target,因此第二三种情况不用再讨论
// 第二种情况,数组最小值在右侧, [left, mid]为有序
if (nums[mid] > nums[right])
{
// target在[left, mid](有序)内
if (target >= nums[left] && target < nums[mid]) right = mid - 1;
// target在无序区间内
else left = mid + 1;
}

// 第三种情况,数组最小值在左侧,[mid, right]为有序
else
{
// target在[mid, right]区间内
if (target > nums[mid] && target <= nums[right]) left = mid + 1;
// target在无序区间内
else right = mid - 1;
}
}
return -1;
}
};

分三种情况讨论:

  • 直接在mid处找到target
  • 数组最小值在右侧, [left, mid]为有序
    • target在[left, mid]有序区间内
    • target在剩余的无序区间内
  • 数组最小值在左侧,[mid, right]为有序
    • target在[mid, right]有序区间内
    • target在剩余的无序区间内

81.搜索旋转排序数组II

本题依然可以用老思路:找到最小值点,将区间划分为两个单调区间,然后分别在两个单调区间中进行搜索。本题实际上不可以这样做,因为本题中数组的元素可以重复,可能存在不止一个最小值点。

看了答案后,发现本题有两种写法,第一种:在循环内部跳过数组左侧和右侧的重复元素:

1
2
3
4
5
6
7
8
9
10
11
12
13
14
15
16
17
18
19
20
21
22
23
24
25
26
27
28
29
30
31
32
33
class Solution {
public:
bool search(vector<int>& nums, int target) {
int left = 0, right = nums.size() - 1;

while (left <= right) {
// 跳过数组左侧的重复元素
while (left < right && nums[left] == nums[left + 1]) left++;
// 跳过数组右侧的重复元素
while (left < right && nums[right] == nums[right - 1]) right--;

int mid = left + (right - left) / 2;
if (nums[mid] == target) return true;

// 判断有序部分
if (nums[mid] >= nums[left]) { // 左侧有序
if (target >= nums[left] && target < nums[mid]) {
right = mid - 1;
} else {
left = mid + 1;
}
} else { // 右侧有序
if (target > nums[mid] && target <= nums[right]) {
left = mid + 1;
} else {
right = mid - 1;
}
}
}
return false;
}
};

第二种,在循环外部直接删去数组尾部与数组头部重复的元素:

1
2
3
4
5
6
7
8
9
10
11
12
13
14
15
16
17
18
19
20
21
22
23
24
25
26
27
28
29
30
31
32
33
34
35
36
class Solution {
public:
bool search(vector<int>& nums, int target) {
// 移除重复的末尾元素以减少干扰
// 可以处理如下情况:[1, 0, 1, 1, 1], [1, 2, 2, 2, 2, 0, 1]
// nums.front() == nums.back()时,可能数组右边有序,也可能左边有序
// 也可写作nums[0] == nums[nums.size() - 1]
while (nums.size() > 1 && nums.front() == nums.back()) nums.pop_back();

int left = 0, right = nums.size() - 1;

while (left <= right)
{
int mid = left + (right - left) / 2;

if (nums[mid] == target) return true;

// [3, 4, 5, 1, 2]
if (nums[mid] > nums[right])
{
// 有序区间[left, mid]
if (target >= nums[left] && target < nums[mid]) right = mid - 1;
// 无序区间[mid, right]
else left = mid + 1;
}
else
{
// 有序区间[mid, right]
if (target > nums[mid] && target <= nums[right]) left = mid + 1;
// 无序区间[left, mid]
else right = mid - 1;
}
}
return false;
}
};

注意:需要先移除重复的末尾元素以减少干扰,再给leftright赋值。

建议采用第二种写法,因为第二种写法相当于在33.搜索旋转排序数组的基础上仅仅添加了移除重复的末尾元素的代码。这道题相当与上一题区别在于这道题包含了重复元素,其实影响到的是,当左端点和右端点相等时,无法判断mid在左半边有序数组还是右半边有序数组,所以只需要一直pop直到左端点和右端点不相等就可以了。

442. 数组中重复的数据

448. 找到所有数组中消失的数字

只有当数字的范围和数组的大小相等,或者有一定偏移关系时,才可以用原地哈希。本题的数字范围1-n,本题的数组中有n个元素,数组下标的范围是0-n-1。这种原地哈希算法适用于和正整数有关,且数字范围和数组长度有关的题目里,映射之后能利用映射关系(下标和值一一对应)来找到解。

对于本题,本质就是将原数组的下标为nums[i] - 1处放上nums[i],最终希望达到的效果是nums[nums[i] - 1] == nums[i]。本题的代码如下所示:

1
2
3
4
5
6
7
8
9
10
11
12
13
14
15
16
17
18
19
20
21
22
23
24
25
26
27
28
29
30
class Solution {
public:
vector<int> findDisappearedNumbers(vector<int>& nums) {
vector<int> res;

// 将nums[i]放到下标为nums[i] - 1的位置上
// 由于原来下标为nums[i] - 1的位置上可能有数,因此需要将该数暂存到nums[i]上
// 之后可以通过while循环将再将该数放到合适的位置上去
// 可以举例子来模拟,即可以弄清楚这个过程
for (int i = 0; i < nums.size(); i ++ )
{
while (nums[nums[i] - 1] != nums[i])
{
int idx = nums[i] - 1;
int tmp = nums[idx];
nums[idx] = nums[i];
nums[i] = tmp;
}
}

for (int i = 0; i < nums.size(); i ++ )
{
// 若nums[i]上的数字不为i + 1,则说明该数字缺失,将其插入结果集中
if (nums[i] != i + 1)
res.push_back(i + 1);
}

return res;
}
};

本题的精简注释版本如下所示:

1
2
3
4
5
6
7
8
9
10
11
12
13
14
15
16
17
18
19
20
21
22
23
24
class Solution {
public:
vector<int> findDisappearedNumbers(vector<int>& nums) {
vector<int> res;
int n = nums.size();

for (int i = 0; i < n; i ++ )
{
// 确保将nums[i]放到下标为nums[i] - 1的位置上
while (nums[nums[i] - 1] != nums[i])
{
int idx = nums[i] - 1; // 即将占用的元素的下标
int tmp = nums[idx]; // 暂存下标为idx处的元素,因为其即将被nums[i]占用
nums[idx] = nums[i]; // 将nums[i]放到下标为nums[i] - 1的位置上
nums[i] = tmp; // 将原来数组中下标为nums[i] - 1的数暂存到位置i
}
}

for (int i = 0; i < n; i ++ )
if (nums[i] != i + 1) res.push_back(i + 1);

return res;
}
};

while循环中的顺序:先写:

1
2
int idx = nums[i] - 1;
nums[idx] = nums[i];

确保nums[i]被放在了下标为nums[i] - 1处。

再将原本下标为idx处的元素缓存下来,暂存到下标i处:

1
2
int tmp = nums[idx];
nums[i] = tmp;

由此构成完整的代码:

1
2
3
4
int idx = nums[i] - 1;
int tmp = nums[idx];
nums[idx] = nums[i];
nums[i] = tmp;

442. 数组中重复的数据

本题依然可以用448的原地哈希法完成,唯一地不同在于,448是将i + 1插入res数组中,本题是将nums[i]插入res数组中,举一个实际的例子即可理解为什么是将nums[i]插入结果集中。

1
2
3
4
5
6
7
8
9
10
11
12
13
14
15
16
17
18
19
20
21
22
23
24
class Solution {
public:
vector<int> findDuplicates(vector<int>& nums) {
vector<int> res;
int n = nums.size();

for (int i = 0; i < n; i ++ )
{
while (nums[nums[i] - 1] != nums[i])
{
int idx = nums[i] - 1;
int tmp = nums[idx];
nums[idx] = nums[i];
nums[i] = tmp;
}
}

for (int i = 0; i < n; i ++ )
{
if (nums[i] != i + 1) res.push_back(nums[i]);
}
return res;
}
};

对原地哈希可进行总结:

  • 情景:数组的长度为n,数组中元素的范围为[1, n]

  • 若是找缺失的数字,则插入结果集的是索引下标+1;若是找出现了两遍的数字,则插入结果集的是元素的值nums[i]

  • 使用代码块:

    1
    2
    3
    4
    5
    6
    7
    8
    9
    10
    for (int i = 0; i < n; i ++ )
    {
    while (nums[nums[i] - 1] != nums[i])
    {
    int idx = nums[i] - 1;
    int tmp = nums[idx];
    nums[idx] = nums[i];
    nums[i] = tmp;
    }
    }

    对数组进行原地哈希后,数组中出现过的数字nums[i]会被重新放置在下标为nums[i] - 1的位置上。范围为[1, n]但数组中没出现过的数字nums[j],其本来应该放置在下标为nums[j] - 1处,但由于没有出现过,现在下标为nums[j] - 1处放置了原数组中的重复元素。这是因为循环的条件nums[nums[i] - 1] != nums[i],当未填满的位置填入了重复元素后,while循环也会终止。例如,对[4, 3, 2, 2, 3, 1]进行原地哈希,结果为[1, 2, 3, 4, 3, 2],原数组中出现过的1, 2, 3, 4被放置在下标为0, 1, 2, 3的位置上,原数组中没有出现过5, 6,因此下标为4,5处放置了原数组中重复的元素2, 3。

  • 原地哈希法的时间复杂度都为O(n),空间复杂度都为O(1)

  • 为什么是 O(n) 时间复杂度?

    每个元素在整个过程中最多被处理两次(一次是放置在正确位置,一次是在最终遍历中检查),因此总体时间复杂度是 O(2n)==O(n)。

41. 缺失的第一个正数

本题的思路和448、442相同,只不过while循环多了限制条件,同时返回值时需要考虑一种特殊情况。

1
2
3
4
5
6
7
8
9
10
11
12
13
14
15
16
17
18
19
20
21
22
23
24
25
26
27
28
29
30
class Solution {
public:
int firstMissingPositive(vector<int>& nums) {
int n = nums.size();

for (int i = 0; i < n; i ++ )
{
// 为避免nums[i] - 1超出索引的范围,需要对nums[i]的大小进行限制
// 0 <= nums[i] - 1 <= n - 1,因此1 <= nums[i] <= n
// 不需要对此范围之外的数进行操作,也无法用原地哈希法操作它们,因为它们会超出索引范围
while (nums[i] >= 1 && nums[i] <= n && nums[nums[i] - 1] != nums[i])
{
// 这四行代码可以简写为swap(nums[nums[i] - 1], nums[i]);
int idx = nums[i] - 1;
int tmp = nums[idx];
nums[idx] = nums[i];
nums[i] = tmp;
}
}

for (int i = 0; i < n; i ++ )
{
if (nums[i] != i + 1)
return i + 1;
}

// 特殊情况, nums = [1], 上面的循环不会返回结果,此时返回n + 1即可
return n + 1;
}
};

本题中,数的个数为n个,但数的范围不在[1, n]中。需要返回缺失的第一个正整数。虽然乍一看不完全符合上题总结的原地哈希法的使用条件,但加上限制条件的原地哈希法依然可以被应用于解决本题。

203.移除链表元素

本题不能这样写:

1
2
3
4
5
6
7
8
9
10
11
12
13
14
class Solution {
public:
ListNode* removeElements(ListNode* head, int val) {
ListNode* dummyHead = new ListNode(0);
dummyHead->next = head;

for (ListNode* cur = dummyHead; cur != NULL; cur = cur->next)
{
if (cur->next != NULL && cur->next->val == val)
cur->next = cur->next->next;
}
return dummyHead->next;
}
};

这样写会导致删除节点后,cur 指针向后移动到了 cur->next->next,从而可能跳过了紧接着的需要删除的节点。比如:

1
1 -> 2 -> 2 -> 3, target = 2

上述写法会导致第三个节点2不能被删除。

本题应当用while循环写,对一个节点,如果是目标节点,则将其删除,否则,向后移动一个节点,不能同时既删除节点又后移一位。本题正确的代码如下所示:

1
2
3
4
5
6
7
8
9
10
11
12
13
14
15
16
class Solution {
public:
ListNode* removeElements(ListNode* head, int val) {
ListNode* dummyHead = new ListNode(0);
dummyHead->next = head;

ListNode* cur = dummyHead;
while (cur->next != NULL)
{
// 如果既删又后移,则会漏掉节点
if (cur->next->val == val) cur->next = cur->next->next; // 要么删
else cur = cur->next; // 要么后移
}
return dummyHead->next;
}
};

本题的完整主函数:

1
2
3
4
5
6
7
8
9
10
11
12
13
14
15
16
17
18
19
20
21
22
23
24
25
26
27
28
29
30
31
32
33
34
35
36
37
38
39
40
41
#include <iostream>
using namespace std;

struct ListNode
{
int val;
ListNode* next;
ListNode(int x): val(x), next(NULL) {}
};

ListNode* remove(ListNode* head, int val)
{
ListNode* dummyHead = new ListNode(0);
dummyHead->next = head;

ListNode* cur = dummyHead;
while (cur->next != NULL)
{
if (cur->next->val == val) cur->next = cur->next->next;
else cur = cur->next;
}

return dummyHead->next;
}

int main()
{
// head = [1,2,6,3]
ListNode* node1 = new ListNode(1);
ListNode* node2 = new ListNode(2);
ListNode* node3 = new ListNode(6);
ListNode* node4 = new ListNode(3);
node1->next = node2;
node2->next = node3;
node3->next = node4;

ListNode* head = remove(node1, 3);
for (ListNode* cur = head; cur != NULL; cur = cur->next) cout << cur->val << ' ';
cout << endl;
return 0;
}

构造链表时,也可以采用函数写法:

1
2
3
4
5
6
7
8
9
10
11
12
13
14
15
16
17
18
19
20
21
22
23
24
25
26
27
28
29
30
31
32
33
34
35
36
37
38
39
40
41
42
43
44
45
46
47
48
49
50
51
52
53
#include <iostream>
using namespace std;

struct ListNode
{
int val;
ListNode* next;
ListNode(int x): val(x), next(NULL) {}
};

ListNode* appendNode(ListNode*& head, int val)
{
// 头为空,则将新节点作为头节点
if (head == NULL) head = new ListNode(val);
// 头不为空,则遍历到链表最后一个节点,将新节点添加到最后一个节点之后
else
{
ListNode* cur = head;
while (cur->next != NULL) cur = cur->next;
cur->next = new ListNode(val);
}
return head;
}

ListNode* remove(ListNode* head, int val)
{
ListNode* dummyHead = new ListNode(0);
dummyHead->next = head;

ListNode* cur = dummyHead;
while (cur->next != NULL)
{
if (cur->next->val == val) cur->next = cur->next->next;
else cur = cur->next;
}

return dummyHead->next;
}

int main()
{
// head = [1,2,6,3]
ListNode* node = NULL;
appendNode(node, 1);
appendNode(node, 2);
appendNode(node, 6);
appendNode(node, 3);

ListNode* head = remove(node, 3);
for (ListNode* cur = head; cur != NULL; cur = cur->next) cout << cur->val << ' ';
cout << endl;
return 0;
}

在定义链表时,特别要注意下面用来赋值的这句话:ListNode(int x): val(x), next(NULL) {}

707.设计链表

本题的细节很多,需要特别注意。

1
2
3
4
5
6
7
8
9
10
11
12
13
14
// get函数的复杂写法
int get(int index) {
if (index < 0 || index > _size - 1) return -1;

LinkedList* cur = _dummyHead;
index ++ ;
while (cur != NULL)
{
cur = cur->next;
index -- ;
if (index == 0) break;
}
return cur->val;
}

本题的完整代码如下所示:

1
2
3
4
5
6
7
8
9
10
11
12
13
14
15
16
17
18
19
20
21
22
23
24
25
26
27
28
29
30
31
32
33
34
35
36
37
38
39
40
41
42
43
44
45
46
47
48
49
50
51
52
53
54
55
56
57
58
59
class MyLinkedList {
public:
struct LinkedList
{
int val;
LinkedList* next;
LinkedList(int x): val(x), next(NULL) {}
};

MyLinkedList() {
_dummyHead = new LinkedList(0);
_size = 0;
}

int get(int index) {
if (index < 0 || index > _size - 1) return -1;

LinkedList* cur = _dummyHead->next;
while (index -- ) cur = cur->next;
return cur->val;
}

void addAtHead(int val) {
LinkedList* head = new LinkedList(val);
head->next = _dummyHead->next;
_dummyHead->next = head;
_size ++ ;
}

void addAtTail(int val) {
LinkedList* tail = new LinkedList(val);
LinkedList* cur = _dummyHead;
while (cur->next != NULL) cur = cur->next;
cur->next = tail;
_size ++ ;
}

void addAtIndex(int index, int val) {
if (index < 0 || index > _size) return;
LinkedList* newNode = new LinkedList(val);
LinkedList* cur = _dummyHead;
while (index -- ) cur = cur->next;
newNode->next = cur->next;
cur->next = newNode;
_size ++ ;
}

void deleteAtIndex(int index) {
if (index < 0 || index > _size - 1) return;
LinkedList* cur = _dummyHead;
while (index -- ) cur = cur->next;
cur->next = cur->next->next;
_size -- ;
}

private:
LinkedList* _dummyHead;
int _size;
};

注意事项:

  1. 带下划线的变量表示类中的变量,而非局部变量

  2. 记得在private中定义类中的变量

  3. 注意插入节点时先更新后面的边,再更新前面的边

  4. 别忘记_size ++ / _size —

  5. 注意对参数index进行判断

  6. while (index -- ) cur = cur->next的意思是,首先判断index是否大于0,是,则index = index - 1,然后执行cur = cur->next

206.反转链表

我记得有递归写法,迭代写法,先尝试实现迭代写法,其本质是双指针。记住下面的图,即可写出本题的双指针法的代码:
leetcode206.png

注意:pre从NULL开始,cur在NULL结束。

一个经典的错误:

1
2
3
4
5
6
7
8
9
10
11
12
13
14
15
16
class Solution {
public:
ListNode* reverseList(ListNode* head) {
ListNode* pre = NULL;
ListNode* cur = head;

while (cur->next)
{
ListNode* tmp = cur->next;
cur->next = pre;
pre = cur;
cur = tmp;
}
return cur;
}
};

这样写的结果是导致未将列表的最后一个节点(即反转后的头节点)的 next 指针正确设置。

本题的递归写法其实更加好写,但其空间复杂度为O(n),高于双指针写法:

1
2
3
4
5
6
7
8
9
10
11
12
class Solution {
public:
ListNode* reverseList(ListNode* head) {
// 终止条件
if (head == NULL || head->next == NULL) return head;

ListNode* last = reverseList(head->next);
head->next->next = head;
head->next = NULL;
return last;
}
};

24. 两两交换链表中的节点

首先尝试用双指针做法解决本题。直接看答案,记住本题的方法。其实不需要双指针,本题是一道单纯的模拟题,但要搞清楚循环终止条件。看过博客后,我写出了以下的代码:

1
2
3
4
5
6
7
8
9
10
11
12
13
14
15
16
17
18
19
20
21
22
23
24
25
26
27
class Solution {
public:
ListNode* swapPairs(ListNode* head) {
ListNode* dummyHead = new ListNode(0);
dummyHead->next = head;
ListNode* cur = dummyHead;

// 终止条件:分别对应有偶数个节点和有奇数个节点
while (cur->next && cur->next->next)
{
// 存1
ListNode* tmp = cur->next;
// 存3
ListNode* tmp1 = cur->next->next->next;
// d->2
cur->next = cur->next->next;
// 2->1
cur->next->next = tmp;
// 1->3
tmp->next = tmp1;

// 后移两位
cur = cur->next->next;
}
return dummyHead->next;
}
};

19.删除链表的倒数第N个节点

本题的笨办法:

1
2
3
4
5
6
7
8
9
10
11
12
13
14
15
16
17
18
19
20
21
22
23
24
25
26
class Solution {
public:
ListNode* removeNthFromEnd(ListNode* head, int n) {
ListNode* dummyHead = new ListNode(0);
dummyHead->next = head;
ListNode* cur = dummyHead;

int num = -1;
// 计算节点数目
while (cur)
{
cur = cur->next;
num ++ ;
}

// 倒数第n个节点是正数第num - n个节点
cur = dummyHead;
while (num > n) // 不可以写成(num - n) --
{
cur = cur->next;
num -- ;
}
cur->next = cur->next->next;
return dummyHead->next;
}
};

看博客,复习巧妙解法。本题的巧妙解法是快慢双指针。快指针先移动n位,然后快慢指针同时移动,直到快指针移动到链表的最后一个节点。此时,慢指针就指向了需要删除的节点。据此,我写出了本题的代码:

1
2
3
4
5
6
7
8
9
10
11
12
13
14
15
16
17
18
19
class Solution {
public:
ListNode* removeNthFromEnd(ListNode* head, int n) {
ListNode* dummyHead = new ListNode(0);
dummyHead->next = head;

ListNode* fast = dummyHead;
ListNode* slow = dummyHead;
// && fast可加可不加,因为本题有限制n<=链表长度,若无此限制,则必须加,否则会出现空指针异常
while (n -- && fast) fast = fast->next;
while (fast->next)
{
fast = fast->next;
slow = slow->next;
}
slow->next = slow->next->next;
return dummyHead->next;
}
};

也可以让快指针先移动n + 1步,然后快慢指针同时移动,直到快指针移动到链表的NULL节点。

160.相交链表

本题拿到我没什么思路,直接看以前的博客。本题的思路:首先计算两个链表的长度,将较长的链表作为链表a,较短的链表作为链表b。然后a链表从sizea - sizeb处开始, b链表从0处开始遍历,直到找到二者的交汇点。本质上体现的是一种末尾对齐的思想。示意图和代码如下所示:

面试题02.07.链表相交_2

1
2
3
4
5
6
7
8
9
10
11
12
13
14
15
16
17
18
19
20
21
22
23
24
25
26
27
28
29
30
31
32
33
34
35
36
37
38
39
40
41
42
43
44
45
class Solution {
public:
ListNode *getIntersectionNode(ListNode *headA, ListNode *headB) {
ListNode* cura = headA, *curb = headB;
int sizea = 0, sizeb = 0;

// 计算a的长度
while (cura)
{
cura = cura->next;
sizea ++ ;
}

// 计算b的长度
while (curb)
{
curb = curb->next;
sizeb ++ ;
}

// 让a为较长的链表, b为较短的链表
if (sizea < sizeb)
{
swap(sizea, sizeb);
swap(headA, headB);
swap(cura, curb);
}

// a链表从sizea - sizeb处开始, b链表从0处开始
cura = headA, curb = headB;
int delta = sizea - sizeb;
while (delta -- ) cura = cura->next;

while (curb)
{
if (cura == curb) return cura;
else
{
cura = cura->next;
curb = curb->next;
}
}
return NULL;
}
};

时间复杂度O(n + m),空间复杂度O(1)。

142.环形链表II

我记得本题是用快慢指针解决的,快指针一次走两格,慢指针一次走一格,二者必然会在节点处相遇。我还记得公式怎么推导,但具体的思路记不清楚了,看博客。看完博客后,我写出了如下的代码:

1
2
3
4
5
6
7
8
9
10
11
12
13
14
15
16
17
18
19
20
21
22
23
24
25
26
class Solution {
public:
ListNode *detectCycle(ListNode *head) {
ListNode* fast = head, * slow = head;

// fast != NULL保证fast->next不报空指针异常
// fast->next != NULL保证fast->next->next不报空指针异常
while (fast && fast->next)
{
fast = fast->next->next;
slow = slow->next;

if (fast == slow)
{
ListNode* node1 = head, * node2 = fast;
while (node1 != node2)
{
node1 = node1->next;
node2 = node2->next;
}
return node1;
}
}
return NULL;
}
};

本题的思路:快慢指针必然会在环中的某处相交,且慢指针在进入环的第一圈中就会和快指针相交。记下交点,让一个指针从起点开始走,另一个指针从交点开始走,二者相交的位置就是环的入口。详细的数学推导和细节见博客。

时间复杂度O(n),空间复杂度O(1)。

242.有效的字母异位词

本题简单,用数组做哈希,用数组统计一个字符串中各个字母出现的次数,然后遍历另一个字符串,在数组中做减减操作,最后判断数组中的所有元素是否都为0。我独立写出了本题的代码:

1
2
3
4
5
6
7
8
9
10
11
12
13
14
15
16
17
18
19
20
21
22
class Solution {
public:
bool isAnagram(string s, string t) {
if (s.size() != t.size()) return false;

vector<int> hash(26, 0);

for (int i = 0; i < s.size(); i ++ )
{
int tmp1 = s[i] - 'a';
hash[tmp1] ++ ;
int tmp2 = t[i] - 'a';
hash[tmp2] -- ;
}

for (int i = 0; i < 26; i ++ )
{
if (hash[i]) return false;
}
return true;
}
};

需要注意,数组的长度为26,而非s.size(),因为s和t中只含有26个英文字母。可以不用vector,用int类型的数组即可。

本题更简洁的版本的代码如下所示:

1
2
3
4
5
6
7
8
9
10
11
12
13
14
15
16
17
18
19
class Solution {
public:
bool isAnagram(string s, string t) {
if (s.size() != t.size()) return false;

int hash[26] = {0};

for (int i = 0; i < s.size(); i ++ )
{
hash[s[i] - 'a'] ++ ;
hash[t[i] - 'a'] -- ;
}

for (int i = 0; i < 26; i ++ )
if (hash[i]) return false;

return true;
}
};

349. 两个数组的交集

由于本题数据范围的限制,可以用数组做哈希,也可以用unordered_set做哈希。我首先写出了数组做哈希的写法(数组索引的范围与元素取值的范围相同),数组做哈希非常快:

数组哈希,数组去重

1
2
3
4
5
6
7
8
9
10
11
12
13
14
15
16
17
18
19
20
class Solution {
public:
vector<int> intersection(vector<int>& nums1, vector<int>& nums2) {
int hash1[1010] = {0};
int hash2[1010] = {0};
vector<int> res;

for (int i = 0; i < nums1.size(); i ++ )
hash1[nums1[i]] ++ ;

for (int i = 0; i < nums2.size(); i ++ )
hash2[nums2[i]] ++ ;

for (int i = 0; i < 1010; i ++ )
{
if (hash1[i] && hash2[i]) res.push_back(i);
}
return res;
}
};

尝试用unordered_set做本题。我不记得怎么用unordered_set做了,也忘记了unordered_set的基本做法,复习博客。

数组哈希,set去重

可以将数组和set结合,这样只需要一个数组即可完成本题:

1
2
3
4
5
6
7
8
9
10
11
12
13
14
15
class Solution {
public:
vector<int> intersection(vector<int>& nums1, vector<int>& nums2) {
unordered_set<int> res; // 用于结果集去重
int hash[1010] = {0};

for (int i = 0; i < nums1.size(); i ++ )
hash[nums1[i]] ++ ;

for (int i = 0; i < nums2.size(); i ++ )
if (hash[nums2[i]]) res.insert(nums2[i]);

return vector<int>(res.begin(), res.end());
}
};

这里的set只是起到了去重的功能,没有起到哈希的功能,哈希的任务还是由数组承担了。注意如何将set转换为vector输出,直接vector<int> (res.begin(), res.end())

set哈希,set去重

也可以完全用set做本题,set既用来做哈希,又用来去重,代码如下所示:

1
2
3
4
5
6
7
8
9
10
11
12
13
14
// 完全用set做本题
class Solution {
public:
vector<int> intersection(vector<int>& nums1, vector<int>& nums2) {
unordered_set<int> res;

unordered_set<int> s1(nums1.begin(), nums1.end());

for (int i = 0; i < nums2.size(); i ++ )
if (s1.find(nums2[i]) != s1.end()) res.insert(nums2[i]);

return vector<int> (res.begin(), res.end());
}
};

202. 快乐数

我记得本题有个巧妙的做法。本题使用的数据结构应该是set。我直接看博客复习本题的写法。我错误的根本原因还是对本题的算法思路理解不清晰。在明确了思路后,我写下了如下的代码:

1
2
3
4
5
6
7
8
9
10
11
12
13
14
15
16
17
18
19
20
21
22
23
class Solution {
public:
bool isHappy(int n) {
unordered_set<int> s;

while (1)
{
int sum = 0; // 用于存储各位数字的平方和

while (n)
{
int digit = n % 10;
sum += digit * digit;
n = n / 10;
}

if (sum == 1) return true;
if (s.find(sum) != s.end()) return false;
n = sum;
s.insert(sum);
}
}
};

本题的思路其实很简单,关键在于对平方和的计算和分类讨论(分为三类)开一个死循环,计算n的各位数字的平方和。若平方和为1,则是快乐数。若平方和在set中出现过,则说明进入了死循环,不是快乐数。否则,将平方和加入到set中,将sum赋给n,进入下一重循环

时间复杂度和空间复杂度都是O(logn),详情参见博客。

1. 两数之和

本题要用map解决。用map的key存储索引,map的value存储nums中的值。首先将数组中的值依次存入map中,然后再在map中搜索target - nums[i],若找到,则返回一对索引。本题思路我是清楚的,但由于忘了map的一些写法,因此复习博客。

实际上,我对本题的理解还是不够深刻。应该是用map的key存储数组中的值,map的value存储数组中的元素的下标,因为我们的目的是快速查找值是否出现过,被快速查找的对象应该被作为key。

先查再插

看完博客后,我写出了以下的代码:

1
2
3
4
5
6
7
8
9
10
11
12
13
14
15
16
17
18
class Solution {
public:
vector<int> twoSum(vector<int>& nums, int target) {
unordered_map<int, int> m;

for (int i = 0; i < nums.size(); i ++ )
{
int t = target - nums[i];
if (m.find(t) != m.end())
{
auto it = m.find(t);
return {i, it->second};
}
m.insert({nums[i], i});
}
return {};
}
};

本题的思路为:先查后插。先查现有的map中有无target - nums[i],有,则将其索引和i一起加入结果集。无,则将遍历到的元素继续插入map中。这样天然的可以防止同一个元素被取出两次

记住map的一些用法:

  • m.insert({nums[i], i})
  • m.find(key) != m.end()
  • auto it = m.find(t); int value = it->second;

插完再查

本题更复杂版本的代码,由于没有先查后插,导致要对找到的索引进行判断,其不能等于当前遍历到的索引,否则会导致同一个数字被使用了两次:

1
2
3
4
5
6
7
8
9
10
11
12
13
14
15
16
17
class Solution {
public:
vector<int> twoSum(vector<int>& nums, int target) {
unordered_map<int, int> m;

for (int i = 0; i < nums.size(); i ++ )
m.insert({nums[i], i});

for (int i = 0; i < nums.size(); i ++ )
{
int t = target - nums[i];
auto it = m.find(t);
if (it != m.end() && it->second != i) return {i, it->second};
}
return {};
}
};

压缩字符串(面试真题)

aaaabb压缩为a4b2,将abcde保持原样不动。我独立写出了以下的代码,可以通过所有的测试样例:

1
2
3
4
5
6
7
8
9
10
11
12
13
14
15
16
17
18
19
20
21
22
23
24
25
26
27
28
29
30
31
32
33
34
35
36
37
38
39
40
#include <iostream>

using namespace std;

string compress(string s)
{
if (s.size() == 1) return s;

string res;
char tmp = s[0];
int size = 1;

for (int i = 1; i < s.size(); i ++ )
{
res += tmp;
while (i < s.size() && s[i] == s[i - 1])
{
i ++ ;
size ++ ;
}

if (size > 1) res += to_string(size); // 也可以写成res += '0' + size;
if (i < s.size()) tmp = s[i];
size = 1;
}

// 处理最后一个字符
if (s[s.size() - 1] != s[s.size() - 2]) res += s[s.size() - 1];

return res;
}

int main()
{
// 将aaabb转换为a3b2输出
// 将abcde原样输出
string s = "aaa";
string res = compress(s);
cout << res << endl;
}

其实没有必要在for循环中嵌套while循环,直接用一个for循环就可以搞定。以下的写法为推荐写法:

1
2
3
4
5
6
7
8
9
10
11
12
13
14
15
16
17
18
19
20
21
22
23
24
25
26
27
28
29
30
31
32
33
34
35
36
37
38
39
40
41
42
43
#include <iostream>
#include <string>

using namespace std;

// aaabb->a3b2
string compress(string s)
{
if (s.size() == 0 || s.size() == 1) return s;

string res;
char tmp = s[0];
int size = 1;

for (int i = 1; i < s.size(); i ++ )
{
// 出现相同字母
if (s[i] == s[i - 1]) size ++ ;
// 出现不同字母
else
{
// 将上一个字符和其出现次数(>1)插入res中
res += tmp;
if (size > 1) res += to_string(size);
// 恢复现场
tmp = s[i];
size = 1;
}
}

// 处理字符串的最后一位
res += tmp;
if (size > 1) res += to_string(size);

return res;
}

int main()
{
string s = "aaaanbv";
string res = compress(s);
cout << res << endl;
}

本题的关键在于分两种情况讨论:出现相同的字母/出现不同的字母,最后记得处理字符串的最后一位

通过本题,记住常用操作——将数字转换为字符:to_string(size)

可以写出上述操作的逆过程的代码:

1
2
3
4
5
6
7
8
9
10
11
12
13
14
15
16
17
18
19
20
21
22
23
24
25
26
27
28
29
30
31
32
33
34
35
36
37
38
39
40
41
42
43
44
#include <iostream>
#include <string>

using namespace std;

bool isdigit(char s)
{
if (s >= '0' && s <= '9') return true;
return false;
}

string decompress(string s)
{
string res;

// s的第一个元素必为字母,从第二个元素开始可能为数字
// 一对对处理,先处理字母,再处理数字(可能有,也可能没有)
for (int i = 0; i < s.size(); i ++ )
{
// 处理字母
char tmp = s[i];

// 处理数字,计算count
int count = 0;
while (i + 1 < s.size() && isdigit(s[i + 1]))
{
count = count * 10 + s[i + 1] - '0';
i ++ ;
}

// 字母加入结果集
if (count == 0) res += tmp;
// 若有数字,则将字母重复数字遍
else while (count -- ) res += tmp; // 也可调用函数res.append(count, tmp);
}
return res;
}

int main()
{
string s = "a56b12";
string res = decompress(s);
cout << res << endl;
}

本题的关键在于字母和数字成对出现(当然数字可能没有),成对地处理字母和数字,将它们成对地放入res中。

454.四数相加II

本题用哈希做的时间复杂度应该为O(n^2)。先枚举nums1和nums2中所有元素之和的组合,然后再在nums3和nums4中查找所有元素之和为-nums1[i] - nums2[j]的情况。由于涉及到索引,所以要用map,map的key存数值,map的value存索引。value似乎要存一组索引,比如(i, j),我忘记怎么写了,看下博客。

实际上,应该是用map的key存储和,map的value存储出现这个和的次数。据此,我写出了以下的代码:

1
2
3
4
5
6
7
8
9
10
11
12
13
14
15
16
17
18
19
20
21
class Solution {
public:
int fourSumCount(vector<int>& nums1, vector<int>& nums2, vector<int>& nums3, vector<int>& nums4) {
unordered_map<int, int> m;

for (int i = 0; i < nums1.size(); i ++ )
for (int j = 0; j < nums2.size(); j ++ )
m[nums1[i] + nums2[j]] ++ ;

int count = 0;
for (int i = 0; i < nums3.size(); i ++ )
{
for (int j = 0; j < nums4.size(); j ++ )
{
if (m.find(-nums3[i] - nums4[j]) != m.end())
count += m.find(-nums3[i] - nums4[j])->second;
}
}
return count;
}
};

更简洁的写法:

1
2
3
4
5
6
7
8
9
10
11
12
13
14
15
16
17
18
class Solution {
public:
int fourSumCount(vector<int>& nums1, vector<int>& nums2, vector<int>& nums3, vector<int>& nums4) {
unordered_map<int, int> m;

for (int num1: nums1)
for (int num2: nums2)
m[num1 + num2] ++ ;

int count = 0;
for (int num3: nums3)
for (int num4: nums4)
if (m.find(-num3 - num4) != m.end())
count += m[-num3 - num4];

return count;
}
};

注意:

  • 用map的key存储和,map的value存储出现这个和的次数
  • map的key不可重复,map的value可以重复。本题中的map起到一个将相同的和归拢,并用value统计其出现次数的作用
  • cpp中的map中的value是支持++操作的,且value可以通过key直接索引到,就像普通的数组那样
  • 时间和空间复杂度均为$O(n^2)$,空间复杂度为$O(n^2)$是两数组的数字各不相同,产生了$n^2$种组合。

383. 赎金信

本题用数组做哈希就可以,因为对象就是26个小写英文字母。据此,我写出了以下的代码:

1
2
3
4
5
6
7
8
9
10
11
12
13
14
15
16
class Solution {
public:
bool canConstruct(string ransomNote, string magazine) {
int cnt[26] = {0};

for (int i = 0; i < magazine.size(); i ++ )
cnt[magazine[i] - 'a'] ++ ;

for (int i = 0; i < ransomNote.size(); i ++ )
cnt[ransomNote[i] - 'a'] -- ;

for (int num: cnt)
if (num < 0) return false;
return true;
}
};

终极优化版本:

1
2
3
4
5
6
7
8
9
10
11
12
13
14
15
16
17
18
19
class Solution {
public:
bool canConstruct(string ransomNote, string magazine) {
int cnt[26] = {0};

// Each letter in magazine can only be used once in ransomNote
if (ransomNote.size() > magazine.size()) return false;

for (char m: magazine)
cnt[m - 'a'] ++ ;

for (char r: ransomNote)
{
cnt[r - 'a'] -- ;
if (cnt[r - 'a'] < 0) return false;
}
return true;
}
};

链接

93.复原IP地址
78.子集
90.子集II

知识

93.复原IP地址

  1. cpp中的string是有pop_back方法的,用于弹出字符串中的最后一个元素。

  2. 字符串中在i的后面插入一个逗点

    1
    s.insert(s.begin() + i + 1 , '.');  
  3. 删除特定位置处的逗点

    1
    s.erase(s.begin() + i + 1);       

初次尝试

93.复原IP地址

我尝试按照131.分割回文串的思路做本题,也写出了相应的代码,但运行结果和答案相差很大,而且代码非常复杂。我来看看卡尔的解法,看看如何写出正确而简单地处理这种字符串类型的回溯题的代码。

78.子集

据卡尔说,子集问题,就是收集树形结构中,每一个节点的结果。 整体代码其实和回溯模板都是差不多的。 对于本题的树形结构,我有一个想法:以1, 2, 3为例,首先选中1前面的空位,则要收集空和123。然后选中1,则要收集1和23。然后选中2,则要收集2和13。然后选中3,则要收集3和12。共有8个子集。但本题的代码我写不出来,直接看卡尔的视频讲解。

90.子集II

本题是40.组合总和II再加上78.子集。利用40题的去重办法(树层去重,用used数组,即if (i > 0 && nums[i] == nums[i - 1] && used[i - 1] == 0)),利用78题的子集问题的解法(主要是在所有节点而不仅仅是叶子节点上收集答案)。据此,我独立写出了本题的代码:

1
2
3
4
5
6
7
8
9
10
11
12
13
14
15
16
17
18
19
20
21
22
23
24
25
26
27
28
29
30
31
32
33
34
class Solution {
public:
vector<int> path;
vector<vector<int>> res;

void backtracking(vector<int>& nums, int startIndex, vector<int>& used)
{
res.push_back(path);

// 终止条件
if (startIndex >= nums.size()) return;

// 单层递归逻辑
for (int i = startIndex; i < nums.size(); i ++ )
{
// 树层去重
if (i > 0 && nums[i] == nums[i - 1] && used[i - 1] == 0) continue;
// 处理节点
path.push_back(nums[i]);
used[i] = 1;
// 递归
backtracking(nums, i + 1, used);
// 回溯
path.pop_back();
used[i] = 0;
}
}
vector<vector<int>> subsetsWithDup(vector<int>& nums) {
vector<int> used(nums.size(), 0);
sort(nums.begin(), nums.end()); // 一定记得要对nums排序
backtracking(nums, 0, used);
return res;
}
};

实现

93.复原IP地址

合法的IP地址:

  • 每个整数位于 0 到 255 之间组成
  • 数字前不能有0,即不能有先导0
  • 不能出现非0-9的字符

因此本题不仅需要对字符串进行切割,还要对子串进行合法性的判断。本题在回溯算法的切割问题中是一道较有难度的题。做了131.分割回文串后,再来做本题,会易于理解一些。使用回溯算法暴力枚举分割的每一种情况。画树形结构图。

20201123203735933.png

画出了上述树形图后,写代码还会有疑惑:

  • 如何模拟切割线

  • 怎么固定切割线,再在剩余的字符串中进行切割

  • 切割出的子串如何表达

接下来写具体的代码:

1
2
3
4
5
6
7
8
9
10
11
12
13
14
15
16
17
18
19
20
21
22
23
24
25
26
27
28
29
30
31
32
33
34
35
36
37
38
39
vector<string> res;

// startIndex表示下一层递归切割的位置,即切割线
// 一个IP需要有三个逗点进行分割,pointSum用于统计逗点的数量, pointSum决定了树的深度
void backtracking(string& s, int startIndex, int pointSum)
{
// 终止条件
// 每次加逗点,都是对其前面的子串做合法性判断
// 此时还需要专门对最后一个子串做合法性判断,最后一个子串合法了,才能将整个IP地址加入结果集中
// isvalid用于判断一个子串是否合法:数字前不能有0,数字在0-255之间,子串中不能有非法字符
if (pointSum == 3) {
if (isvalid(s, startIndex, s.size() - 1)) // 左闭右闭
{
res.push_back(s); // s会在后面被修改,具体来说是被切割并加上逗点
return;
}
}

// 单层搜索逻辑
for (int i = startIndex; i < s.size(); i ++ )
{
// 切割后,对产生的第一个子串的合法性进行判断。子串的区间:[startindex, i]
if (isvalid(s, startIndex, i))
{
// 进入下一层递归前,需要在子串后面加上逗点
// 将.插入到s.begin() + i的后面,故传入的参数是s.begin() + i + 1
s.insert(s.begin() + i + 1, '.');
pointSum += 1; // 逗点数量+1

// 递归
// 由于给字符串s额外加了一个逗点,因此是i + 2(本来是i + 1)
backtracking(s, i + 2, pointSum);

// 回溯
s.erase(s.begin() + i + 1); // 删除s中插入的逗点
pointSum -= 1;
}
}
}

上述代码的精妙之处在于,就是在原来的字符串s的基础上进行修改,修改就是在合适的位置上添加逗点。本题的关键在于如何模拟切割的过程。切割的过程本质上和组合问题的取数的过程是一样的。另外还需要对子串进行合法性的判断,子串是[startIndex, i]。子串合法后再加上逗点。

根据上述核心代码,我独立写出了解决本题的完整的代码:

1
2
3
4
5
6
7
8
9
10
11
12
13
14
15
16
17
18
19
20
21
22
23
24
25
26
27
28
29
30
31
32
33
34
35
36
37
38
39
40
41
42
43
44
45
46
47
48
49
50
51
52
53
54
55
56
57
58
59
60
61
62
63
64
65
66
67
68
69
70
71
72
// 直接在s的基础上添加逗号,得到可能的IP地址
class Solution {
public:
vector<string> res;

// 判断区间[start, end]的合法性
// 三个要求:1. 没有非数字的字符
// 2. 在0-255之间
// 3. 没有先导0
bool isvalid(string& s, int start, int end)
{
if (start > end) return false;

string tmp = s.substr(start, end - start + 1);

// 先导0
if (tmp.size() > 1 && tmp[0] == '0') return false;

int sum = 0;
int d = 1;

for (int i = tmp.size() - 1; i >= 0; i -- )
{
// 非数字的字符
if (tmp[i] < '0' || tmp[i] > '9') return false;
sum += (tmp[i] - '0') * d;
d = d * 10;
if (sum > 255) return false;
}
return true;
}

// startIndex为分割线,dotSum为逗点数目
void backtracking(string& s, int startIndex, int dotSum)
{
// 终止条件
if (dotSum == 3)
{
// 对第四段(s的最后一段)做合法性判断
if (isvalid(s, startIndex, s.size() - 1))
{
res.push_back(s);
}
return;
}

// 单层搜索逻辑
// 区间[startIndex, i]
for (int i = startIndex; i < s.size(); i ++ )
{
// 对区间合法性进行判断
if (isvalid(s, startIndex, i))
{
// 合法,则插入逗点
s.insert(s.begin() + i + 1, '.');
dotSum ++ ;

// 递归,本区间终止于i, 故下一个区间开始于i + 2
backtracking(s, i + 2, dotSum);

// 回溯
s.erase(s.begin() + i + 1);
dotSum -- ;
}
}
}

vector<string> restoreIpAddresses(string s) {
backtracking(s, 0, 0);
return res;
}
};

isvalid函数可以写的更简洁更自然:

1
2
3
4
5
6
7
8
9
10
11
12
13
14
15
16
17
18
bool isvalid(string& s, int start, int end)
{
if (start > end) return false;

// 先导0
if (s[start] == '0' && start != end) return false;

int num = 0;
for (int i = start; i <= end; i ++ )
{
// 非数字字符
if (s[i] < '0' || s[i] > '9') return false;
// 在0-255之间
num = num * 10 + s[i] - '0';
if (num > 255) return false;
}
return true;
}
  • 时间复杂度: $O(3^4)$,IP地址最多包含4个数字,每个数字最多有3种可能的分割方式(1位,2位,3位);则搜索树的最大深度为4,每个节点最多有3个子节点(对应每个数字可能是1位,2位,3位的情况)。
  • 空间复杂度: $O(n)$,原因如下:
    • 递归栈:递归的深度固定,最多为4,因为IP地址由四部分组成。但这并不直接决定空间复杂度,因为递归深度很小。
    • 存储当前解:在递归过程中,需要存储当前正在构建的IP地址,这需要额外的空间。此外,每次递归调用时,都可能创建字符串的子串来表示IP地址的某一部分。字符串的最大长度为输入字符串的长度n,因此需要额外的空间来存储这些子串。
    • 输出解的集合:输出的解的数量并不直接影响空间复杂度的理论计算,但实际上会使用额外空间来存储所有可能的IP地址。然而,这些空间通常不计入空间复杂度计算中,因为它不依赖于递归过程中的临时存储需求。

78.子集

之前讲的组合问题、分割问题,我们都是在树形结构的叶子节点上收获结果,因此在终止条件处收获结果。可以画出如下的树形结构:

78.子集

观察如上树形结构,发现我们想收获的结果其实在每一个节点中。因此不是在终止条件中收获结果,而是每进入一层递归就将单个结果放入结果集中。现在开始对着树形结果写代码:

1
2
3
4
5
6
7
8
9
10
11
12
13
14
15
16
17
18
19
20
21
22
23
24
25
26
27
// 一维数组存放单个结果
vector<int> path;
// 二维数组作为结果集
vector<vector<int>> res;

// startIndex:下一层递归从哪里开始取数
void backtracking(vector<int> nums, int startIndex)
{
// 每进入一层递归,都要将当前的path放入结果集中
// 因为要将叶子节点的集合放入结果集中,然后再结束,因此先有本逻辑,再有终止条件
res.push_back(path);

// 终止条件:走到叶子节点,叶子节点的剩余集合都为空
// 本终止条件可以不写,因为单层搜索逻辑中的for循环已经对startIndex的大小进行了限制
if (startIndex >= nums.size()) return;

// 单层搜索逻辑
for (int i = startIndex; i < nums.size(); i ++ )
{
// 每进入一层递归,都要收获当前节点的结果,放入单个结果数组中
path.push_back(nums[i]);
// 进入下一层递归
backtracking(nums, i + 1);
// 回溯
path.pop_back();
}
}

不写终止条件的写法如下所示:

1
2
3
4
5
6
7
8
9
10
11
12
13
14
15
16
17
18
19
20
21
22
23
class Solution {
public:
vector<int> path;
vector<vector<int>> res;

void backtracking(vector<int>& nums, int startIndex)
{
res.push_back(path);

for (int i = startIndex; i < nums.size(); i ++ )
{
path.push_back(nums[i]);
backtracking(nums, i + 1);
path.pop_back();
}
return;
}

vector<vector<int>> subsets(vector<int>& nums) {
backtracking(nums, 0);
return res;
}
};

90.子集II

与78的区别:给的集合中允许有重复的元素,因此需要对重复子集去重。本题的关键在于去重,本题是子集+组合总和II(树层去重)的结合,并没有新的知识点。

本题的树形结构。used数组用于记录某个元素是否出现过。因为去重要让大小相邻的元素挨在一起,因此需要先对数组进行排序。本题的去重是树层去重(树层上相邻的元素如果相等,则不能重复取,否则会得到重复的子集),树枝不需要去重。

90.子集II

现在开始写代码:

1
2
3
4
5
6
7
8
9
10
11
12
13
14
15
16
17
18
19
20
21
22
23
vector<int> path; // 单个结果
vector<vector<int>> res; // 结果集

void backtracking(vector<int>& nums, int startIndex, vector<int>& used)
{
// 终止条件不需要写,在for循环中实际上已经限制了startIndex的大小
res.push_back(path); // 收获结果,需要在每个节点都收获结果

// 单层递归逻辑
for (int i = startIndex; i < nums.size(); i ++ )
{
// 树层去重, used[i - 1] == 0意味着第i - 1个元素是第i个元素的回溯
if (i > 0 && nums[i] == nums[i - 1] && used[i - 1] = 0) continue;
// 处理节点
path.push_back(nums[i]);
used[i] = 1;
// 递归
backtracking(nums, i + 1, used);
// 回溯
path.pop_back();
used[i] = 0;
}
}

回溯中的去重逻辑都这么写。本题去重也可以用startIndex和i进行比较来实现,但这种去重写法并不通用,遇到排列问题时依然要用used数组的写法进行去重。去重的写法掌握used数组写法即可。

本题的时间和空间复杂度和78相同。时间复杂度: $O(n\times2^n)$,空间复杂度: $O(n)$。

本题也可以用哈希法去重,但时间复杂度更高,虽然也能够通过所有测试样例且不超时,代码如下所示:

1
2
3
4
5
6
7
8
9
10
11
12
13
14
15
16
17
18
19
20
21
22
23
24
25
26
27
28
29
30
class Solution {
public:
vector<int> path;
vector<vector<int>> res;

void backtracking(vector<int>& nums, int startIndex)
{
res.push_back(path);
unordered_set<int> s;

for (int i = startIndex; i < nums.size(); i ++ )
{
// set去重
if (s.find(nums[i]) != s.end()) continue;

// 处理节点
s.insert(nums[i]);
path.push_back(nums[i]);
// 递归
backtracking(nums, i + 1);
// 回溯
path.pop_back();
}
}
vector<vector<int>> subsetsWithDup(vector<int>& nums) {
sort(nums.begin(), nums.end()); // set去重依然需要排序
backtracking(nums, 0);
return res;
}
};

因此,本题的去重写法有三种:

  • used数组去重
  • startIndex去重
  • set去重

掌握第一种即可。第一种是思路最清晰也最通用的。

本题像78一样,也可以不写终止条件,因为startIndex的大小在for循环中已经得到了限制。精简版本的代码如下所示:

1
2
3
4
5
6
7
8
9
10
11
12
13
14
15
16
17
18
19
20
21
22
23
24
25
26
27
28
29
30
class Solution {
public:
vector<int> path;
vector<vector<int>> res;

void backtracking(vector<int>& nums, int startIndex, vector<int>& used)
{
res.push_back(path);

for (int i = startIndex; i < nums.size(); i ++ )
{
// 去重
if (i > 0 && nums[i] == nums[i - 1] && used[i - 1] == 0) continue;
// 处理节点
path.push_back(nums[i]);
used[i] = 1;
// 递归
backtracking(nums, i + 1, used);
// 回溯
path.pop_back();
used[i] = 0;
}
}
vector<vector<int>> subsetsWithDup(vector<int>& nums) {
vector<int> used(nums.size(), 0);
sort(nums.begin(), nums.end());
backtracking(nums, 0, used);
return res;
}
};

心得与备忘录

93.复原IP地址

  1. 本题是131.分割回文串的加强版。因为和131同样是用回溯法求解的分割问题,所以基本原理是相同的,比如startIndex用于作为分割线,分割的区间是[startIndex, i]
  2. 本题的终止条件和131有显著地不同。131的终止条件是startIndex移动到字符串的末尾,而本题的终止条件是添加了3个逗点,且最后一段区间是合法的。3个逗点的终止条件也限制了树的深度。
  3. 一般处理字符串的问题都比较复杂。本题对字符串处理的精妙之处在于直接在原本的字符串s上进行修改,添加逗点,作为分隔符从而得到合法的IP地址。本题还用到了两个和字符串有关的STL,分别是inserterase函数。
  4. 本题对区间合法性的判断较为复杂,共有3个要求:
    • 段位以0为开头的数字不合法
    • 段位里有非正整数字符不合法
    • 段位如果大于255了不合法
    • 段位若大于255,则立即判断为不合法,return false。若完成for循环后再对num进行判断,可能出现整数型变量溢出
  5. 本题的时间复杂度:$O(3^4)$,空间复杂度:$O(n)$
  6. 本题的细节比较多,比较容易写错,属于回溯法解决分割问题中的难题,需要不断复习。

78.子集

  1. 子集是收集树形结构中树的所有节点的结果。而组合问题、分割问题是收集树形结构中叶子节点的结果。
  2. 子集也是一种组合问题,因为它的集合是无序的,子集{1,2}和子集{2,1}是一样的。那么既然是无序,取过的元素不会重复取,写回溯算法的时候,for就要从startIndex开始。
  3. 先收集结果集,再写终止条件的原因:当递归到叶子节点时,要先将叶子节点的结果放入结果集中,再终止,因此先写收集结果集的逻辑,再写终止条件。否则叶子节点的结果无法被放入结果集中。
  4. 本题也可以不写终止条件,因为单层递归逻辑的for循环中实际上限制了startIndex的大小,因此最后return即可。但初学者还是建议写终止条件,和标准的回溯模板保持一致。
  5. 本题的时间复杂度: $O(n\times2^n)$,空间复杂度: $O(n)$。时间和空间复杂度的分析同77.组合

90.子集II

  1. 本题是40.组合总和II与78.子集这两题的结合。

  2. 40的精华在于去重(树层去重),78的精华在于在每个节点处都收集结果(而不是像组合、分割问题那样在叶子节点,即终止条件处收集结果),而是在递归函数的开始处(进入递归相当于进入一个节点)收集结果。本题结合了两题的精华。

  3. 树层去重掌握used数组写法即可,具体代码为:

    1
    if (i > 0 && nums[i] == nums[i - 1] && used[i - 1] == 0) continue;
  4. 树层去重前,需要对nums数组进行排序。
  5. 本题的时间和空间复杂度和上一题(78)相同。
  6. 去重共有三种写法,掌握思路最清晰也最通用的used数组写法即可。
  7. 本题像78一样,也可以不写终止条件,因为startIndex的大小在for循环中已经得到了限制。