Netflix Clone
tech stack
- Frontend: React
- Server-side Rendering: Next.js
- Styling: Tailwind CSS
- Data abstraction layer: Prisma
- Storage: MongoDB
- Authentication: NextAuth
- Deploy: Vercel
- Typescript
- the entire website fully
The entire website fully responsive across all devices.
function overview
credential login: username + password
profile: automatically generated once we register
homepage: loaded with a random movie-billboard
movies: load from database
favourites: add movies as favourites
botton: shows more information about the movie
play the movie
Google oauth login
How to initialize next.js and Tailwind which is going to be crucial for our styling.
Environment setup
create project
terminal:1
npx create-next-app --typescript
set everything as default
open folder netflix-clone, enter command:1
npm run dev
The website is running on: http://localhost:1689/
clean up the project:
remove pages/_document.tsx
remove everything in pages/index.tsx except the main function:
1 | export default function Home() { |
remove all the content in styles/globals.css. Get a white page with Netflix Clone.
add test.tsx in pages folder. Add the below content in test.tsx1
2
3
4
5
6
7const MyPage = () => {
return (
<h1>Hello New Page</h1>
)
}
export default MyPage;
I can visit Hello New Page in http://localhost:1689/test.
Delete test.tsx, it is just a demonstration of how easy it is to use Next.js.
setup tailwind
tailwind tutorial: https://tailwindcss.com/docs/guides/nextjs
run the following commands in terminal:1
2npm install -D tailwindcss postcss autoprefixer
npx tailwindcss init -p
Now we have tailwind.config.js and postcss.config.js. Open tailwind.config.js and write the below code (according to tailwind tutorial above):1
2
3
4
5
6
7
8
9
10
11
12/** @type {import('tailwindcss').Config} */
module.exports = {
content: [
"./app/**/*.{js,ts,jsx,tsx}",
"./pages/**/*.{js,ts,jsx,tsx}",
"./components/**/*.{js,ts,jsx,tsx}",
],
theme: {
extend: {},
},
plugins: [],
}
Write code in styles/globals.css to import tailwind styles:1
2
3@tailwind base;
@tailwind components;
@tailwind utilities;
enter the command npm run dev again and we can see a different web page, because the content in globals.css reset the css.
Try to change the color of netflix clone to green in the web page, just write the following code in index.tsx:1
2
3
4
5
6
7export default function Home() {
return (
<>
<h1 className="text-2xl text-green-500">Netflix Clone</h1>
</>
);
}
Auth Screen UI
In styles/globals.css, write:1
2
3
4
5
6
7@tailwind base;
@tailwind components;
@tailwind utilities;
body {
@apply bg-zinc-900 h-full overflow-x-hidden;
}
the web page turned to black. Add some code in globals.css:1
2
3
4
5
6
7#__next {
@apply h-full;
}
html {
@apply h-full;
}
create images folder in public folder and download hero.jpg and logo.png from github repository.
Create auth.tsx in pages. It is the auth page. Write the following code in it:1
2
3
4
5
6
7
8
9
10
11
12
13
14
15
16
17
18
19
20
21
22
23
24
25
26
27const Auth = () => {
return (
// first div: add background pictures in auth page
// second dic: make the picture a bit darker in the large screen
// img: set logo (NETFLIX) className="h-12" makes it smaller
// third div: container
<div className="relative h-full w-full bg-[url('/images/hero.jpg')] bg-no-repeat bg-center bg-fixed bg-cover">
<div className="bg-black w-full h-full lg: bg-opacity-50">
<nav className="px-12 py-5">
<img src = "/images/logo.png" alt = "Logo" className="h-12"/>
</nav>
<div className="flex justify-center">
<div className="bg-black bg-opacity-70 px-16 py-16 self-center mt-2 lg: w-2/5 lg: max-w-md rounded-md w-full">
<h2 className="text-white text-4xl mb-8 font-semibold">
Sign in
</h2>
<div className="flex flex-col gap-4">
</div>
</div>
</div>
</div>
</div>
);
}
export default Auth;
create components folder and create Input.tsx. Write some codes in it:1
2
3
4
5
6
7const Input = () => {
return (
<input />
)
}
export default Input;
Now add the Input in auth.tsx :1
2
3
4
5import Input from "@/components/Input";
<div className="flex flex-col gap-4">
<Input />
</div>
Now add some floating labels in Input.tsx:1
2
3
4
5
6
7
8
9
10
11
12
13
14
15
16
17
18
19
20
21
22
23
24
25
26const Input = () => {
return (
<div className="relative">
<input
className="
block
rounded-md
px-6
pt-6
pb-1
w-full
text-md
text-white
bg-neutral-700
appearance-none
focus: outline-none
focus: ring-0
peer
"
placeholder=" "
/>
</div>
)
}
export default Input;
现在我们想在sign in之下的第一个输入框加上Email字样,当点击输入框时,Email变小,不点击输入框时,Email变大,这是一种浮动的特效。1
2
3
4
5
6
7
8
9
10
11
12
13
14
15
16
17
18
19
20
21
22
23
24
25
26
27
28
29
30
31
32
33
34
35
36
37
38
39
40
41
42
43
44
45
46
47
48
49// duration-150: duration for animation
const Input = () => {
return (
<div className="relative">
<input
id = "email"
className="
block
rounded-md
px-6
pt-6
pb-1
w-full
text-md
text-white
bg-neutral-700
appearance-none
focus: outline-none
focus: ring-0
peer
"
placeholder=" "
/>
<label
className="
absolute
text-md
text-zinc-400
duration-150
transform
-translate-y-3
scale-75
top-4
z-10
origin-[0]
left-6
peer-placeholder-shown:scale-100
peer-placeholder-shown:translate-y-0
peer-focus:scale-75
peer-focus:-translate-y-3
"
htmlFor="email">
Email
</label>
</div>
)
}
export default Input;
接下来让输入框模块化。加入react的一些特性:1
2
3
4
5
6
7
8
9
10
11
12
13
14
15
16
17
18
19
20
21
22
23
24
25
26
27
28
29
30
31
32
33
34
35
36
37
38
39
40
41
42
43
44
45
46
47
48
49
50
51
52
53
54
55
56
57
58
59
60
61
62
63
64
65
66
67
68import React from 'react';
interface InputProps {
id: string;
onChange: any;
value: string;
label: string;
type?: string;
}
// duration-150: duration for animation
const Input: React.FC<InputProps> = ({
id,
onChange,
value,
label,
type
}) => {
return (
<div className="relative">
<input
onChange={onChange}
type={type}
value={value}
id={id}
className="
block
rounded-md
px-6
pt-6
pb-1
w-full
text-md
text-white
bg-neutral-700
appearance-none
focus: outline-none
focus: ring-0
peer
"
placeholder=" "
/>
<label
className="
absolute
text-md
text-zinc-400
duration-150
transform
-translate-y-3
scale-75
top-4
z-10
origin-[0]
left-6
peer-placeholder-shown:scale-100
peer-placeholder-shown:translate-y-0
peer-focus:scale-75
peer-focus:-translate-y-3
"
htmlFor="id">
{label}
</label>
</div>
)
}
export default Input;
此时发现auth.tsx报错,在input处加入以下代码:1
2
3
4
5
6
7<Input
label="Email"
onChange={() => {}}
id="email"
type="email"
value=""
/>
我们发现网页上的输入框无法输入内容,在auth.tsx中加入以下代码来解决这个问题:1
2
3
4
5
6
7
8
9
10
11import { useState } from "react"
import Input from "@/components/Input";
const Auth = () => {
const [email, setEmail] = useState('');
label="Email"
onChange={(ev) => setEmail(ev.target.value)}
id="email"
type="email"
value={email}
现在就可以在网页端的输入框内打字了。然后将上述内容复制两次,制造出username和password的输入框。1
2
3
4
5
6
7
8
9
10
11
12
13
14
15
16
17const [name, setName] = useState('');
const [password, setPassword] = useState('');
<Input
label="Username"
onChange={(ev: any) => setName(ev.target.value)}
id="name"
value={name}
/>
<Input
label="Password"
onChange={(ev: any) => setPassword(ev.target.value)}
id="password"
type="password"
value={password}
/>
接下来写按钮login botton:1
2
3<button className="bg-red-600 py-3 text-white rounded-md w-full mt-10 hover:bg-red-700 transition">
Login
</button>
产生了一个红色的按钮,点击按钮颜色会变深。
接着1
2
3
4
5
6<p className="text-neutral-500 mt-12">
First time using Netflix?
<span className="text-white ml-1 hover:underline cursor-pointer">
Create account
</span>
</p>
接着在login和register之间产生一个跳转。1
2
3
4
5
6
7
8
9const [variant, setVariant] = useState('login');
const toggleVariant = useCallback(() => {
setVariant((currentVarient) => currentVarient === 'login' ? 'register': 'login')
}, [])
<span onClick={toggleVariant} className="text-white ml-1 hover:underline cursor-pointer">
Create account
</span>
接着再将原本的login改为{variant === 'login' ? 'Sign in': 'Register'}。这样点击create account就会在sign in和register之间切换。由于在sign in时不需要看到username,而在register时要输入username,因此将username包裹在register中:1
2
3
4
5
6
7
8{variant === 'register' && (
<Input
label="Username"
onChange={(ev: any) => setName(ev.target.value)}
id="name"
value={name}
/>
)}
接着让按钮在sign in时显示为login,在register时显示为sign up。1
2
3<button className="bg-red-600 py-3 text-white rounded-md w-full mt-10 hover:bg-red-700 transition">
{variant === 'login' ? 'Login': 'Sign up'}
</button>
接着让login界面中显示提示语:First time using Netflix. Create account。在register页面中显示提出语:Already have an account?Login.1
2
3
4
5
6<p className="text-neutral-500 mt-12">
{variant === 'login' ? 'First time using Netflix?' : 'Already have an account?'}
<span onClick={toggleVariant} className="text-white ml-1 hover:underline cursor-pointer">
{variant === 'login' ? 'Create account' : 'Login'}
</span>
</p>
NextAuth, Prisma, Mongo Setup
将上述登录注册的UI界面通过prisma连接到mongodb。先在vscode中安装扩展prisma,其可以帮助对prisma文件进行格式化和高亮。接着在终端输入命令:npm install -D prisma
再输入命令:npx prisma init,本命令可以产生一个schema.prisma文件。将其中的数据库修改为mongodb:1
2
3
4
5
6
7
8generator client {
provider = "prisma-client-js"
}
datasource db {
provider = "mongodb"
url = env("DATABASE_URL")
}
接着在终端输入:npm install @prisma/client。接着再创建新的文件夹lib。在其中创建prismadb.ts文件,写入以下代码:1
2
3
4
5
6
7import { PrismaClient } from '@prisma/client';
const client = global.prismadb || new PrismaClient();
if (process.env.NODE_ENV === 'production') global.prismadb = client;
export default client;
next.js具有特性:hot reloading。每次代码改变时,我们的项目自动更新并重新运行。对prisma而言,每次会产生若干个PrismaClient实例,就会得到报错:已经有若干个Prisma Client正在运行。我们将PrismaClient存储在一个全局文件中,而全局文件并不会被hot reloading影响,因此就不会产生上面的报错。接着来解决prismadb标红的错误。
根目录下创建文件global.d.ts,在其中定义prismadb,写入以下内容:1
2
3
4
5
6
7import { PrismaClient } from '@prisma/client';
declare global {
namespace globalThis {
var prismadb: PrismaClient
}
}
接着进入schema.prisma文件,填入DATABASE_URL。需要先进入.env文件,将其中的database url换成有效的url。在谷歌中搜索mongodb atlas,注册并登录。点击build a database。我的database的username是cyf,密码是20001017。IP地址点击add my current IP address即可。接着在overview页面点击connect,选择mongodb for vscode。复制它给出的URL并粘贴到.env文件中。需要将URL中的<password>替换为自己真实的密码。并在URL的末尾加上我的实际数据库的名字:1
DATABASE_URL="mongodb+srv://cyf:20001017@cluster0.38xordg.mongodb.net/Cluster0"
接着,在schema.prisma文件中一次性定义好所有的models(数据模型)。因为反复修改数据模型和运行项目可能会导致一些麻烦和报错。schema.prisma文件内容如下所示:1
2
3
4
5
6
7
8
9
10
11
12
13
14
15
16
17
18
19
20
21
22
23
24
25
26
27
28
29
30
31
32
33
34
35
36
37
38
39
40
41
42
43
44
45
46
47
48
49
50
51
52
53
54
55
56
57
58
59
60
61
62
63
64
65
66
67
68
69
70
71
72
73
74
75
76
77// This is your Prisma schema file,
// learn more about it in the docs: https://pris.ly/d/prisma-schema
// Looking for ways to speed up your queries, or scale easily with your serverless or edge functions?
// Try Prisma Accelerate: https://pris.ly/cli/accelerate-init
generator client {
  provider = "prisma-client-js"
}

datasource db {
  provider = "mongodb"
  url      = env("DATABASE_URL")
}
model User {
id String @id @default(auto()) @map("_id") @db.ObjectId // 每个model都需要这一行,因为mongodb的model一定需要定义id
name String
image String? // ?表示可选,可要可不要
email String? @unique // 非必须,可能用到oauth login
emailVerified DateTime?
hashedPassword String? // 密码登录所需要
createAt DateTime @default(now())
updateAt DateTime @updatedAt // 自动更新 更新时间
favoriteIds String[] @db.ObjectId // 用户最喜欢的电影
sessions Session[]
accounts Account[]
}
// 用于Google Account或者GitHub Account
model Account {
id String @id @default(auto()) @map("_id") @db.ObjectId
userId String @db.ObjectId // account和userid之间的关系
type String
provider String
providerAccountId String
refresh_token String? @db.String
access_token String? @db.String
expires_at Int?
token_type String?
scope String?
id_token String? @db.String
session_state String?
// 将account model和user model之间通过userId连接, onDelate表示二者的删除是同步的(user被删除了,account也被删除)
user User @relation(fields: [userId], references: [id], onDelete: Cascade)
@@unique([provider, providerAccountId]) // 独一无二,不允许重复
}
model Session {
id String @id @default(auto()) @map("_id") @db.ObjectId
sessionToken String @unique
userId String @db.ObjectId
expires DateTime
user User @relation(fields: [userId], references: [id], onDelete: Cascade)
}
model VerificationToken {
id String @id @default(auto()) @map("_id") @db.ObjectId
identifier String
token String @unique
expires DateTime
@@unique([identifier, token])
}
model Movie {
id String @id @default(auto()) @map("_id") @db.ObjectId
title String
description String
videoUrl String
thumbnailUrl String // 缩略网址
genre String // 类型
duration String
}
接着在终端运行命令:npx prisma db push,将schema.prisma文件中定义的数据模型上传到云端,在mongodb的网页端选择database-browse collections,即可看到定义的5个数据模型。这说明prisma已经成功和mongodb连接起来了。
接着进入pages/api/hello.ts,可以通过链接:http://localhost:1689/api/hello访问到其中的内容。删除hello.ts,新建`[...nextauth].ts`文件,其会被next app识别。我们在这个文件中写next auth的middleware。通过命令npm install next-auth安装next-auth。还需要运行命令:npm install bcrypt。这个包用于用户名密码登录。在[...nextauth].ts文件中写下以下的内容:1
2
3
4
5
6
7
8
9
10
11
12
13
14
15
16
17
18
19
20
21
22
23
24
25
26
27
28
29
30
31
32
33
34
35
36
37
38
39
40
41
42
43
44
45
46
47
48
49
50
51
52
53
54
55
56
57
58
59
60
61
62
63import NextAuth from 'next-auth';
import Credentials from 'next-auth/providers/credentials';
import { compare } from 'bcrypt';
import prismadb from '@/lib/prismadb';
export default NextAuth({
providers: [
Credentials({
id: 'credentials',
name: 'Credentials',
credentials: {
email: {
label: 'Email',
type: 'text',
},
password: {
label: 'Password',
type: 'password',
}
},
async authorize(credentials) {
if (!credentials?.email || !credentials?.password) {
throw new Error('Email and password required');
}
// 通过email找到用户,需要import prismadb
const user = await prismadb.user.findUnique({
where: {
email: credentials.email
}
});
// 判断找到的user是否存在
if (!user || !user.hashedPassword) {
throw new Error('Email does not exist');
}
// 判断用户输入的密码是否正确
const isCorrectPassword = await compare(
credentials.password,
user.hashedPassword
);
if (!isCorrectPassword) {
throw new Error("Incorrect password");
}
return user; // 用户密码输入正确,则返回由email找到的唯一user
}
})
],
pages: {
signIn: '/auth',
},
// debug on
debug: process.env.NODE_ENV === 'development',
session: {
strategy: 'jwt',
},
})
在.env文件中加入以下两个环境变量:1
2NEXTAUTH_JWT_SECRET = "NEXT-JWT-SECRET"
NEXTAUTH_SECRET = "NEXT-SECRET"
在[...nextauth].ts文件中添加以下的内容:1
2
3
4
5 jwt: {
secret: process.env.NEXTAUTH_JWT_SECRET,
},
secret: process.env.NEXTAUTH_SECRET,
});
接下来修复bcrypt标红的报错。在终端输入命令:npm i -D @types/bcrypt。安装了bcrypt后,不再标红报错。
进入pages/auth.tsx。在其中添加login和register的函数。首先通过命令行安装axios: npm i axios。然后在auth.tsx中引入axios并定义register函数:1
2
3
4
5
6import axios from "axios";
// register function
const register = useCallback(async () => {
}, []); // dependency: []
接着写下完整的register函数:1
2
3
4
5
6
7
8
9
10
11
12// register function
const register = useCallback(async () => {
try {
await axios.post('/api/register', {
email,
name,
password
});
} catch (error) {
console.log(error);
}
}, []); // dependency: []
接着在pages/api中定义register。在register.ts中写下了如下的代码:1
2
3
4
5
6
7
8
9
10
11
12
13
14
15
16
17
18
19
20
21
22
23
24
25
26
27
28
29
30
31
32
33
34
35
36
37
38
39
40
41
42
43
44
45
46import bcrypt from 'bcrypt';
import { NextApiRequest, NextApiResponse } from 'next';
import prismadb from '@/lib/prismadb';
export default async function handler(req: NextApiRequest, res: NextApiResponse) {
if (req.method !== 'POST') {
return res.status(405).end(); // we only want to allow post calls to /api/register
}
// try and catch block
// try: extract some values from request.body
try {
const { email, name, password } = req.body;
// check if an email is already in use
const existinguser = await prismadb.user.findUnique({
where: {
email,
}
});
// email in use, return Email taken
if (existinguser) {
return res.status(422).json({error: 'Email taken'});
}
// hash the password
const hashedPassword = await bcrypt.hash(password, 12);
// 将user信息存入数据库
const user = await prismadb.user.create({
data: {
email,
name,
hashedPassword,
image: '',
emailVerified: new Date(),
}
});
return res.status(200).json(user);
} catch (error) {
console.log(error);
return res.status(400).end();
}
}
这就完成了/api/register。在auth.tsx中填入dependency的具体内容:[email, name, password]); // dependency in []。
接着,我们需要在点击sign up按钮时呼叫/api/register。先不管按钮上写的是login还是register,将按钮统一绑定到register函数:1
2<button onClick={register} className="bg-red-600 py-3 text-white rounded-md w-full mt-10 hover:bg-red-700 transition">
{variant === 'login' ? 'Login': 'Sign up'}
打开网页,F12打开调试模式,选择network,输入用户名、邮箱和密码,可以看到register函数被成功调用。接着打开mongodb atlas的网站,选择database-browse collections-user,可以看到其中添加了一条用户信息的数据,成功!到此,用户名密码注册部分完成了。
现在开始做Login部分。在auth.tsx中添加以下login函数:1
2
3
4
5
6
7
8
9
10
11
12
13
14
15// login function
const login = useCallback(async () => {
// try and catch block
try {
// 需要用到[..nextauth].ts中的Credentials
await signIn('credentials', {
email,
password,
redirect: false,
callbackUrl: '/'
});
} catch (error) {
console.log(error);
}
}, [email, password]); // login only need email and password
接着在按钮处调用login函数:1
<button onClick={variant === 'login' ? login : register} className="bg-red-600 py-3 text-white rounded-md w-full mt-10 hover:bg-red-700 transition">
这样就可以在点击login按钮时调用login函数,在点击sign up按钮时调用register函数。点击login按钮,网页并没有产生预期的跳转,打印出错误信息:Error: This action with HTTP GET is not supported by NextAuth.js。尝试修复这个问题。在api文件夹中再创建auth文件夹,将[...nextauth].ts文件拖拽到其中。然后这个问题就被修复了。接着继续在login函数中添加router:1
2
3
4
5
6
7
8
9
10
11
12
13
14
15
16
17
18
19const router = useRouter();
// login function
const login = useCallback(async () => {
// try and catch block
try {
// 需要用到[..nextauth].ts中的Credentials
await signIn('credentials', {
email,
password,
redirect: false,
callbackUrl: '/'
});
router.push('/');
} catch (error) {
console.log(error);
}
}, [email, password, router]); // login only need email and password, and then we add router
接着在register函数中添加login部分,一旦注册成功后就自动登录。1
2
3
4
5
6
7
8
9
10
11
12
13
14// register function
const register = useCallback(async () => {
try {
await axios.post('/api/register', {
email,
name,
password
});
login();
} catch (error) {
console.log(error);
}
}, [email, name, password, login]); // dependency in []
同时注意调整login和register函数的顺序,让login定义在register之前(因为register中需要调用login函数)。现在再次尝试输入邮箱和密码并点击login按钮,发现可以成功跳转到根目录。
Google and Github OAuth
加入Google and Github OAuth非常简单。首先在终端中运行命令:npm install react-icons。通过这个包可以向项目中添加Google, Github和其他炫酷的icon。接下来写google和github一键登录的UI界面。在auth.tsx中加入以下代码。首先是引入react中包含icons的包,然后在login/sign up按钮下定义一个div,用于空出更大的空间。再定义一个div,用于存放按钮。在这个div中定义按钮的各种属性(居中、圆角等)。最后再通过FcGoogle引入Google的图标。接着,我们复制上面的代码,将图标改为Github。以上的代码如下所示:1
2
3
4
5
6
7
8
9
10
11
12
13
14
15
16
17
18
19
20
21
22
23
24
25
26
27
28
29
30
31
32
33
34
35
36
37
38import { FcGoogle } from 'react-icons/fc';
import { FaGithub } from 'react-icons/fa';
<div className="flex flex-row items-center gap-4 mt-8 justify-center">
<div
className="
w-10
h-10
bg-white
rounded-full
flex
items-center
justify-center
cursor-pointer
hover:opacity-80
transition
"
>
<FcGoogle size={30} />
</div>
<div
className="
w-10
h-10
bg-white
rounded-full
flex
items-center
justify-center
cursor-pointer
hover:opacity-80
transition
"
>
<FaGithub size={30} />
</div>
</div>
接着进入.env文件中增加一些环境变量。如下所示:1
2
3
4
5GITHUB_ID=
GITHUB_SECRET=
GOOGLE_CLIENT_ID=
GOOGLE_CLIENT_SECRET=
接着在[...nextauth].ts文件中添加包和GithubProvider、GoogleProvider。1
2
3
4
5
6
7
8
9
10
11import GithubProvider from 'next-auth/providers/github';
import GoogleProvider from 'next-auth/providers/google';
GithubProvider({
clientId: process.env.GITHUB_ID || '',
clientSecret: process.env.GITHUB_SECRET || ''
}),
GoogleProvider({
clientId: process.env.GOOGLE_CLIENT_ID || '',
clientSecret: process.env.GOOGLE_CLIENT_SECRET || ''
}),
接着执行命令:npm install @next-auth/prisma-adapter。接着在[...nextauth].ts文件中添加以下代码:1
2
3import { PrismaAdapter } from '@next-auth/prisma-adapter';
adapter: PrismaAdapter(prismadb),
接下来填入.env文件中的GITHUB_ID和GITHUB_SECRET。去到GITHUB-SETTINGS-DEVELOPER SETTINGS-OAUTH APPS-NEW OAUTH APP,填入以下内容:1
2
3
4
5
6
7
8
9Register a new OAuth application
Application name
netflix-clone
Homepage URL
http://localhost:1689
Authorization callback URL
http://localhost:1689
接着点击register application,然后将生成的GITHUB_ID和GITHUB_SECRET复制到.env文件中。
现在我们在auth.tsx中给github一键登录写一个函数:1
onClick={() => signIn('github', { callbackUrl: '/' })}
并在.env文件中指定重定向URL的路径:NEXTAUTH_URL=http://localhost:10564/
进行上述操作后,github一键登录成功,一键登录成功后被导航回到了根目录。然后可以在mongodb的account中看到一条新的数据。本来应该在user中也看到一条新的数据,但我的user中没有github一键登录产生的新user的数据。这个问题在github的issues中有解释:https://github.com/AntonioErdeljac/next-netflix-tutorial/issues/13。这个问题应该不是一个问题,不用担心。
现在开始完成google一键登录。相比于github,Google会更麻烦些。进入google cloud console: https://console.cloud.google.com/welcome?pli=1&project=advance-proton-400620。新建项目并填入项目名称,点创建。选中该项目,搜索apis & services。选择oauth权限请求页面,选择外部,点击创建。填入应用名称、用户支持电子邮件、开发者联系信息,然后保存并继续。然后一路点击保存并继续。点击凭据-创建凭据-创建 OAuth 客户端 ID。选择web应用-添加URL:http://localhost:10564/api/auth/callback/google。我们就可以得到client ID和client secret。将它们复制到.env文件中。然后在auth.tsx中给google一键登录写一个函数:1
onClick={() => signIn('google', { callbackUrl: '/' })}
在网页端尝试点击google一键登录,成功!
Protecting routes, Profiles screen
如何通过授权登录保护client路径和api路径。在lib文件夹中创建serverAuth.ts。在其中写下如下的代码:1
2
3
4
5
6
7
8
9
10
11
12
13
14
15
16
17
18
19
20
21
22
23
24
25
26
27
28
29
30
31
32
33import { NextApiRequest } from 'next';
import { getSession } from 'next-auth/react';
import prismadb from '@/lib/prismadb';
import { error } from 'console';
const serverAuth = async (req: NextApiRequest) => {
// fetch log in user session
const session = await getSession({ req });
// use serverAuth in api controller
// req parameter will hold jwt token to get logged in user
// use session to get other fields
if (!session?.user?.email) {
throw new Error('Not signed in');
}
// 通过email找到不同的user
const currentUser = await prismadb.user.findUnique({
where: {
email: session.user.email,
}
});
// 无currentUser, 说明jwt token或者session不正确或者过期了
if (!currentUser) {
throw new Error('Not signed in');
}
return { currentUser };
}
export default serverAuth;
用上述文件可以在所有的api routes中检查我们是否登录。进入pages/api中,创建current.ts,在其中写上以下的代码:1
2
3
4
5
6
7
8
9
10
11
12
13
14
15
16
17
18
19import { NextApiRequest, NextApiResponse } from 'next';
import serverAuth from '@/lib/serverAuth';
export default async function handler(req: NextApiRequest, res: NextApiResponse) {
if (req.method !== 'GET') {
return res.status(405).end();
}
// try and catch block
try {
const { currentUser } = await serverAuth(req);
return res.status(200).json(currentUser);
} catch (error) {
console.log(error);
return res.status(400).end();
}
}
下面开始写用于front end fetching的部分,在libs/fetcher.ts,在其中写下代码:1
2
3
4
5import axios from 'axios';
const fetcher = (url: string) => axios.get(url).then((res) => res.data);
export default fetcher;
在前端写用于载入当前用户的代码。在根目录下新建hooks文件夹,在其中新建文件useCurrentUser.ts。然后在终端中运行命令:npm install swr。然后在useCurrentUser.ts中写入:1
2
3
4
5
6
7
8
9
10
11
12
13
14
15
16
17
18import useSWR from 'swr';
import fetcher from '@/lib/fetcher';
// svr: versal developed package, which is good at fetching data
// If the data already exists, we are not going to fetch the data again
const useCurrentUser = () => {
const { data, error, isLoading, mutate } = useSWR('/api/current', fetcher)
return {
data,
error,
isLoading,
mutate
}
};
export default useCurrentUser;
下面我们来展示如何保护client routes。我们想让用户在不登陆的情况下访问不到我们的网站。在pages/index.tsx中首先创建一个sign out按钮。1
<button className="h-10 w-full bg-white" onClick={() => signOut()}>Logout!</button>
接下来我们来演示如何在pages/index.tsx中保护家路径。在其中写下以下的代码:1
2
3
4
5
6
7
8
9
10
11
12
13
14
15
16
17
18
19
20
21
22
23
24
25
26
27
28
29
30
31
32import { NextPageContext } from "next";
import { getSession, signOut } from "next-auth/react";
// fetch our session from client side
// cannot use serverAuth
export async function getServerSideProps(context: NextPageContext) {
const session = await getSession(context);
// session不存在,则返回登录界面
if (!session) {
return {
redirect: {
destination: '/auth',
permanent: false,
}
}
}
// session存在,则返回空
return {
props: {}
}
}
export default function Home() {
return (
<>
<h1 className="text-4xl text-green-500">Netflix Clone</h1>
<button className="h-10 w-full bg-white" onClick={() => signOut()}>Logout!</button>
</>
);
}
现在实现了功能:用户不能在未登录的情况下直接访问家目录。现在的问题:登出以后无法登录并进入到家目录。进入mongodb-network access。点击add ip address,选择allow access from anywhere。目前项目仍然不能正常登录。报错信息显示:1
2
3
4
5
6
7
8
9
10
11
12[next-auth][error][CLIENT_FETCH_ERROR]
https://next-auth.js.org/errors#client_fetch_error fetch failed {
error: {
message: 'fetch failed',
stack: 'TypeError: fetch failed\n' +
' at node:internal/deps/undici/undici:12443:11\n' +
' at process.processTicksAndRejections (node:internal/process/task_queues:95:5)',
name: 'TypeError'
},
url: 'http://localhost:10564/api/auth/session',
message: 'fetch failed'
}
我尝试了若干种解决办法,最后是这样解决的:
由于在默认情况下,port和forwarded address是不同的,这样就会导致上面的报错,我猜测是产生了跨域问题,导致port和forwarded address之间的信息转发失败了。我们需要将port和forwarded address的端口号改成相同的,并在.env文件和package.json文件中做出相应的修改。以我在本项目中的实际操作为例。我将port改为10564,将forwarded address也改为10564(vscode-PORTS中会自动补全为localhost:10564),然后在.env文件中添加:
1 | NEXTAUTH_URL="http://localhost:10564" |
在package.json文件中添加:1
2
3
4"scripts": {
"dev": "next dev -p 10564",
"start": "next start -p 10564",
},
然后重启项目,就可以成功地通过用户名密码/github/google登入登出根页面了。
接下来关注如何通过useCurrentUser.ts中的hook来获取用户信息。在index.tsx中加入以下代码:1
2
3
4
5import useCurrentUser from "@/hooks/useCurrentUser";
const { data : user } = useCurrentUser();
<p className="text-white">Logged in as : {user?.email}</p>
这样在根页面就会显示Logged in as + 登录用户邮箱的信息。现在我们来创建用户档案页面。在pages文件夹下创建profiles.tsx文件,在其中加入以下框架:1
2
3
4
5
6
7
8
9const Profiles = () => {
return (
<div>
<p className="text-white text-4xl">Profiles</p>
</div>
)
};
export default Profiles;
接着访问http://localhost:10564/profiles,就可以看到白色的Profiles字样。接着在`profiles.tsx`文件中写`fetch session`的代码:1
2
3
4
5
6
7
8
9
10
11
12
13
14
15
16
17// fetch our session from client side, just like what we do in index.tsx
export async function getServerSideProps(context: NextPageContext) {
const session = await getSession(context); // get session
if (!session) {
return {
redirect: {
destination: '/auth',
permanent: false,
}
}
}
return {
props: {}
}
}
接着在auth.tsx中,将三个登录处的重定向URL重定向到profiles页面并删除router。现在产生了效果:在未登录时访问profiles页面会被重定向到auth页面。在auth页面登录后会被重定向到profiles页面。从github仓库中下载default blue图片,作为用户的默认头像。在profiles.tsx中写下了如下的代码:1
2
3
4
5
6
7
8
9
10
11
12
13
14
15
16
17
18
19
20
21
22
23
24
25
26
27
28
29
30
31
32
33
34
35
36
37
38
39
40
41
42
43
44
45
46const Profiles = () => {
const { data: user } = useCurrentUser();
return (
<div className="flex items-center h-full justify-center">
<div className="flex flex-col">
<h1 className="text-3xl md:text-6xl text-white text-center" >Who is watching?</h1>
<div className="flex items-center justify-center gap-8 mt-10">
<div onClick={() => {}}>
<div className="group flex-row w-44 mx-auto">
<div
className="
w-44
h-44
rounded-md
flex
items-center
justify-center
border-2
border-transparent
group-hover:cursor-pointer
group-hover:border-white
overflow-hidden
"
>
<img src="/images/default-blue.png" alt="Profile" />
</div>
<div
className="
mt-4
text-gray-400
text-2xl
text-center
group-hover:text-white
"
>
{user?.name}
</div>
</div>
</div>
</div>
</div>
</div>
)
};
产生了如下的效果:
然后让点击图片会重定向回到根网页。增加以下代码即可:1
2
3const router = useRouter()
<div onClick={() => router.push('/')}>
Navagation Component
清理index.tsx文件,只剩下骨架即可(不需要按钮和sign out功能):1
2
3
4
5
6
7
8
9
10
11
12
13
14
15
16
17
18
19
20
21
22
23
24
25
26
27
28
29
30
31import { NextPageContext } from "next";
import { getSession } from "next-auth/react";
// fetch our session from client side
// cannot use serverAuth
export async function getServerSideProps(context: NextPageContext) {
const session = await getSession(context);
// session不存在,则返回登录界面
if (!session) {
return {
redirect: {
destination: '/auth',
permanent: false,
}
}
}
// session存在,则返回空
return {
props: {}
}
}
export default function Home() {
return (
<>
</>
);
}
我们需要在上述文件中添加Navbar,但目前Navbar尚不存在,因此需要在components文件夹中添加Navbar.tsx。1
2
3
4
5
6
7
8
9const Navbar = () => {
return (
<div>
Navbar
</div>
)
}
export default Navbar;
然后在index.tsx中import并添加Navbar。接下来在Navbar.tsx中写入具体的内容。1
2
3
4
5
6
7
8
9
10
11
12
13
14
15
16
17
18
19
20
21
22
23
24
25
26
27
28
29
30
31
32
33
34
35
36const Navbar = () => {
return (
// navigation type
<nav className="w-full fixed z-40">
<div
className="
px-4
md:px-16
py-6
flex
flex-row
items-center
transition
duration-500
bg-zinc-900
bg-opacity-90
"
>
<img className="h-4 lg:h-7" src="/images/logo.png" alt="Logo" />
<div
className="
flex-row
ml-8
gap-7
hidden
lg:flex
"
>
<NavbarItem />
</div>
</div>
</nav>
)
}
export default Navbar;
接着在components中定义NavbarItem.tsx,写出其骨架:1
2
3
4
5
6
7
8
9const NavbarItem = () => {
return (
<div>
</div>
)
}
export default NavbarItem;
接着丰满其中的细节:1
2
3
4
5
6
7
8
9
10
11
12
13
14
15
16
17
18import React from 'react';
interface NavbarItemProps {
label: string;
}
const NavbarItem: React.FC<NavbarItemProps> = ({
label
}) => {
return (
<div className="text-white cursor-pointer hover:text-gray-300 trasition">
{label}
</div>
)
}
export default NavbarItem;
需要从Navbar.tsx中传入label: <NavbarItem label="Home" />,并依照同样的方式创建另外几个导航组件:1
2
3
4
5
6
7
8
9
10<NavbarItem label="Home" />
<NavbarItem label="Series" />
<NavbarItem label="Films" />
<NavbarItem label="New & Popular" />
<NavbarItem label="My List" />
<NavbarItem label="Browse by languages" />
<div className="lg:hidden flex flex-row items-center gap-2 ml-8 cursor-pointer relative">
<p className="text-white text-sm">Browse</p>
</div>
小屏幕时,只出现Browse,不出现其他navagation component。接着去查找icons: https://react-icons.github.io/react-icons/。找到一个向下展开的小箭头,在`Navbar.tsx`中引入并使用这个小箭头:1
2
3import { BsChevronDown } from 'react-icons/bs';
<BsChevronDown className="text-white transition" />
接着创建手机端(小屏幕)的菜单。先在components中创建MobileMenu.tsx,在其中写以下的代码:1
2
3
4
5
6
7
8
9
10
11
12
13
14
15
16
17
18
19
20
21
22
23import React from 'react';
interface MobileMenuProps {
visible?: boolean;
}
const MobileMenu: React.FC<MobileMenuProps> = ({ visible }) => {
if (!visible) {
return null;
}
return (
<div className="bg-black w-56 absolute top-8 left-0 py-5 flex-col border-2 border-gray-800 flex">
<div className='flex flex-col gap-4'>
<div className='px-3 text-center text-white hover:underline'>
Home
</div>
</div>
</div>
)
};
export default MobileMenu;
然后在Navbar.tsx中引入MobileMenu。并实现手机(小屏幕)上点击browse展开出home的功能。1
2
3
4
5
6
7const [showMobileMenu, setShowMobileMenu] = useState(false);
const toggleMobileMenu = useCallback(() => {
    setShowMobileMenu((current) => !current);
}, []);
<MobileMenu visible={showMobileMenu} />
对于上述代码的解释:这段代码是使用React Hooks编写的,主要用于在React组件中管理和切换移动设备菜单的显示状态。具体来说,这段代码定义了一个状态变量showMobileMenu和一个切换该状态的函数toggleMobileMenu。下面是这段代码的详细解释:
useState 钩子
1 | const [showMobileMenu, setShowMobileMenu] = useState(false); |
useState是一个React Hook,允许在函数组件中添加状态。这里,它被用来定义一个名为showMobileMenu的状态变量,用于跟踪移动菜单是否显示。该状态的初始值为false,意味着菜单默认是不显示的。setShowMobileMenu是一个函数,用于更新showMobileMenu状态的值。当调用这个函数并传入一个新的值时,组件会重新渲染,并且showMobileMenu的值会更新为传入的新值。
useCallback 钩子
1 | const toggleMobileMenu = useCallback(() => { |
useCallback是另一个React Hook,它返回一个记忆化的回调函数。这个回调函数只会在依赖项数组(这里是空数组[])中的值发生变化时才会更新。在这个例子中,由于依赖项数组为空,toggleMobileMenu函数在组件的整个生命周期内保持不变。toggleMobileMenu函数的作用是调用setShowMobileMenu来切换showMobileMenu状态的值。它通过传递一个函数给setShowMobileMenu,这个函数接收当前的状态值current作为参数,并返回其相反值!current。这样,如果菜单当前是显示的(true),调用toggleMobileMenu会将其隐藏(设为false),反之亦然。
总结
这段代码的主要目的是控制移动菜单的显示状态。通过点击或触发某个事件来调用toggleMobileMenu函数,可以在显示和隐藏移动菜单之间切换,从而为用户提供一个响应式的导航体验。这种模式在开发响应式Web应用时非常常见,特别是在需要改进移动设备上的用户界面和交互时。
进入MobileMenu.tsx中,加入一些新的class。1
2
3
4
5
6
7
8
9
10
11
12
13
14
15
16
17
18<div className='px-3 text-center text-white hover:underline'>
Home
</div>
<div className='px-3 text-center text-white hover:underline'>
Series
</div>
<div className='px-3 text-center text-white hover:underline'>
Films
</div>
<div className='px-3 text-center text-white hover:underline'>
New & Popular
</div>
<div className='px-3 text-center text-white hover:underline'>
My List
</div>
<div className='px-3 text-center text-white hover:underline'>
Browse by Languages
</div>
这样点开browse就会展开上述的内容。接下来是profile menu。首先在导航组件中添加一个search(即一个放大镜形状的图标)。再添加一个铃铛,最后添加用户的默认头像,然后在用户头像处也添加一个向下展开的箭头。在Navbar.tsx中使用如下代码:1
2
3
4
5
6
7
8
9
10
11
12
13
14<div className="flex flex-row ml-auto gap-7 items-center">
<div className="text-gray-200 hover:text-gray-300 cursor-pointer transition">
<BsSearch />
</div>
<div className="text-gray-200 hover:text-gray-300 cursor-pointer transition">
<BsBell />
</div>
<div className="flex flex-row items-center gap-2 cursor-pointer relative">
<div className="w-6 h-6 lg:w-10 lg:h-10 rounded-md overflow-hidden">
<img src="/images/default-blue.png" alt="" />
</div>
<BsChevronDown className="text-white transition" />
</div>
</div>
再添加AccountMenu。先在components中定义AccountMenu.tsx,在其中写一个骨架:1
2
3
4
5
6
7
8
9const AccountMenu = () => {
return (
<div>
</div>
)
}
export default AccountMenu;
然后再在Navbar.tsx中引入AccountMenu。在AccountMenu.tsx中写入具体的内容:1
2
3
4
5
6
7
8
9
10
11
12
13
14
15
16
17
18
19
20
21
22
23
24
25
26
27
28
29
30import { signOut } from "next-auth/react";
import React from "react";
interface AccountMenuProps {
visible: boolean;
}
const AccountMenu: React.FC<AccountMenuProps> = ({
visible
}) => {
if (!visible) {
return null;
}
return (
<div className="bg-black w-56 absolute top-14 right-0 py-5 flex-col border-2 border-gray-800 flex">
<div className="flex flex-col gap-3">
<div className="px-3 group/item flex flex-row gap-3 items-center w-full">
<img className="w-8 rounded-md" src="/images/default-blue.png" alt="" />
<p className="text-white text-sm group-hover/item:underline">
Username
</p>
</div>
</div>
</div>
)
}
export default AccountMenu;
在Navbar.tsx中加入<AccountMenu visible/>,让AccountMenu。接下来再在AccountMenu.tsx中加入signOut按钮。1
2
3
4
5
6
7
8
9
10
11
12
13
14
15
16return (
<div className="bg-black w-56 absolute top-14 right-0 py-5 flex-col border-2 border-gray-800 flex">
<div className="flex flex-col gap-3">
<div className="px-3 group/item flex flex-row gap-3 items-center w-full">
<img className="w-8 rounded-md" src="/images/default-blue.png" alt="" />
<p className="text-white text-sm group-hover/item:underline">
Username
</p>
</div>
<hr className="bg-gray-600 border-0 h-px my-4" />
<div onClick={() => signOut()} className="px-3 text-center text-white text-sm hover:underline">
Sign out of Netflix
</div>
</div>
</div>
)
然后还需要加入展开AccountMenu和收起AccountMenu的功能。在Navbar.tsx中加入代码:1
2
3
4
5
6
7
8
9
10
11
12
13
14const [showAccountMenu, setShowAccountMenu] = useState(false);
const toggleAccountMenu = useCallback(() => {
setShowAccountMenu((current) => !current);
}, []);
<div onClick={toggleAccountMenu} className="flex flex-row items-center gap-2 cursor-pointer relative">
<div className="w-6 h-6 lg:w-10 lg:h-10 rounded-md overflow-hidden">
<img src="/images/default-blue.png" alt="" />
</div>
<BsChevronDown className="text-white transition" />
<AccountMenu visible={showAccountMenu} />
</div>
然后加入旋转 控制AccountMenu展开和收起的箭头的功能。1
<BsChevronDown className={`text-white transition ${showAccountMenu ? `rotate-180` : `rotate-0`}`} />
同理,对控制browse的箭头也做相同的处理。1
<BsChevronDown className={`text-white transition ${showMobileMenu ? `rotate-180` : `rotate-0`}`} />
现在想加一个特效:向下滑动时页面变黑,其他情况下页面透明。在Navbar.tsx中加入以下代码:1
2
3
4
5
6
7
8
9
10
11
12
13
14
15
16
17
18
19
20
21
22
23
24
25
26
27
28
29
30
31
32const [showBackground, setShowBackground] = useState(false);
useEffect(() => {
const handleScroll = () => {
if (window.scrollY >= TOP_OFFSET) {
setShowBackground(true);
} else {
setShowBackground(false);
}
}
window.addEventListener('scroll', handleScroll); // listen to scroll event
return () => {
window.removeEventListener('scroll', handleScroll); // remove listener
}
}, []);
<nav className="w-full fixed z-40">
<div
className={`
px-4
md:px-16
py-6
flex
flex-row
items-center
transition
duration-500
${showBackground ? 'bg-zinc-900 bg-opacity-90' : ''}
`}
加上这些代码后,当滚动页面时,导航组件都是透明的,但当开始滑动鼠标滚轮时,导航组件的背景变为黑色。
可以在index.sh中添加代码来测试这个功能:
1 | export default function Home() { |
添加完上述代码后,页面可以滚动,发现功能是正常的。
Billboard Component, Random Movie Endpoint
每次会随机加载一部电影。进入github仓库,打开movies.json。将其中的电影全部加入到数据库中。1
2
3
4
5
6
7
8
9
10
11
12
13
14
15
16
17
18
19
20
21
22
23
24
25
26
27
28
29
30
31
32
33
34[
{
"title":"Big Buck Bunny",
"description":"Three rodents amuse themselves by harassing creatures of the forest. However, when they mess with a bunny, he decides to teach them a lesson.",
"videoUrl":"http://commondatastorage.googleapis.com/gtv-videos-bucket/sample/BigBuckBunny.mp4",
"thumbnailUrl":"https://upload.wikimedia.org/wikipedia/commons/7/70/Big.Buck.Bunny.-.Opening.Screen.png",
"genre":"Comedy",
"duration":"10 minutes"
},
{
"title":"Sintel",
"description":"A lonely young woman, Sintel, helps and befriends a dragon, whom she calls Scales. But when he is kidnapped by an adult dragon, Sintel decides to embark on a dangerous quest to find her lost friend Scales.",
"videoUrl":"http://commondatastorage.googleapis.com/gtv-videos-bucket/sample/Sintel.mp4",
"thumbnailUrl":"http://uhdtv.io/wp-content/uploads/2020/10/Sintel-3.jpg",
"genre":"Adventure",
"duration":"15 minutes"
},
{
"title":"Tears of Steel",
"description":"In an apocalyptic future, a group of soldiers and scientists takes refuge in Amsterdam to try to stop an army of robots that threatens the planet.",
"videoUrl":"http://commondatastorage.googleapis.com/gtv-videos-bucket/sample/TearsOfSteel.mp4",
"thumbnailUrl":"https://mango.blender.org/wp-content/uploads/2013/05/01_thom_celia_bridge.jpg",
"genre":"Action",
"duration":"12 minutes"
},
{
"title":"Elephant's Dream",
"description":"Friends Proog and Emo journey inside the folds of a seemingly infinite Machine, exploring the dark and twisted complex of wires, gears, and cogs, until a moment of conflict negates all their assumptions.",
"videoUrl":"http://commondatastorage.googleapis.com/gtv-videos-bucket/sample/ElephantsDream.mp4",
"thumbnailUrl":"https://download.blender.org/ED/cover.jpg",
"genre":"Sci-Fi",
"duration":"15 minutes"
}
]
上述json文件中的数据格式和schema.prisma中的movies数据类型中定义的内容相同,除了缺少由mongodb产生的id。在mongodb网站中选择database-browse collections-movie-insert document,将json文件中的内容粘贴进去即可。现在就完成了对数据模型movie的修改。
现在创建一条新的路径:random。在pages/api/random.ts中写下以下的代码:1
2
3
4
5
6
7
8
9
10
11
12
13
14
15
16
17
18
19
20
21
22
23
24
25
26
27
28
29
30
31// random movie will be loaded every time we refresh the page
import { NextApiRequest, NextApiResponse } from "next";
import prismadb from '@/lib/prismadb';
import serverAuth from "@/lib/serverAuth";
export default async function handler(req: NextApiRequest, res: NextApiResponse) {
// limit request method to GET
if (req.method !== 'GET') {
return res.status(405).end();
}
// try and catch block
try {
// check if the user log in
await serverAuth(req);
const movieCount = await prismadb.movie.count();
const randomIndex = Math.floor(Math.random() * movieCount); // a random integar
const randomMovies = await prismadb.movie.findMany({
take: 1,
skip: randomIndex
});
return res.status(200).json(randomMovies[0]); // take only one movies
} catch (error) {
console.log(error);
return res.status(400).end();
};
}
在hooks/useBillboard.ts中写下以下的代码,避免对首页推荐电影的重复加载:1
2
3
4
5
6
7
8
9
10
11
12
13
14
15
16
17
18
19
20
21import useSWR from "swr";
import fetcher from "@/lib/fetcher";
const useBillboard =() => {
const { data, error, isLoading } = useSWR('/api/random', fetcher, {
// static data only load once the user visits the page
// not every time they lose focus out of the window
revalidateIfStale: false,
revalidateOnFocus: false,
revalidateOnReconnect: false,
});
return {
data,
error,
isLoading,
}
}
export default useBillboard;
在components中新建Billboard.tsx,并在其中搭建一个骨架:1
2
3
4
5
6
7
8
9
10
11import React from "react";
const Billboard = () => {
return (
<div>
</div>
)
}
export default Billboard;
然后在index.tsx中引入Billboard。接着在Billboard.tsx中填入具体的内容,目的是fetch the data for a random movie。1
2
3
4
5
6
7
8
9
10
11
12
13import useBillboard from "@/hooks/useBillboard";
import React from "react";
const Billboard = () => {
const { data } = useBillboard();
return (
<div>
</div>
)
}
export default Billboard;
可以打开网页的调试界面:network-random-preview,就可以看到随机选择的电影的信息。接着继续写Billboard.tsx,在Billboard中添加随机的电影、电影名、电影介绍和More info按钮:1
2
3
4
5
6
7
8
9
10
11
12
13
14
15
16
17
18
19
20
21
22
23
24
25
26
27
28
29
30
31
32
33
34
35
36
37
38
39
40
41
42
43
44
45
46
47
48
49
50
51
52
53
54
55
56
57
58
59
60
61
62
63
64
65
66
67
68
69
70
71
72
73
74
75
76
77import useBillboard from "@/hooks/useBillboard";
import React from "react";
import { AiOutlineInfoCircle } from "react-icons/ai";
const Billboard = () => {
const { data } = useBillboard();
return (
<div className="relative h-[56.25vw]">
<video
className="
w-full
h-[56.25vw]
object-cover
brightness-[60%]
"
autoPlay
muted
loop
poster={data?.thumbnailUrl}
src={data?.videoUrl}>
</video>
<div className="absolute top-[30%] md:top-[40%] ml-4 md:ml-16">
<p className="
text-white
text-1xl
md:text-5xl
h-full
w-[50%]
lg:text-6xl
font-bold
drop-shadow-xl
">
{data?.title}
</p>
<p className="
text-white
text-[8px]
md:text-lg
mt-3
md:mt-8
w-[90%]
md:w-[80%]
lg:w-[50%]
drop-shadow-xl
">
{data?.description}
</p>
<div className="flex flex-row items-center mt-3 md:mt-4 gap-3">
<button
className="
bg-white
text-white
bg-opacity-30
rounded-md
py-1 md:py-2
px-2 md:px-4
w-auto
text-xs lg:text-lg
font-semibold
flex
flex-row
items-center
hover:bg-opacity-20
transition
"
>
<AiOutlineInfoCircle className="mr-1" />
More Info
</button>
</div>
</div>
</div>
)
}
export default Billboard;
本节到此结束,效果图如下所示:
补充
await和async的区别和联系:在TypeScript中,async和await关键字一起使用,作为处理异步操作的一种方式,主要用于替代传统的回调函数和Promise。它们两者之间有着明确的区别和各自的用途:
async
async关键字用于声明一个异步函数,它让函数自动返回一个Promise。这意味着,当你在一个函数声明前加上async,这个函数就会返回一个Promise,而不是直接返回值。- 使用
async,你可以在函数内部使用await表达式。 async函数可以包含零个或多个await表达式。
例子:
1 | async function fetchData() { |
在这个例子中,fetchData函数返回一个解析为字符串”data”的Promise。
await
await关键字用于等待一个Promise解析,它只能在async函数内部使用。- 当
await前面的Promise被解析后,函数执行会继续,await表达式的结果就是Promise解析的值。 - 使用
await可以让异步代码看起来像是同步代码,这使得代码更容易理解和维护。
例子:
1 | async function showData() { |
在这个例子中,showData函数内部调用了fetchData函数,并在其Promise解析之后继续执行,打印出解析后的数据。
总结
async是一个使函数返回Promise的修饰符,而await是用于等待Promise解析的操作符。await只能在async函数内部使用。- 它们一起使用提供了一种更简洁和直观的方式来处理JavaScript中的异步操作,避免了回调地狱(Callback Hell)的问题。
Movie List & Movie Card Components, Movies Endpoint, Cool hover effect
在pages/api中创建一个新的movies文件夹。在其中创建index.ts,并在其中写入这个api的具体内容:1
2
3
4
5
6
7
8
9
10
11
12
13
14
15
16
17
18
19
20
21
22
23
24
25import { NextApiRequest, NextApiResponse } from "next";
import prismadb from '@/lib/prismadb';
import serverAuth from '@/lib/serverAuth';
export default async function handler(req: NextApiRequest, res: NextApiResponse) {
// this api call only get request method
if (req.method !== 'GET') {
return res.status(405).end();
}
// try and catch block
try {
await serverAuth(req); // authenticate this route
// load all the movies
const movies = await prismadb.movie.findMany();
return res.status(200).json(movies);
} catch (error) {
console.log(error);
return res.status(400).end();
}
}
接着再创建一个hook。在hook文件夹中创建useMovieList.ts。并写入以下代码:1
2
3
4
5
6
7
8
9
10
11
12
13
14
15
16
17
18
19import useSWR from "swr";
import fetcher from "@/lib/fetcher";
const useMovieList = () => {
const { data, error, isLoading } = useSWR('api/movies', fetcher, {
// 不需要重新验证
revalidateIfStale: false,
revalidateOnFocus: false,
revalidateOnReconnect: false,
});
return {
data,
error,
isLoading
}
};
export default useMovieList;
接着进入pages/index.tsx,加入以下代码:1
2
3<div className="pb-40">
<MovieList />
</div>
由于我们有多个MovieList,因此需要将MovieList包裹在div中。接着我们创建MovieList。在components中创建MovieList.tsx,并在其中搭建一个骨架:1
2
3
4
5
6
7const MovieList = () => {
return (
<div></div>
)
}
export default MovieList;
接着丰满其中的细节:1
2
3
4
5
6
7
8
9
10
11
12
13
14
15
16
17
18
19
20
21
22
23
24
25
26
27
28
29
30
31
32import React from "react";
import { isEmpty } from 'lodash';
interface MovieListProps {
data: Record<string, any>[]; // type: array
title: string;
}
const MovieList: React.FC<MovieListProps> = ({ data, title }) => {
// do not render empty data
if (isEmpty(data)) {
return null;
}
return (
<div className="px-4 md:px-12 mt-4 space-y-8">
<div>
<p className="text-white text-md md:text-xl lg:text-2xl font-semibold mb-4">
{title}
</p>
<div className="grid grid-cols-4 gap-2">
{data.map((movie) => (
<div key={movie.id}>movie</div>
))}
</div>
</div>
</div>
)
}
export default MovieList;
记得安装必要的库:1
2npm install lodash
npm install -D @types/lodash
接着在pages/index.tsx中给MovieList传入必要的参数:
1 | const { data: movies = [] } = useMovieList(); // use the newly created hook |
产生了如下效果: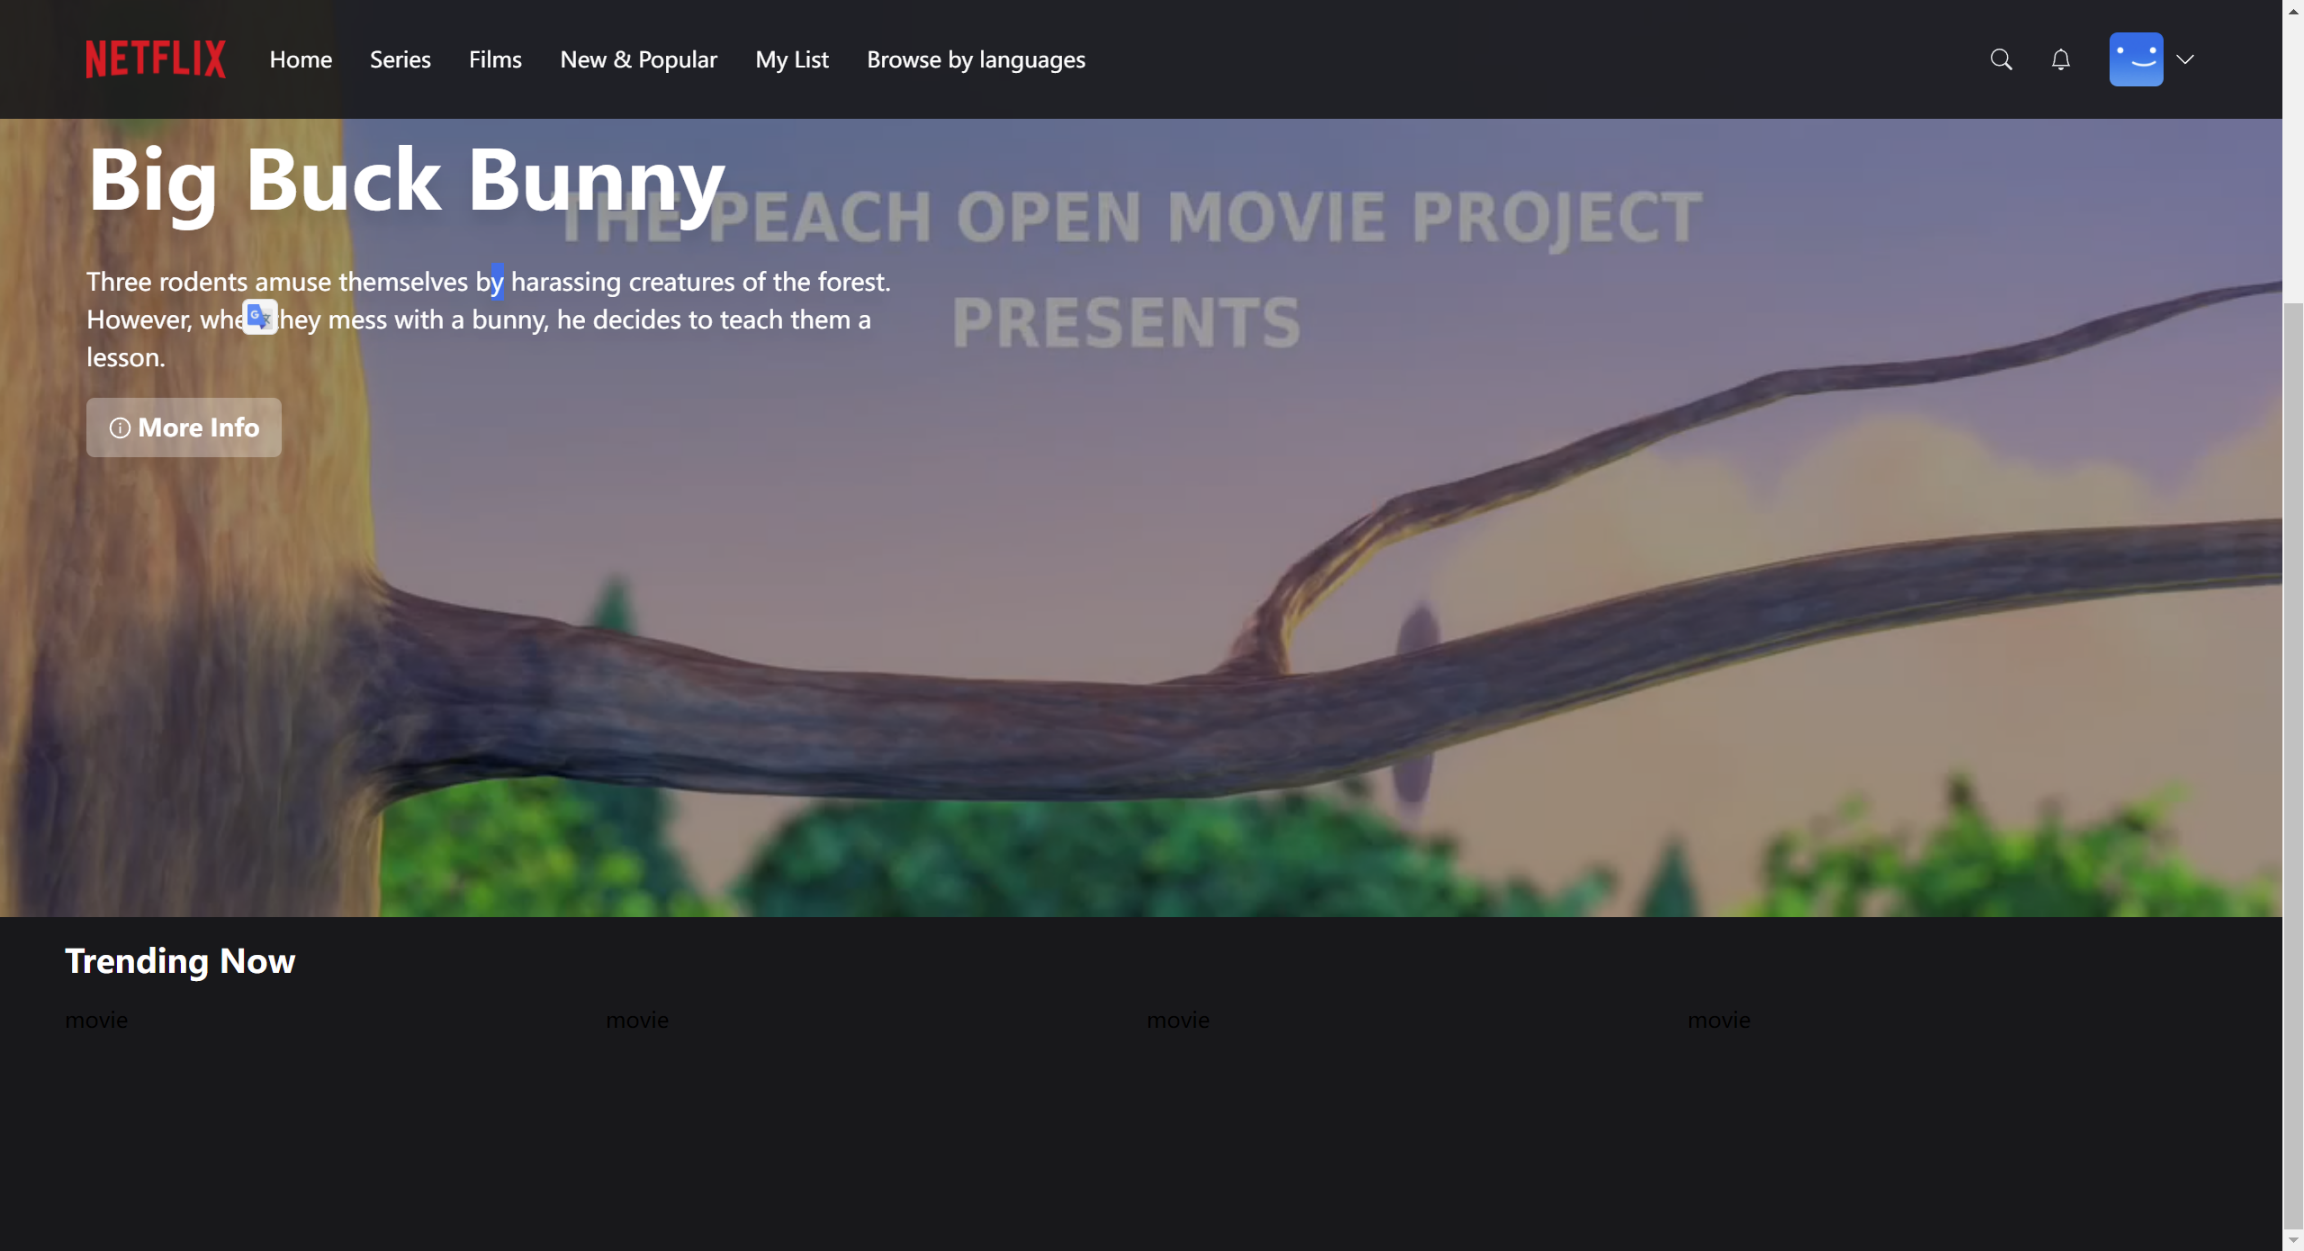
现在将黑色的movies小字转换成实际的电影,并用上炫酷的Tailwind hover效果。在MovieList.tsx中加入下面的代码:1
<MovieCard key={movie.id} data={movie} />
接着在components文件夹中创建MovieCard.tsx文件。填入以下的骨架:1
2
3
4
5
6
7
8
9
10
11
12
13
14
15
16
17import React from "react";
interface MovieCardProps {
data: Record<string, any>;
}
const MovieCard: React.FC<MovieCardProps> = ({
data
}) => {
return (
<div>
</div>
)
}
export default MovieCard;
接着继续丰满上述代码的细节:1
2
3
4
5
6
7
8
9
10
11
12
13
14
15
16
17
18
19
20
21
22
23
24
25
26
27
28
29
30
31
32
33
34
35
36
37
38
39
40
41
42
43
44
45
46
47
48
49
50
51
52
53
54
55
56
57
58
59
60
61
62
63
64
65
66
67
68
69
70
71
72
73
74
75
76
77
78
79
80
81
82
83
84
85
86
87
88
89
90
91
92
93
94
95
96
97
98
99
100
101
102
103
104
105
106
107
108
109
110import React from "react";
import { BsFillPlayFill } from "react-icons/bs";
interface MovieCardProps {
data: Record<string, any>;
}
const MovieCard: React.FC<MovieCardProps> = ({
data
}) => {
return (
<div className="group bg-zinc-900 col-span relative h-[12vw]">
<img
className="
cursor-pointer
object-cover
transition
duration
shadow-xl
rounded-md
group-hover:opacity-90
sm:group-hover:opacity-0
delay-300
w-full
h-[12vw]
"
src={data.thumbnailUrl} alt="Thumbnail" />
<div
className="
opacity-0
absolute
top-0
transition
duration-200
z-10
invisible
sm:visible
delay-300
w-full
scale-0
group-hover:scale-110
group-hover:-translate-y-[6vw]
group-hover:translate-x-[2vw]
group-hover:opacity-100
"
>
<img
className="
cursor-pointer
object-cover
transition
duration
shadow-xl
rounded-t-md
w-full
h-[12vw]
"
src={data.thumbnailUrl} alt="Thumbnail" />
<div
className="
z-10
bg-zinc-800
p-2
lg:p-4
absolute
w-full
transition
shadow-md
rounded-b-md
"
>
<div className="flex flex-row items-center gap-3">
<div
className="
cursor-pointer
w-6
h-6
lg:w-10
lg:h-10
bg-white
rounded-full
flex
justify-center
items-center
transition
hover:bg-neutral-300
"
onClick={() => {}}>
<BsFillPlayFill size={30} />
</div>
</div>
<p className="text-green-400 font-semibold mt-4">
New <span className="text-white">2024</span>
</p>
<div className="flex flex-row mt-4 gap-2 items-center">
<p className="text-white text-[10px] lg:text-sm">{data.duration}</p>
</div>
<div className="flex flex-row mt-4 gap-2 items-center">
<p className="text-white text-[10px] lg:text-sm">{data.genre}</p>
</div>
</div>
</div>
</div>
)
}
export default MovieCard;
最后实现的效果图如下所示:

Favourites / My List functionality
本节我们将实现favourite按钮,其在播放按钮的旁边。我们还将在Trending List下面实现My List,其中将只展示我们favourite的电影。在pages/api/favorite.ts中写下以下的代码:1
2
3
4
5
6
7
8
9
10
11
12
13
14
15
16
17
18
19
20
21
22
23
24
25
26
27
28
29
30
31
32
33
34
35
36
37
38
39
40
41
42
43
44
45
46
47
48
49
50
51
52
53
54
55
56
57
58
59
60
61
62
63
64
65
66
67
68
69
70
71
72
73
74
75
76
77
78
79
80
81// can handle both post request and delete request
// api to add and remove favourite ID in our list
import { NextApiRequest, NextApiResponse } from "next";
import { without } from "lodash";
import prismadb from '@/lib/prismadb';
import serverAuth from "@/lib/serverAuth";
export default async function handler(req: NextApiRequest, res: NextApiResponse) {
// try and catch block
try {
// handle post request
if (req.method === 'POST') {
const { currentUser } = await serverAuth(req); // get curent user
const { movieId } = req.body; // get movieId
// check if the movieId is correct
const existingMovie = await prismadb.movie.findUnique({
where: {
id: movieId,
}
});
if (!existingMovie) {
throw new Error('Invalid ID');
}
// update user and push movieId to their favoriteIds defined in schema.prisma
const user = await prismadb.user.update({
where: {
email: currentUser.email || '',
},
data: {
favoriteIds: {
push: movieId,
}
}
});
return res.status(200).json(user);
}
// handle delete request when a user want to unfavorite a movie
if (req.method === 'DELETE') {
const { currentUser } = await serverAuth(req);
const { movieId } = req.body;
const existingMovie = await prismadb.movie.findUnique({
where: {
id: movieId,
}
});
if (!existingMovie) {
throw new Error('Invalid ID');
}
// a list of our current favorite IDs without the above movie id
const updateFavoriteIds = without(currentUser.favoriteIds, movieId);
// update User information
const updatedUser = await prismadb.user.update({
where: {
email: currentUser.email || '',
},
data: {
favoriteIds: updateFavoriteIds,
}
});
return res.status(200).json(updatedUser);
}
return res.status(405).end();
} catch (error) {
console.log(error);
return res.status(400).end();
}
}
接下来创建一个api route,其将只加载我们最喜欢的电影列表。在pages/api/favorites.ts,写下如下的代码:1
2
3
4
5
6
7
8
9
10
11
12
13
14
15
16
17
18
19
20
21
22
23
24
25
26
27
28
29
30
31
32// fetch all of our favorite movies
import { NextApiRequest, NextApiResponse } from "next";
import prismadb from '@/lib/prismadb';
import serverAuth from "@/lib/serverAuth";
export default async function handler(req:NextApiRequest, res: NextApiResponse) {
// limit this route only to get method
if (req.method !== 'GET') {
return res.status(405).end();
}
// try and catch block
try {
const { currentUser } = await serverAuth(req);
// find all movies which have a relation to current user favorite IDs
const favoriteMovies = await prismadb.movie.findMany({
where: {
id: {
in: currentUser?.favoriteIds,
}
}
});
return res.status(200).json(favoriteMovies);
} catch (error) {
console.log(error);
return res.status(400).end();
}
}
接着再写一个hook,用于加载最喜欢的电影列表。在hooks/useFavorites.ts中写入以下的代码:1
2
3
4
5
6
7
8
9
10
11
12
13
14
15
16
17
18
19import useSWR from "swr";
import fetcher from "@/lib/fetcher";
const useFavorites = () => {
const { data, error, isLoading, mutate } = useSWR('/api/favorites', fetcher, {
revalidateIfStale: false,
revalidateOnFocus: false,
revalidateOnReconnect: false,
});
return {
data,
error,
isLoading,
mutate
}
};
export default useFavorites;
再写一个组件:components/FavoriteButton.tsx,作为按钮:1
2
3
4
5
6
7
8
9
10
11
12
13
14
15
16
17
18
19
20import axios from "axios";
import React, { useCallback, useMemo } from "react";
import useCurrentUser from "@/hooks/useCurrentUser";
import useFavorites from "@/hooks/useFavorites";
interface FavoriteButtonProps {
movieId: string;
}
// only one parameter: movieId
const FavoriteButton: React.FC<FavoriteButtonProps> = ({ movieId }) => {
return (
<div>
</div>
)
}
export default FavoriteButton;
将该按钮加在MovieCard中。在components/MovieCard.tsx中的播放按钮之后加入:1
<FavoriteButton movieId={data?.id} />
补充知识:在JavaScript和TypeScript中,?操作符在这个上下文中被用作可选链(Optional Chaining)操作符。当你在一个对象后面加上?后跟属性名或方法,这意味着如果这个对象存在(即不是null或undefined),则会尝试访问该属性或方法;如果对象是null或undefined,则不会尝试访问该属性或方法,而是直接返回undefined。这避免了在访问深层嵌套对象属性时可能出现的类型错误。
接着写components/FavoriteButton.tsx:1
2
3
4
5
6
7
8
9
10
11
12
13
14
15
16
17
18
19
20
21
22
23
24
25
26
27
28
29
30
31
32
33
34
35
36import axios from "axios";
import React, { useCallback, useMemo } from "react";
import { AiOutlinePlus } from "react-icons/ai";
import useCurrentUser from "@/hooks/useCurrentUser";
import useFavorites from "@/hooks/useFavorites";
interface FavoriteButtonProps {
movieId: string;
}
// only one parameter: movieId
const FavoriteButton: React.FC<FavoriteButtonProps> = ({ movieId }) => {
return (
<div className="
cursor-pointer
group/item
w-6
h-6
lg:w-10
lg:h-10
border-white
border-2
rounded-full
flex
justify-center
items-center
transition
hover:border-neutral-300
">
<AiOutlinePlus className="text-white" size ={25} />
</div>
)
}
export default FavoriteButton;
然后在Trending Now列表以外再创建一个My Favorites列表。进入pages/index.tsx中,增加以下的代码:1
2
3const { data: favorites = [] } = useFavorites(); // use hook to get favorite movies
<MovieList title="My List" data={favorites} />
由于目前还没有最喜欢的电影,因此My List为空。在FavoriteButton.tsx中添加以下代码:1
2
3
4
5
6
7
8
9
10
11
12
13
14
15
16
17
18
19
20
21
22
23
24
25
26
27
28
29
30
31
32
33
34const { mutate: mutateFavorites } = useFavorites();
const { data: currentUser, mutate } = useCurrentUser();
// check if the favorite list of current user includes movieId
const isFavorite = useMemo (() => {
const list = currentUser?.favoriteIds || [];
return list.include(movieId);
}, [currentUser, movieId]); // dependency in []
// once we click the favorite, we will check if the current movie is favorited
// if yes, trigger the delete request
// if no, add the movie in the favorite list
const toggleFavorites = useCallback(async () => {
let response;
if (isFavorite) {
response = await axios.delete('/api/favorite', { data: { movieId }});
} else {
response = await axios.post('/api/favorite', { movieId });
}
// update the favorite list of current user
const updatedFavoriteIds = response?.data?.favoriteIds;
// mutate用于更新currentUser数据
mutate({
...currentUser, // 复制了currentUser对象中的所有属性到一个新对象中
// 如果currentUser对象中已经存在favoriteIds属性,这一操作将会覆盖原有的值。如果不存在,就会添加一个新的favoriteIds属性
favoriteIds: updatedFavoriteIds,
});
mutateFavorites(); // 来自useFavorites中的mutate,每次更新currentUser的favoriteIds的数据后,立即刷新
}, [movieId, isFavorite, currentUser, mutate, mutateFavorites]);
实现了上述函数后,我们要让favorite按钮变得可交互。添加以下代码:1
2
3
4
5
6
7
8
9
10
11
12
13
14
15
16
17
18
19
20
21
22
23
24const Icon = isFavorite ? AiOutlineCheck : AiOutlinePlus;
return (
<div
onClick={toggleFavorites}
className="
cursor-pointer
group/item
w-6
h-6
lg:w-10
lg:h-10
border-white
border-2
rounded-full
flex
justify-center
items-center
transition
hover:border-neutral-300
">
<Icon className="text-white" size ={25} />
</div>
)
这样点击Trending Now列表上的电影上的加号时,其就会被添加到My List,然后加号会变成勾。这样一部电影就被选择为favorite了。同理,在My List中点击打勾符号,电影就会被取消选中,从My List里面消失。但目前该功能还是有bug。解决方法似乎是:https://github.com/nextauthjs/next-auth/issues/7199,需要将getSession替换为getServerSession。替换后问题得到了解决。
详细解决步骤:在[..nextauth].ts中添加AuthOptions,然后在serverAuth.ts中使用getServerSession替换getSession,并给getServerSession传入三个参数:req, res, authOptions,最后在所有用到serverAuth的api中将const { currentUser } = await serverAuth(req)替换为const { currentUser } = await serverAuth(req, res);。即可以修复上述bug。
Play Button, Video Player, Single Movie Endpoint
在billboard中加入播放按钮。还要创建player route。
首先创建pages/api/movies/[movieId].ts,在其中写入代码:1
2
3
4
5
6
7
8
9
10
11
12
13
14
15
16
17
18
19
20
21
22
23
24
25
26
27
28
29
30
31
32
33
34
35
36
37
38
39
40
41
42import { NextApiRequest, NextApiResponse } from "next";
import prismadb from '@/lib/prismadb';
import serverAuth from "@/lib/serverAuth";
export default async function handler(req: NextApiRequest, res: NextApiResponse) {
// limit to get request
if (req.method !== 'GET') {
return res.status(405).end();
}
// try and catch block
try {
await serverAuth(req, res);
const { movieId } = req.query; // search for movie Id
if (typeof movieId !== 'string') {
throw new Error('Invalid ID');
}
if (!movieId) {
throw new Error('Invalid ID');
}
// find movie using movieId
const movie = await prismadb.movie.findUnique({
where: {
id: movieId
}
});
if (!movie) {
throw new Error('Invalid ID');
}
return res.status(200).json(movie);
} catch (error) {
console.log(error);
return res.status(400).end();
}
}
接着创建一个hook。创建hooks/useMovie.ts,在其中写入代码:1
2
3
4
5
6
7
8
9
10
11
12
13
14
15
16
17
18
19
20
21
22
23import useSWR from "swr";
import fetcher from "@/lib/fetcher";
// parameter: id,该id会被/api/movies/[movieId].ts中的[movieId]解析
const useMovie = (id?: string) => {
const {
data,
error,
isLoading
} = useSWR(id ? `/api/movies/${id}` : null, fetcher, {
revalidateIfStale: false,
revalidateOnFocus: false,
revalidateOnReconnect: false
});
return {
data,
error,
isLoading,
}
}
export default useMovie;
接着创建一个play按钮的component。创建components/PlayButton.tsx,在其中写入骨架:1
2
3
4
5
6
7
8
9
10
11
12
13
14
15
16
17
18
19import React from "react";
import { BsFillPlayFill } from "react-icons/bs";
import { useRouter } from 'next/router';
interface PlayButtonProps {
movieId: string;
}
const PlayButton: React.FC<PlayButtonProps> = ({ movieId }) =>{
const router = useRouter();
return (
<div>
</div>
)
};
export default PlayButton;
接着在components/Billboard.tsx中加入上述组件。在写有more info字样的按钮前加入:<PlayButton movieId={data?.id} />。接着继续丰满components/PlayButton.tsx中的细节:1
2
3
4
5
6
7
8
9
10
11
12
13
14
15
16
17
18
19
20
21
22
23
24
25
26
27
28
29
30
31
32
33
34
35
36import React from "react";
import { BsFillPlayFill } from "react-icons/bs";
import { useRouter } from 'next/router';
interface PlayButtonProps {
movieId: string;
}
const PlayButton: React.FC<PlayButtonProps> = ({ movieId }) =>{
const router = useRouter();
return (
<button
onClick={() => router.push(`/watch/${movieId}`)}
className="
bg-white
rounded-md
py-1 md:py-2
px-2 md:px-4
w-auto
text-xs lg:text-lg
font-semibold
flex
flex-row
items-center
hover:bg-neutral-300
transition
"
>
<BsFillPlayFill size={25} className="mr-1" />
Play
</button>
)
};
export default PlayButton;
现在就实现了点击播放按钮,跳转到另一个页面。接着在MovieCard组件中也实现上述点击播放然后跳转的功能。进入components/MovieCard.tsx,在其中添加代码:1
2
3import { useRouter } from 'next/router';
const router = useRouter();
onClick={() => router.push(`/watch/${data?.id}`)}>
现在需要具体写跳转到的页面。开始写/watch页面。创建pages/watch/[movieId].tsx,在其中写入以下的骨架:1
2
3
4
5
6
7
8
9
10
11
12
13
14
15
16
17
18
19
20// outside of api folder, so this is a client route
import React from "react";
import useMovie from "@/hooks/useMovie";
import { useRouter } from "next/router";
const Watch = () => {
const router = useRouter();
const { movieId } = router.query;
const { data } = useMovie(movieId as string);
return (
<div>
</div>
)
}
export default Watch;
现在点击播放按钮,会跳转到一个空白页面。继续丰满上述代码:1
2
3
4
5
6
7
8
9
10
11
12
13
14
15
16
17
18
19
20
21
22
23
24
25
26
27
28
29
30
31
32
33
34
35
36
37
38
39
40
41
42
43
44
45// outside of api folder, so this is a client route
import React from "react";
import { AiOutlineArrowLeft } from "react-icons/ai";
import useMovie from "@/hooks/useMovie";
import { useRouter } from "next/router";
const Watch = () => {
const router = useRouter();
const { movieId } = router.query;
const { data } = useMovie(movieId as string);
return (
<div className="h-screen w-screnn bg-black">
<nav
className="
fixed
w-full
p-4
z-10
flex-row
items-center
gap-8
bg-black
bg-opacity-70
"
>
<AiOutlineArrowLeft onClick={() => router.push('/')} className="text-white cursor-pointer" size={40} />
<p className="text-white text-1xl md:text-3xl font-bold">
<span className="font-light">
Watching:
</span>
{data?.title}
</p>
</nav>
<video
autoPlay
controls
className="h-full w-full"
src={data?.videoUrl}></video>
</div>
)
}
export default Watch;
现在就实现了功能:点击播放按钮,跳转到播放视频的页面,播放视频的页面会自动加载视频的名字,并有一个返回按钮,点击之可以返回到homepage。播放视频的页面中的视频可以播放、暂停、拖动时间条。
Info Modal Component
点击More Info按钮,会显示电影的信息。在Treanding Now下面会加一个展开按钮,会展开电影相关的信息。
创建hooks/useInfoModel.ts,并通过命令npm install zustand安装新的库。zustand是一个轻量化的全局状态管理库。在useInfoModel.ts中写入以下的代码:1
2
3
4
5
6
7
8
9
10
11
12
13
14
15
16
17
18import { create } from "zustand";
export interface ModalStoreInterface {
movieId?: string;
isOpen: boolean;
openModal: (movieId: string) => void;
closeModal: () => void;
};
// hook
const useInfoModal = create<ModalStoreInterface>((set) => ({
movieId: undefined,
isOpen: false,
openModal: (movieId: string) => set({ isOpen: true, movieId }),
closeModal: () => set({ isOpen: false, movieId: undefined}),
}));
export default useInfoModal;
创建components/InfoModal.tsx,写入以下的代码:1
2
3
4
5
6
7
8
9
10
11
12
13
14
15
16
17
18
19
20
21
22
23
24
25
26
27
28
29
30
31
32
33
34
35
36
37
38
39
40
41
42
43
44
45
46
47import React, { useCallback, useEffect, useState} from "react";
import { AiOutlineClose } from "react-icons/ai"; // close Button
import PlayButton from "./PlayButton"; // PlayButton
import FavoriteButton from "./FavoriteButton";
import useInfoModal from "@/hooks/useInfoModal";
import useMovie from "@/hooks/useMovie";
interface InfoModalProps {
visible?: boolean;
onClose: any;
};
const InfoModal: React.FC<InfoModalProps> = ({ visible, onClose }) => {
// a state for visible, visible is boolean so !! before it
const [isVisible, setIsVisible] = useState(!!visible);
// fetch moveId
const { movieId } = useInfoModal();
// fetch data from movie
const { data = {} } = useMovie(movieId);
// use Effect
useEffect(() => {
setIsVisible(!!visible); // set visible on every new visible change that we get
}, [visible]); // visible in dependency
const handleClose = useCallback(() => {
setIsVisible(false);
// a cool animation
setTimeout(() => {
onClose();
}, 300); // 300 ms
}, [onClose]);
if (!visible) {
return null;
}
return (
<div>
</div>
)
}
export default InfoModal;
在pages/index.tsx中加入InfoModal:1
2import InfoModal from "@/components/InfoModal";
<InfoModal visible onClose={() => {}} />
接下来继续丰满InfoModal.tsx:1
2
3
4
5
6
7
8
9
10
11
12
13
14
15
16
17
18
19
20
21
22
23
24
25
26
27
28
29
30
31
32
33
34
35
36
37
38
39
40
41
42
43
44
45
46
47
48
49
50
51
52
53
54
55
56
57
58
59
60
61
62
63
64
65
66
67
68
69
70
71
72
73
74
75
76
77
78
79
80
81
82
83
84
85
86
87
88
89
90
91
92
93
94
95
96
97
98
99
100import React, { useCallback, useEffect, useState} from "react";
import { AiOutlineClose } from "react-icons/ai"; // close Button
import PlayButton from "./PlayButton"; // PlayButton
import FavoriteButton from "./FavoriteButton";
import useInfoModal from "@/hooks/useInfoModal";
import useMovie from "@/hooks/useMovie";
interface InfoModalProps {
visible?: boolean;
onClose: any;
};
const InfoModal: React.FC<InfoModalProps> = ({ visible, onClose }) => {
// a state for visible, visible is boolean so !! before it
const [isVisible, setIsVisible] = useState(!!visible);
// fetch moveId
const { movieId } = useInfoModal();
// fetch data from movie
const { data = {} } = useMovie(movieId);
// use Effect
useEffect(() => {
setIsVisible(!!visible); // set visible on every new visible change that we get
}, [visible]); // visible in dependency
const handleClose = useCallback(() => {
setIsVisible(false);
// a cool animation
setTimeout(() => {
onClose();
}, 300); // 300 ms
}, [onClose]);
if (!visible) {
return null;
}
return (
<div
className="
z-50
transition
duration-300
bg-black
bg-opacity-80
flex
justify-center
items-center
overflow-x-hidden
overflow-y-auto
fixed
inset-0
"
>
<div
className="
relative
w-auto
mx-auto
max-w-3xl
rounded-md
overflow-hidden
"
>
<div
className={`
${isVisible ? 'scale-100': 'scale-0'}
transform
duration-300
relative
flex-auto
bg-zinc-900
drop-shadow-md
`}>
<div className="relative h-96">
<video
className="
w-full
brightness-[60%]
object-cover
h-full
"
autoPlay
muted
loop
poster={data?.thumbnailUrl}
src={data?.videoUrl}
></video>
</div>
</div>
</div>
</div>
)
}
export default InfoModal;
产生了如下的效果: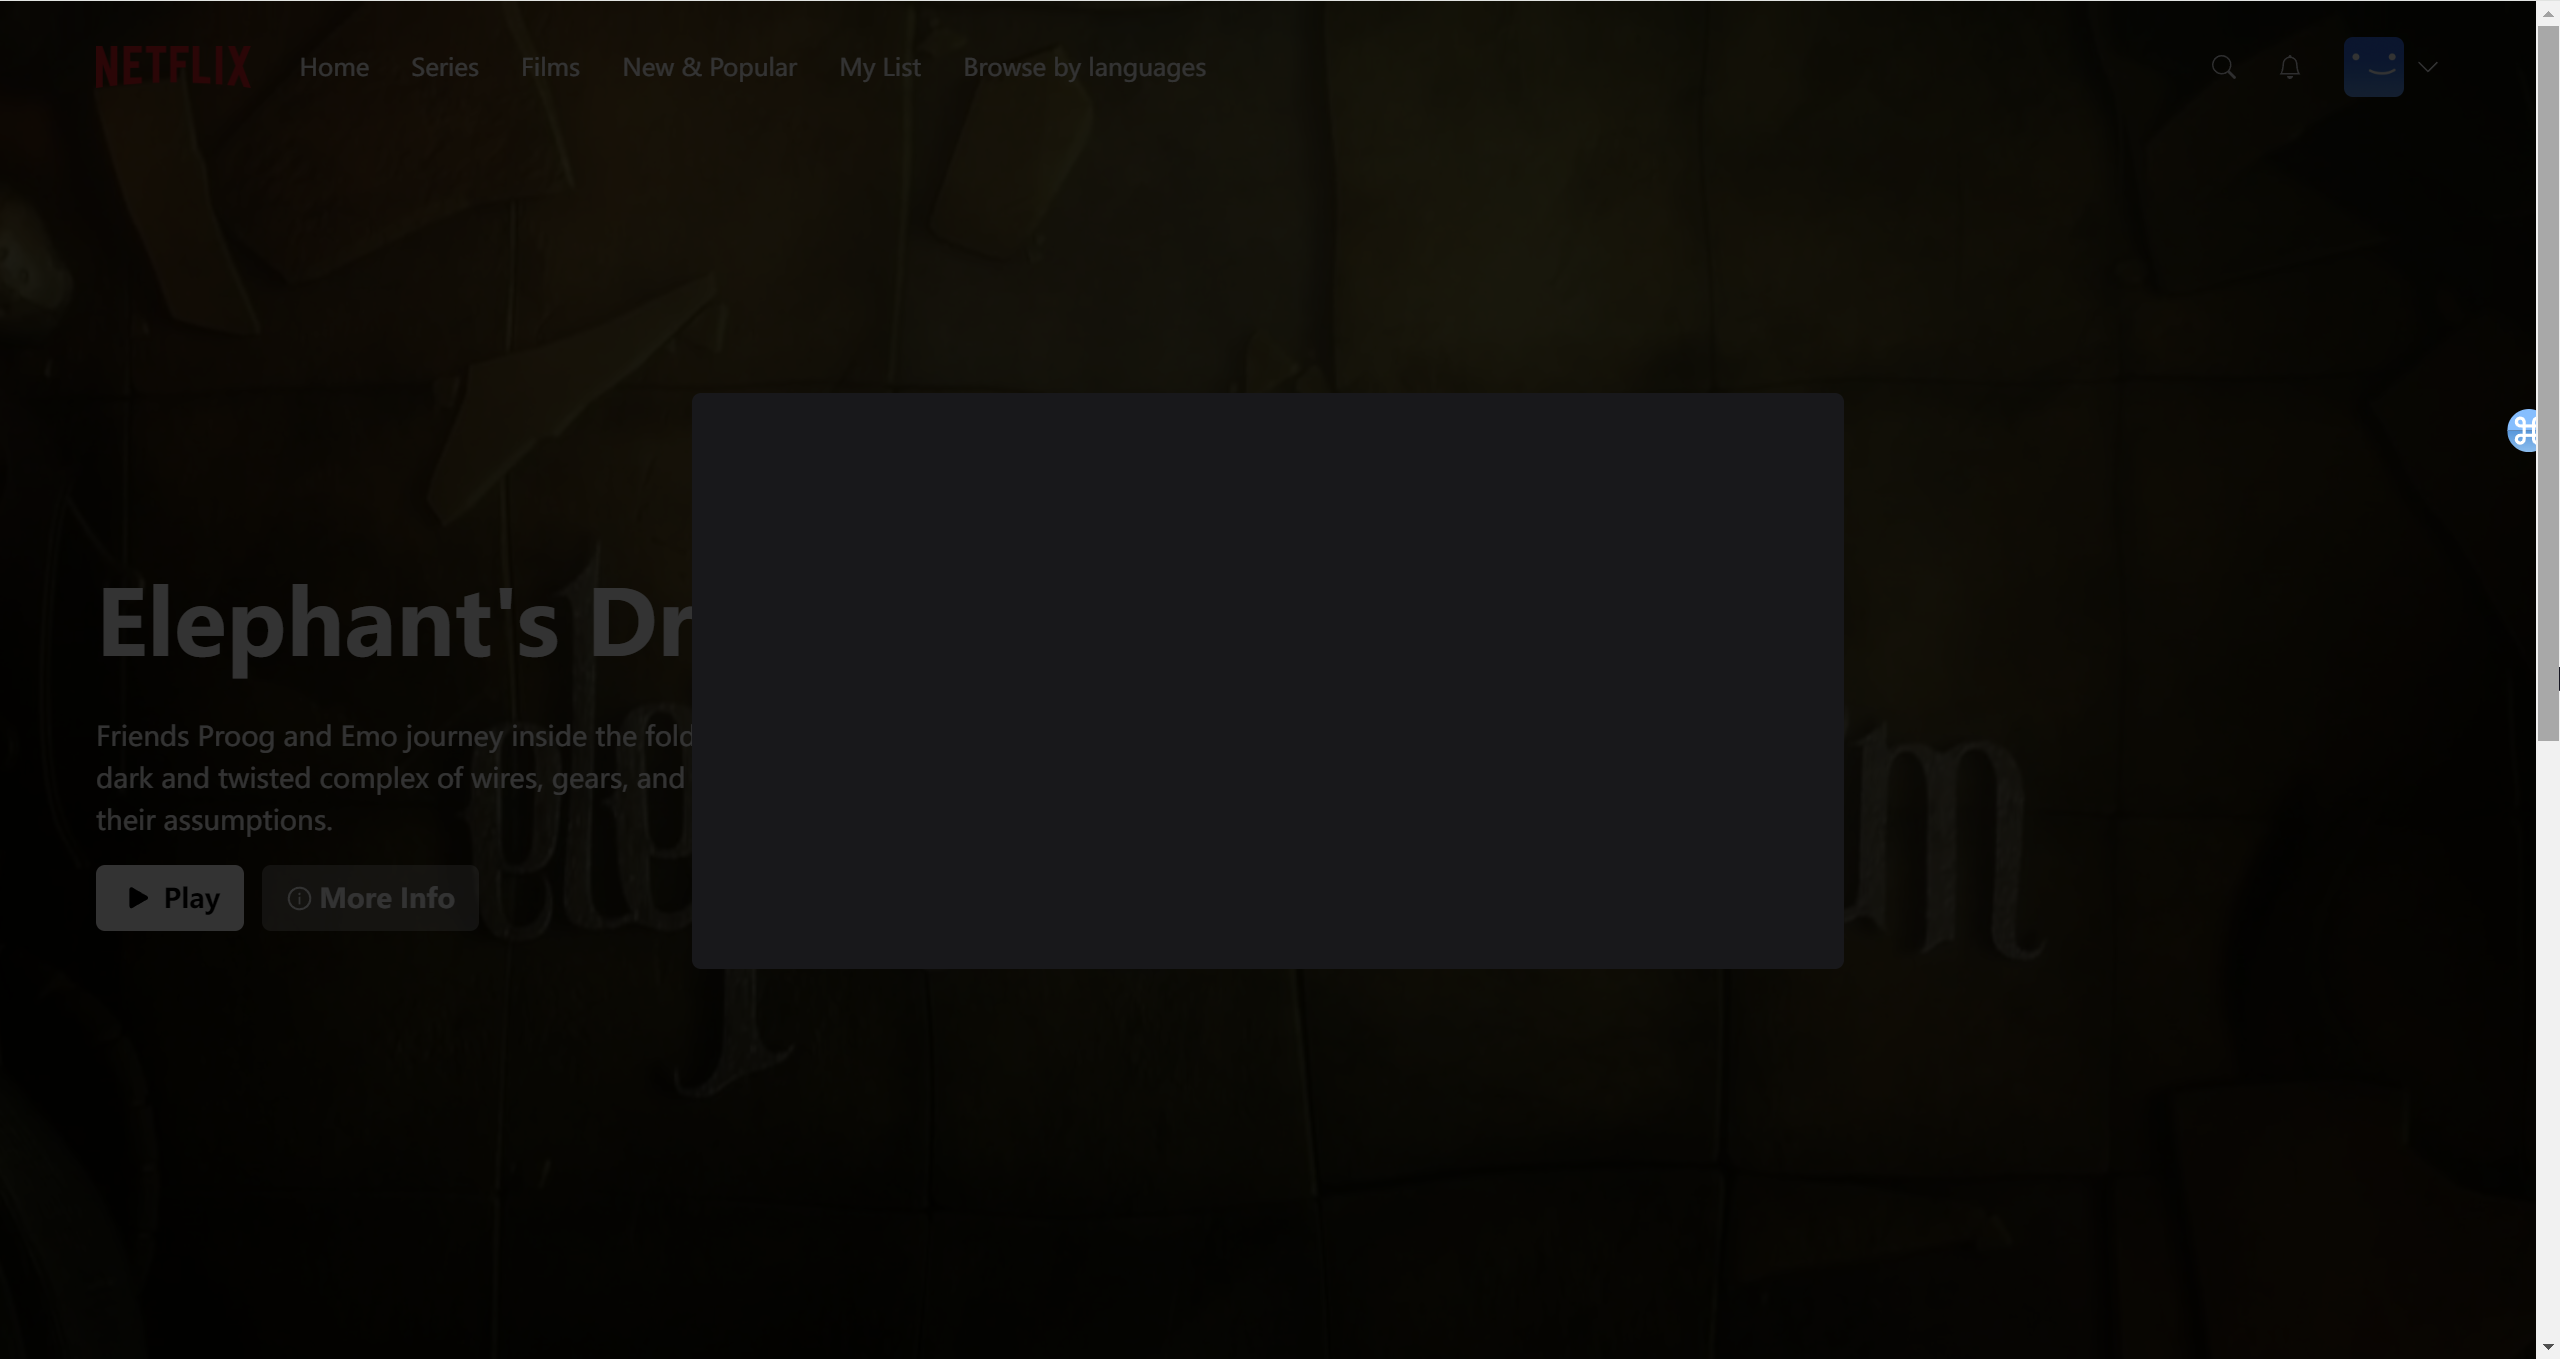
接下来再给上面的黑色方框加上一个关闭按钮,并添加播放按钮和收藏按钮。在InfoModal.tsx中添加以下代码:1
2
3
4
5
6
7
8
9
10
11
12
13
14
15
16
17
18
19
20
21
22
23
24
25
26
27
28
29
30
31
32<div
className="
cursor-pointer
absolute
top-3
right-3
h-10
w-10
rounded-full
bg-black
bg-opacity-70
flex
items-center
justify-center
"
onClick={() => {}}>
<AiOutlineClose className="text-white" size={20} />
</div>
<div className="
absolute
bottom-[10%]
left-10
">
<p className="text-white text-3xl md:text-4xl h-full lg:text-5xl font-bold mb-8">
{data?.title}
</p>
<div className="flex flex-row gap-4 items-center">
<PlayButton movieId={data?.id} />
<FavoriteButton movieId={data?.id} />
</div>
</div>
最后再加上New字样和电影的各类信息:1
2
3
4
5
6
7
8
9
10
11
12
13
14
15
16
17<div className="px-12 py-8">
<p className="text-green-400 font-semibold text-lg">
New
</p>
<p className="text-white text-lg">
{data?.duration}
</p>
<p className="text-white text-lg">
{data?.genre}
</p>
<p className="text-white text-lg">
{data?.description}
</p>
</div>
并加上点击关闭按钮实现关闭页面的功能,即在onClick函数中调用handleClose即可:onClick={handleClose}>
然后在pages/index.tsx中实现对上述模块InfoModal.tsx的触发。1
2const { isOpen, closeModal } = useInfoModal(); // use useInfoModal hook to trigger InfoModal
<InfoModal visible={isOpen} onClose={closeModal} />
现在需要实现在billboard中点击More Info按钮展现上述的Info Modal组件的功能。进入components/Billboard.tsx中,写入以下的代码:1
2
3
4
5
6
7const { openModal } = useInfoModal();
const handleOpenModal = useCallback(() => {
openModal(data?.id);
}, [openModal, data?.id]);
onClick={handleOpenModal}
在电影卡片中再插入一个按钮。使得点击该按钮,可以展现影片的详细信息,在components/MovieCard.tsx中加入以下的代码:1
2
3
4
5
6
7
8
9
10
11
12
13
14
15
16
17
18
19
20
21
22
23
24const { openModal } = useInfoModal();
<div
onClick={() => openModal(data?.id)}
className="
cursor-pointer
ml-auto
group/item
w-6
h-6
lg:w-10
lg:h-10
border-white
border-2
rounded-full
flex
justify-center
items-center
transition
hover:border-neutral-300">
<BiChevronDown
size={30}
className="text-white group-hover/item:text-neutral-300"/>
</div>
这样,点击电影卡片上的向下的箭头,就会显示出影片的详细信息。调用我们在本节实现的useInfoModal这个hook即可轻松地实现上述功能。
现在继续修复个人profile中名字始终加载为username的问题。将username改为用户实际的名字。进入components/AccountMenu.tsx中,修改以下的代码:1
2
3
4
5const { data } = useCurrentUser();
<p className="text-white text-sm group-hover/item:underline">
{data?.name}
</p>
即可在个人profile中加载出实际的用户名。
Vercel Deployment
可以同时复制并粘贴多行命令,命令行会自动逐一执行这些命令。要想在vercel上部署,要确保没有warning。要解决所有warning,只需要在.eslintrc.json中加入代码:1
2
3"rules": {
"@next/next/no-img-element": "off"
}
然后在命令行中输入:npm run lint,即可得到:No ESLint warnings or errors。此时所有warning就都被消去了。
注册vercel时,注意用github账号注册vercel,否则需要将账号绑定到github。进入vercel,点击add new,选中想要导入的github仓库,点击import,在configure project页面添加一些environment variables,即将原本项目中.env文件中的各个环境变量(除去NEXTAUTH_URL外)填入即可。
然后点击deploy即可。部署大概需要两三分钟的时间。部署以后,就可以直接通过域名访问我们的项目的网页。我发现要在本地启动项目,即运行命令:npm run dev,才能实现正常的登录功能。尚不清楚为什么,按理来说部署到云平台后就本地的服务就不需要启动了。
目前该问题依然无法解决,而且似乎部署在vercel上的项目无法正常进行google/github oauth验证登录,尚不明白原因,但不再浪费时间去尝试。至少本项目在本地是能够成功运行的,我将本地的项目回滚到了fix prisma error when deploying的版本。通过链接:http://localhost:33350可以正常进行oauth登录,注册和邮箱密码登录。
尝试在vercel上重新部署本应用,现在发现账号密码登录和github oauth登录都可以正常使用了(不需要在本地启动项目,项目直接在vercel上运行),但google oauth还是无法正常运行,我猜测是账号邮箱重复的问题,可以在数据库中查看并验证我的猜测。实际上应该不是账号邮箱重复的问题,就是哪一步配置不对或者网站抽风,不管了。